

How Plans work in PulsyAI
PulsyAI uses a multi-tenant architecture where Plans appear in three different contexts depending on who is viewing them and from which domain:
The same “Plans” URL serves different content depending on context — your end-clients accessing your branded domain see your custom prices, while you accessing your own admin see what you pay PulsyAI. This separation is what makes PulsyAI’s white-label model genuinely white-label: your end-clients have zero visibility into your supplier relationship with PulsyAI.
In short: create plans in Rebilling, your end-clients see them through your branded domain.
The PulsyAI pricing model
PulsyAI plans use a hybrid subscription-plus-usage pricing model designed for voice AI workloads, with three pricing components per plan:- Monthly price — A flat subscription fee charged every month (e.g. $49/month).
- Minutes included — A pre-paid amount of voice AI minutes included in the base subscription (e.g. 10 minutes per month).
- Overage charge (per minute) — A per-minute rate charged for usage above the included amount (e.g. $0.20 per additional minute).
$49 / 10 minutes / $0.20 overage plan who uses 30 minutes in a given month would be billed:
Create a plan
1
Open the Rebilling page
Click Rebilling in the left sidebar of your white-label admin. With your Stripe account already configured, you’ll see the plan management interface with the Add Plan button at the top right.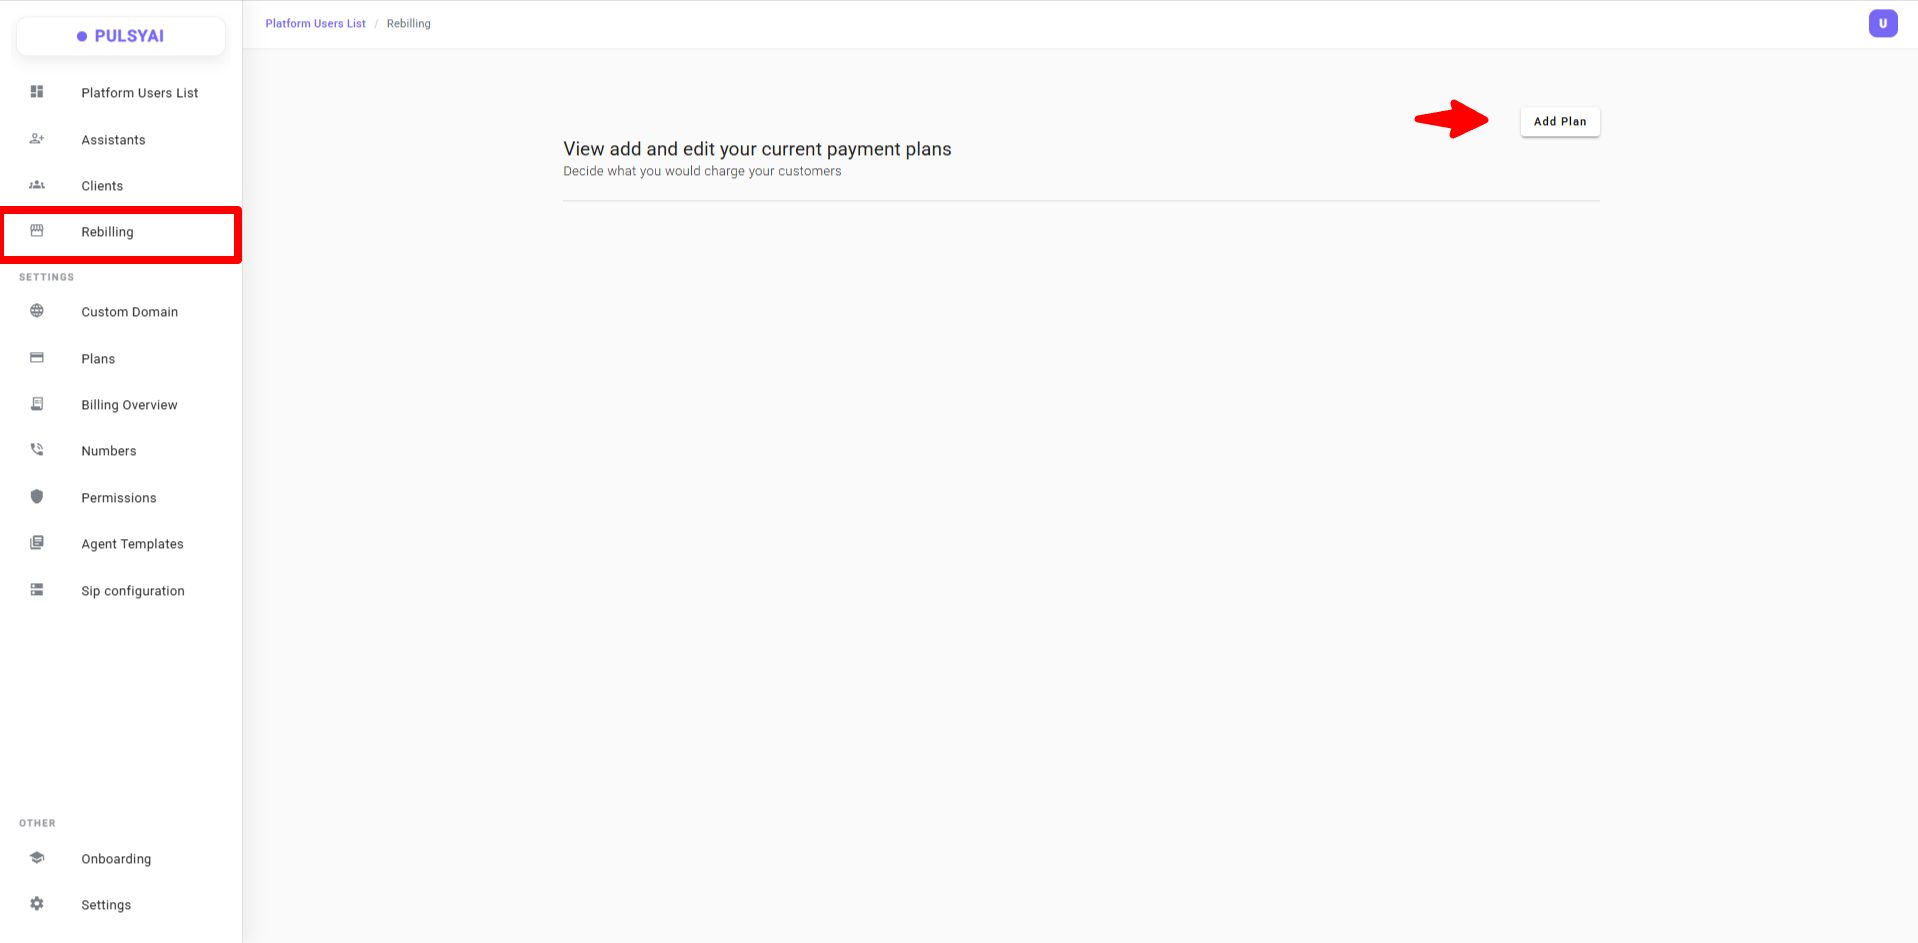
2
Open the Create a product modal
Click Add Plan to open the Create a product modal. The modal has three sections: Plan Details, Features, and Pricing.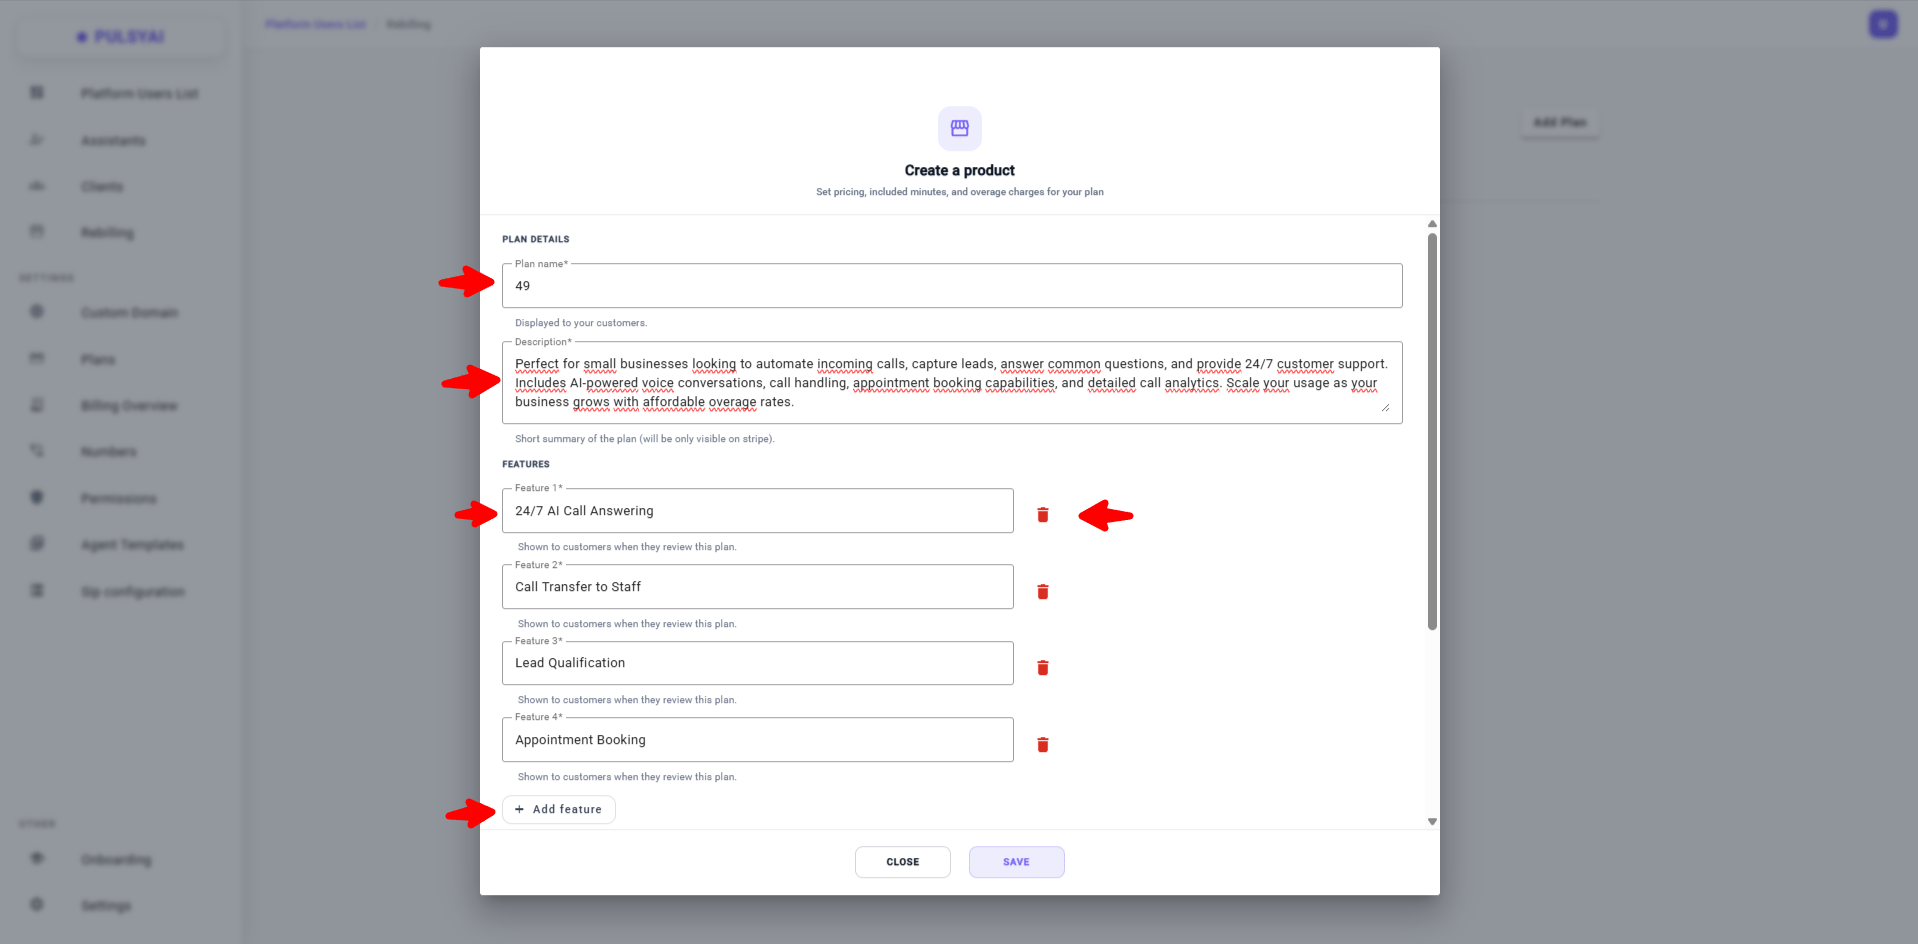
3
Fill in the Plan Details
- Plan name (required) — The name displayed to your end-clients (e.g. “Bronze Plan”, “Professional”, “Starter”).
- Description (required) — A short summary of the plan. This is only visible inside Stripe — your end-clients do not see this description. Use it for your own internal Stripe organization, not for marketing copy.
4
Add features
Click + Add feature to add a customer-facing bullet point. Each feature is a free-text input — type whatever you want to communicate to clients about what’s included in the plan.Features are entirely customizable and unlimited. Common examples:
- “24/7 AI Call Answering”
- “Lead Qualification”
- “Appointment Booking”
- “Call Transfer to Staff”
- “SMS Follow-Ups”
- “Priority Support”
- “Custom Knowledge Base”
5
Set the Pricing
Fill in the three required pricing fields: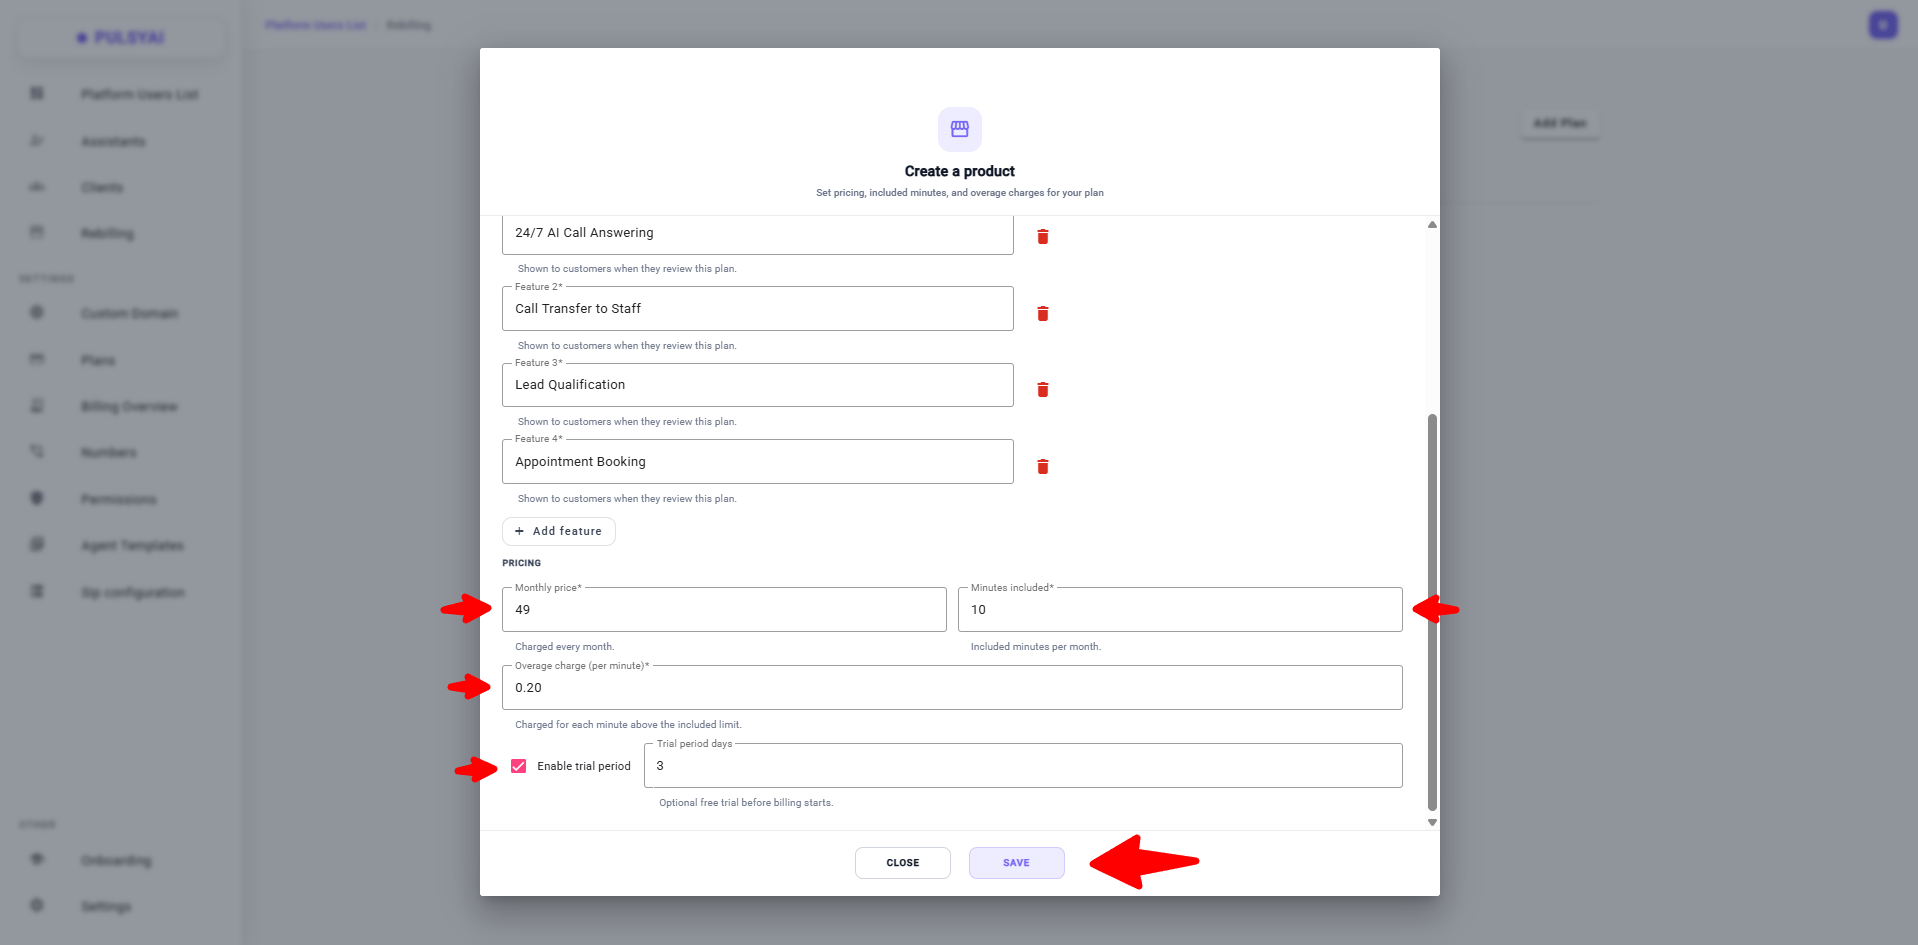
- Monthly price (required) — The flat subscription fee in USD, charged every month.
- Minutes included (required) — The number of voice AI minutes included in the base subscription each month.
- Overage charge (per minute) (required) — The per-minute rate charged for usage above the included amount.
6
Optionally enable a trial period
Check Enable trial period to offer end-clients a free window before billing starts, then enter the number of days (e.g. 3, 7, 14). During the trial, your end-clients do not pay you — they get full access to the plan without subscription charges.
7
Save the plan
Click SAVE at the bottom of the modal. PulsyAI creates the plan in your white-labeled platform and provisions the corresponding Product and Price in your connected Stripe account automatically — no manual Stripe configuration needed.
After you create a plan
Once saved, your plan appears as a card on the Rebilling page with all of its details laid out: name, monthly price, trial period (if enabled), cost structure, included features, visibility controls, and edit/delete actions.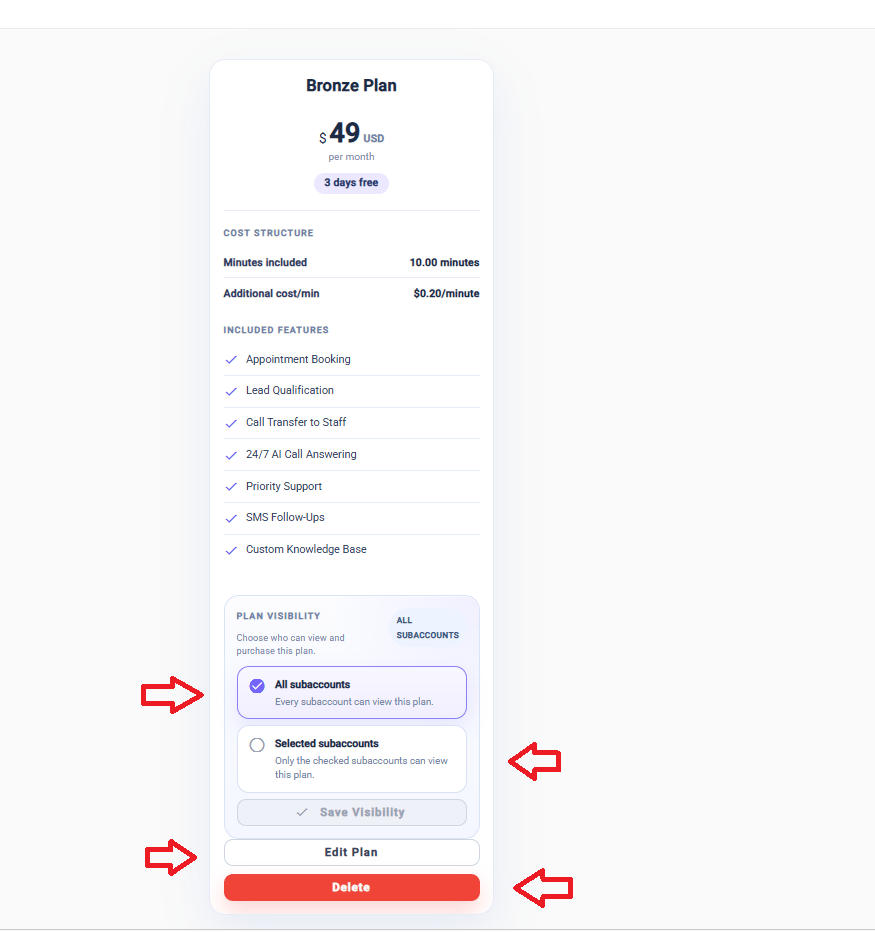
- Review the full plan configuration at a glance.
- Control which end-clients can see and purchase the plan (see Plan visibility below).
- Edit the plan’s features and trial period.
- Delete the plan.
Plan visibility — control who sees each plan
Plan visibility lets you decide which of your end-clients can see and purchase a given plan. This is one of PulsyAI’s most powerful white-label features for resellers and master partners who run mixed pricing arrangements with different clients. Each plan has two visibility modes:- All subaccounts (default) — Every end-client on your white-labeled platform can see and purchase this plan. Use this for your standard public plans.
- Selected subaccounts — Only the specific end-clients you check can see and purchase this plan. The plan is invisible to every other end-client on your platform.
- On the plan card, find the PLAN VISIBILITY section.
- Switch the selection from All subaccounts to Selected subaccounts.
- Check the specific end-clients who should have access.
- Click Save Visibility to apply.
A practical use case
A reseller negotiates a custom deal with a single enterprise client at $1,000/month with bespoke included minutes and features — a price they don’t want their other clients to see. The reseller:- Creates a “Custom Enterprise — Client X” plan at $1,000/month with the agreed features and limits.
- Sets the plan visibility to Selected subaccounts.
- Checks only the enterprise client’s subaccount.
- Saves visibility.
- Legacy pricing grandfathered to long-standing clients.
- Pilot pricing for clients testing new offerings.
- Internal staff accounts on free or discounted plans.
- Migration plans used temporarily during a pricing change.
- Promotional plans tied to specific marketing campaigns or partners.
What your end-clients see
The plans you create appear to your end-clients on the Plans page of your white-labeled platform — accessed through your branded custom domain (for example,yourbrand.com/plans) — formatted as side-by-side pricing cards with the plan name, monthly price, included minutes, your list of features, and a Select button to subscribe.
End-clients only see plans whose visibility includes their subaccount — visibility-restricted plans are filtered out automatically based on who is viewing the page.
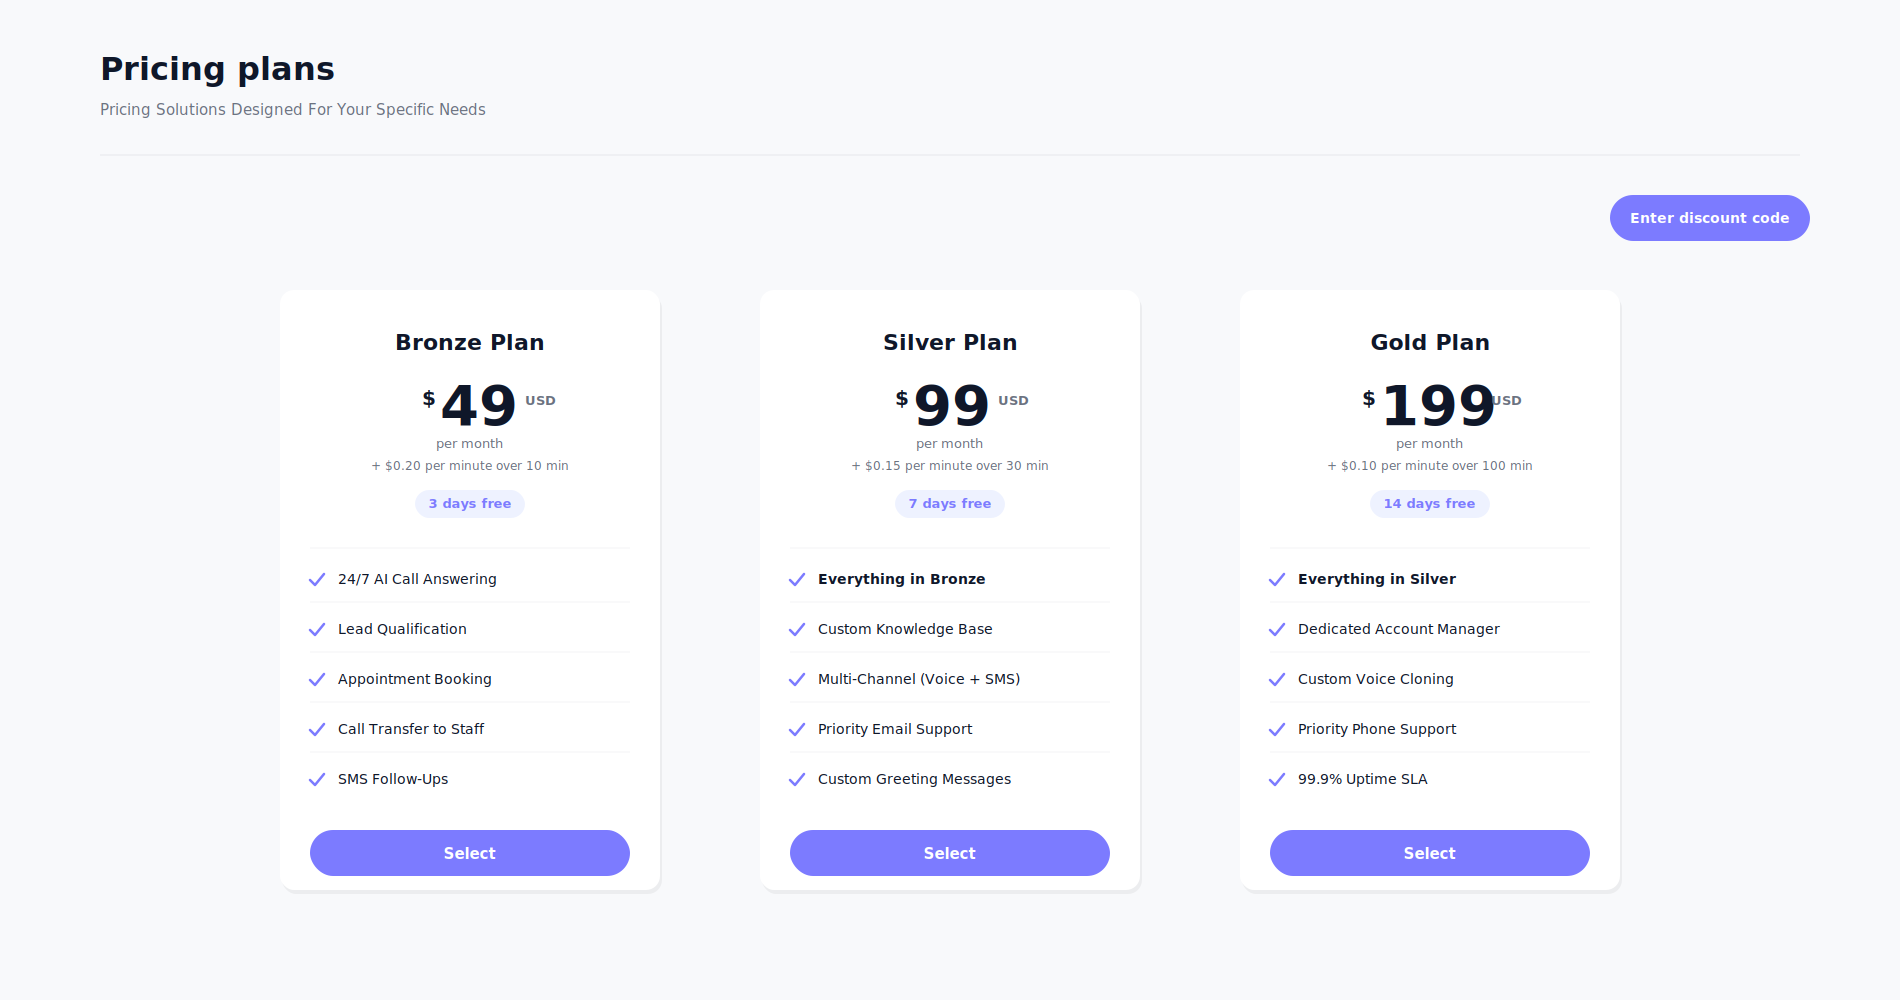
- Compare all plans visible to them side by side.
- Subscribe to a plan by clicking Select.
- See which plan they’re currently on (marked as Current plan).
- Apply a discount code if you’ve configured one.
Editing a plan
Once a plan is saved, most fields are locked because Stripe does not allow editing of core Price object fields after creation. The fields you CAN edit are:- Features — Add new features, edit existing ones, or remove features at any time.
- Trial period — Enable, disable, or change the number of trial days.
- Plan visibility — Change which end-clients can see the plan (All subaccounts vs Selected subaccounts).
- Plan name
- Description
- Monthly price
- Minutes included
- Overage charge per minute
Deleting a plan
Click the red Delete button at the bottom of the plan card to remove the plan from your platform.Next step
Clients
Manage your end-client subaccounts, view their dashboards, and impersonate them for support.