

Where to find Interface Colors
Interface colors are configured from the Settings page in the white-label admin. Click Settings at the bottom of the left sidebar — the Change Theme Color button sits at the top of the Settings page, next to Add Logo..png?fit=max&auto=format&n=6GTIrmu0x2zb1-oE&q=85&s=2300894ed2633c15de5738901fc15f35)
Three ways to choose your color
Clicking Change Theme Color opens a modal with three different ways to select your brand color — use whichever fits your workflow.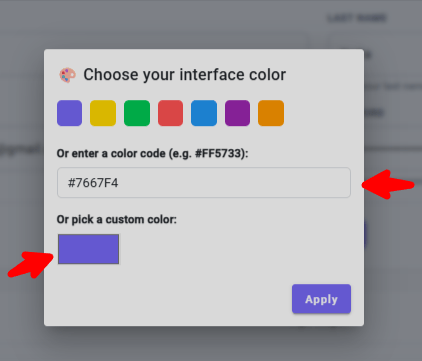
#FF5733) in the input field. This is the most direct way to use an exact brand color from your design system or company style guide.
3. Custom color picker — Click the colored square under Or pick a custom color to open a full visual picker.
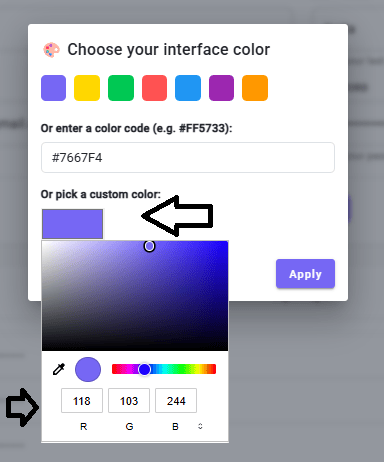
- A saturation and lightness gradient to fine-tune the exact shade.
- A hue slider (rainbow strip) to scan through the color spectrum.
- An eyedropper to sample colors from anywhere on your screen — handy for matching a color from your existing website or logo.
- Editable RGB values for pixel-precise color matching when you know your exact target values.
Apply your color
1
Open the Change Theme Color modal
From the Settings page, click Change Theme Color at the top.
2
Select your color
Choose your color using one of the three methods above — a preset swatch, a HEX code, or the custom picker. As you make a selection, the preview square under Or pick a custom color updates to show your current choice.
3
Apply
Click Apply in the bottom-right of the modal. Your color is saved and immediately applied across your white-labeled platform — every user who accesses your platform, including your end-clients, sees the new color on their next interaction.
Where your color appears
Your selected color becomes the primary accent across the PulsyAI interface. Visible elements include:- Primary action buttons (Edit, Save, Add, Apply, and similar)
- Selected and active states in the left sidebar navigation
- Interactive controls, toggles, and form focus indicators
- Highlights, badges, and branding accents throughout the dashboard
Change your color later
To update your theme color, open the Change Theme Color modal again, select a new color, and click Apply. The new color overwrites the previous one immediately. There is no separate “Reset” option — to revert to PulsyAI’s default, set the HEX value back to#7667F4 (or to whichever default color your platform shipped with).
Next step
Stripe Setup
Connect your Stripe account so you can rebill your end-clients directly on your own pricing.