

Where to find Clients
Click Clients in the left sidebar of your white-label admin. The page opens to the View Sub-Accounts list with all of your end-clients in a single table.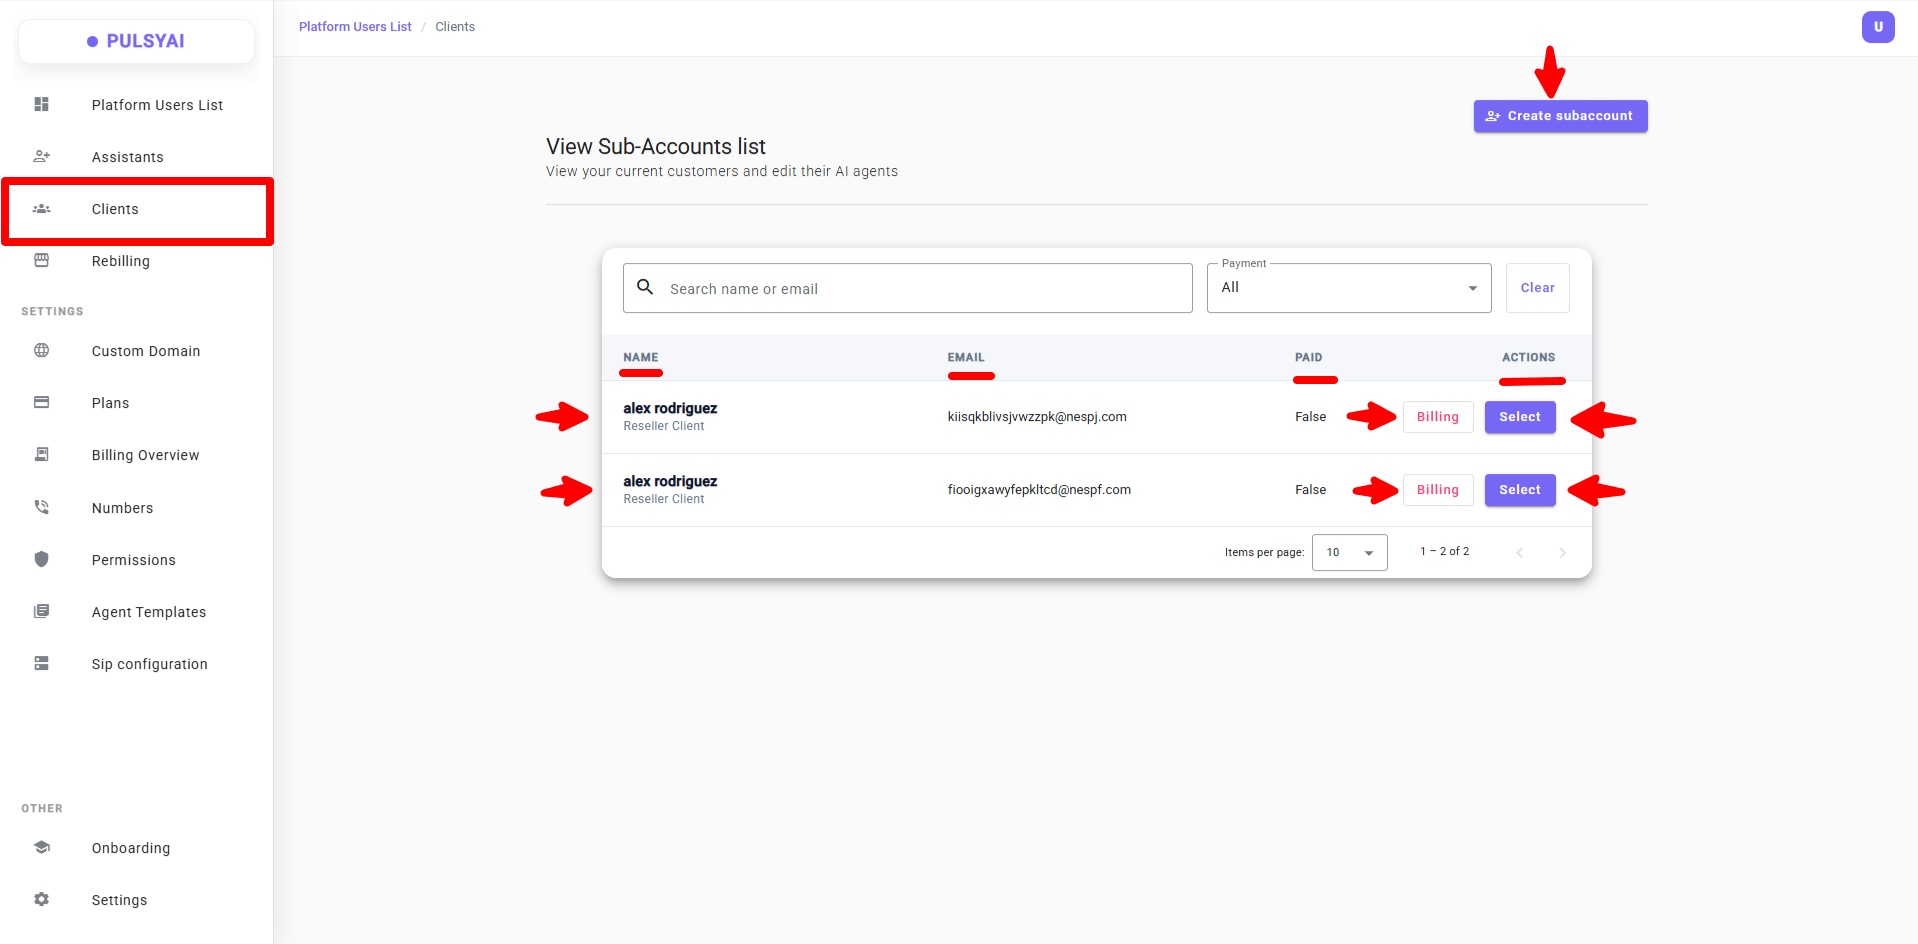
The Clients list
Each row in the list shows one of your subaccounts with:- Name — The subaccount’s full name. A “Reseller Client” label appears beneath the name to indicate it’s a subaccount you own.
- Email — The subaccount’s email address.
- Paid — Whether the subaccount has an active paid status (
True/False). - Actions — Two buttons per row:
- Billing — Opens the Update Billing Status modal to toggle the Paid status manually.
- Select — Opens the impersonation view to operate as that subaccount.
How subaccounts get created
There are two ways a subaccount can appear in your Clients list — choose the one that fits your reseller workflow: 1. Self-signup on your branded domain Your end-client navigates to your custom domain’s signup page (for example,yourbrand.com/signup), creates an account through the sign-up form, chooses a plan, and pays through Stripe. Their account is automatically tied to your reseller tenancy and appears in your Clients list. This is the most scalable approach for resellers who want end-clients to onboard themselves with no manual work per account.
2. Manual creation by you
You create the subaccount on behalf of your end-client using the Create subaccount button (documented in the next section), then share the login credentials with them through your preferred channel — email, SMS, or in person. The end-client receives credentials directly from you and logs in straight on your branded domain, never seeing a PulsyAI URL or page during onboarding.
Create a subaccount manually
Manual creation is useful when you want to onboard a client yourself — for example, after a sales call, or when handing off a fully configured platform to a client who isn’t technical.1
Open the Create subaccount modal
Click the Create subaccount button at the top right of the Clients page. A modal opens with the subaccount creation form.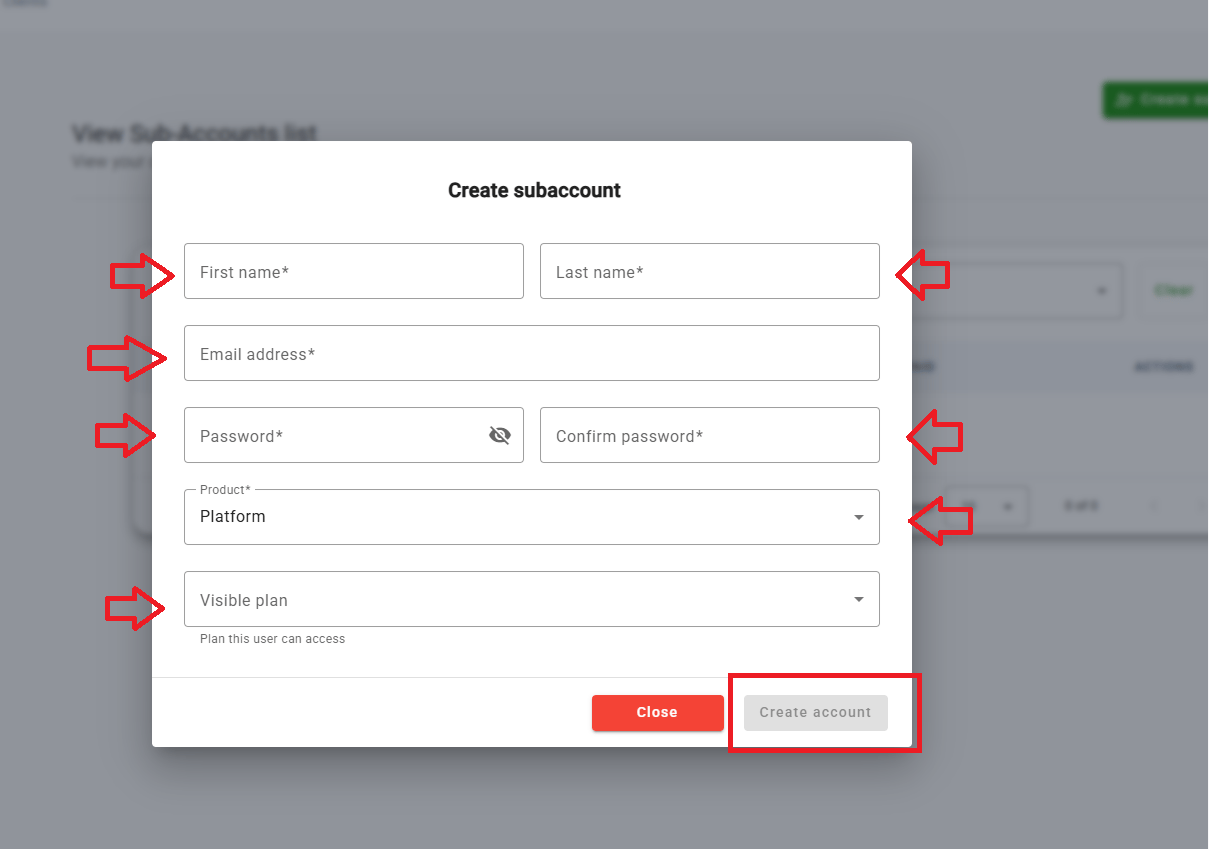
2
Fill in the personal details
- First name (required) — The end-client’s first name.
- Last name (required) — The end-client’s last name.
- Email address (required) — The email the end-client will use to log in. This must be a valid email address.
- Password (required) — Set an initial password for the end-client. You can share this password with them through your preferred channel (email, SMS, or in person), and they can change it later from their account settings.
- Confirm password (required) — Retype the password to confirm.
3
Choose the onboarding experience (Product)
The Product dropdown controls what kind of onboarding flow your end-client sees the first time they log in. Choose the one that matches the client’s technical level and the scope of what they need.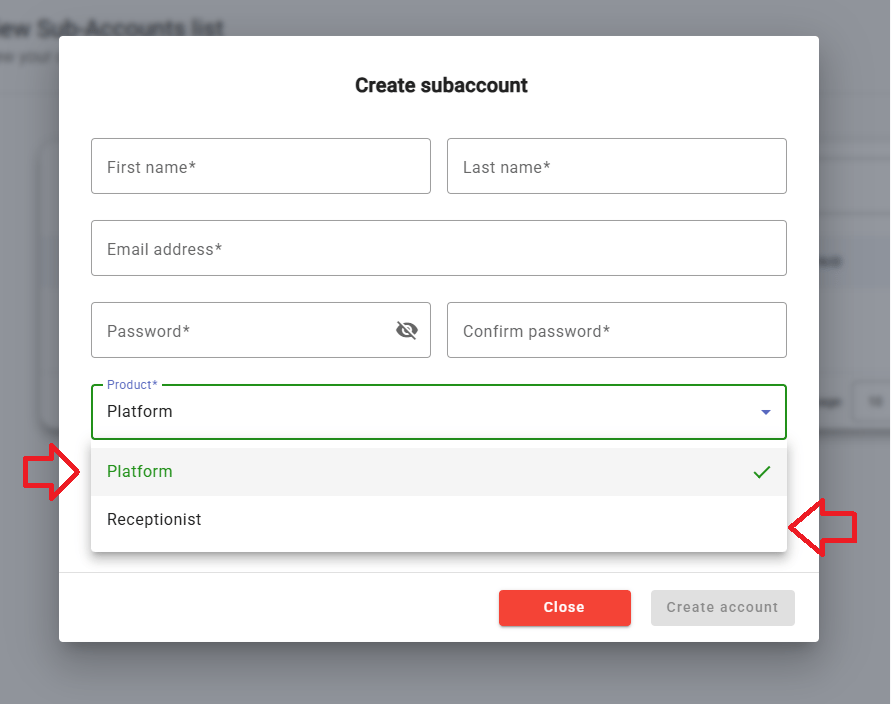
- Platform — The full reseller-style onboarding experience. Best for technically capable clients, agencies operating under your brand, or anyone who wants full access to call flows, integrations, knowledge bases, and the complete agent builder.
- Receptionist — A simplified onboarding flow designed for business owners and non-technical end-clients. The client picks a pre-built agent template and is up and running in three to four steps, completing setup in about two minutes. Best for SMB owners (dental practices, real estate agents, plumbing companies, etc.) who just want a working AI agent without configuring everything from scratch.
4
Optionally pre-set the visible plan
The Visible plan dropdown lets you decide which plan the new subaccount will see on their pricing page. This is a convenient inline shortcut for the same control you can manage from the Plans page’s visibility settings.Leave this empty to let the subaccount see all plans set to “All subaccounts” visibility, or select a specific plan to restrict their pricing page to that single plan — useful for custom-deal clients who should only see their negotiated tier.
5
Create the account
Click Create account at the bottom of the modal. The new subaccount is created instantly and appears in your Clients list. Share the login credentials with your end-client so they can access their dashboard on your branded domain.
Manage billing status
The Billing button on each row opens the Update Billing Status modal where you can manually control whether a subaccount is marked as Paid.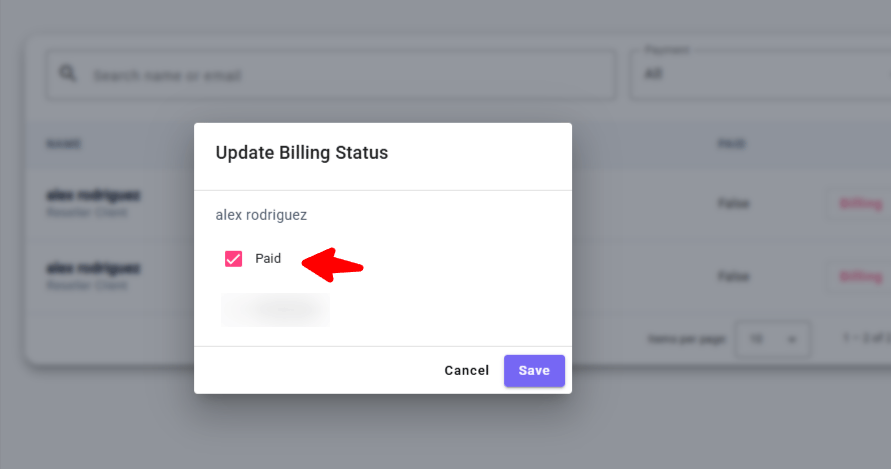
When subaccounts get marked Paid automatically
When a subaccount subscribes to one of your plans through the standard checkout flow (selecting a plan and completing payment via Stripe on your branded domain), their Paid status is set to True automatically. You do not need to intervene for the normal subscription flow.When to use the manual Paid toggle
The Paid checkbox exists for edge cases outside the standard Stripe-checkout flow:- External payment arrangements — Some resellers handle payment outside the platform (sending a Stripe payment link directly, accepting wire transfers, invoicing through a separate accounting system, etc.). In these cases the subaccount has paid you, but PulsyAI’s Stripe integration has no record of it. Manually toggle Paid to True to activate their account.
- Your own test or internal subaccounts — Resellers sometimes create subaccounts under their own domain for their own internal use — running their own AI agents for their own business, building demo accounts to show prospects, testing configurations, etc. These accounts have no plan attached and no payment record, so they are inactive by default. Marking them Paid activates them.
Impersonate a subaccount
Clicking Select on a subaccount opens the impersonation view — you log into the platform as that subaccount and see exactly what they see. This is the primary tool for client support, onboarding assistance, debugging, and any kind of hands-on work on behalf of a subaccount.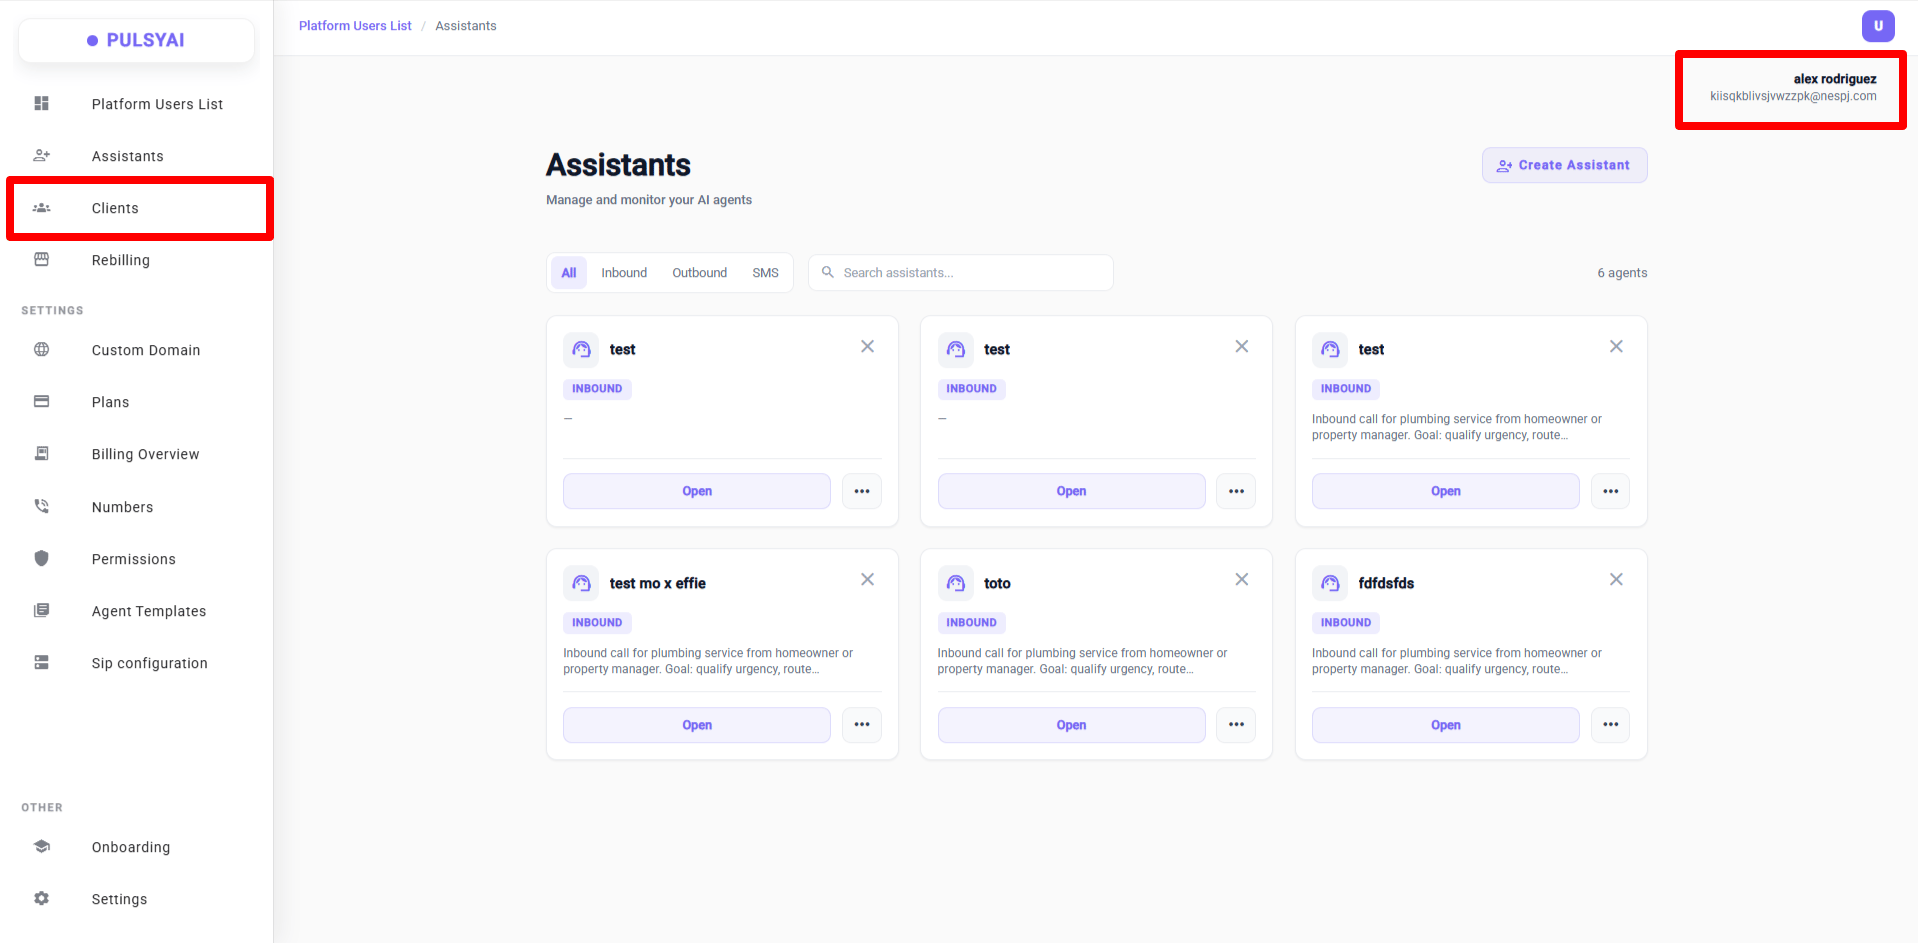
What you can do while impersonating
While operating as a subaccount, you have full access to everything that subaccount would have access to:- View and modify all of their AI agents (inbound, outbound, and SMS).
- Edit prompts, scripts, call flows, knowledge bases, and agent settings.
- Build entirely new agents from scratch on their account.
- Inspect their call logs, analytics, and conversations.
- Configure integrations, SMS configuration, phone numbers, and SIP configuration on their behalf.
- Troubleshoot and debug live issues by reproducing what the subaccount is experiencing.
- Access the subaccount’s Settings page — including their profile information, account preferences, password reset, and API keys — exactly as the subaccount themselves would see and edit them.
How you know you’re impersonating
The top-right corner of the platform displays the subaccount’s name and email while you are impersonating them — this is your visual indicator that you are no longer in your own admin view.How to exit impersonation
To return to your own reseller admin view, navigate back via the Clients entry in the left sidebar, or click any other admin-level navigation item (Plans, Rebilling, Custom Domain, etc.). Selecting any non-impersonated entry exits the impersonation context.Subaccount independence
Each subaccount is fully independent — they have their own dashboard, their own AI agents, their own phone numbers, their own knowledge bases, their own call logs, and their own analytics. Activity on one subaccount has no effect on another. This multi-tenant separation is what makes PulsyAI’s white-label model scalable: you can manage dozens or hundreds of independent client accounts from a single reseller admin, without any cross-contamination of data or configurations.Next step
Billing Overview
Monitor consumption across all your subaccounts — track minutes, sessions, and active users with date-range filters and Excel export.