

How transfers work — two pieces that must both be configured
Setting up a transfer involves two distinct configurations:- Recipients — configured on the Transfers tab of your agent. This is the list of phone numbers your agent can route calls to.
- The trigger directive in the agent prompt — configured in the Call Flow tab where you write the agent’s script. This is the prompt-side instruction that tells the agent when and how to fire the transfer function call.
Setting up recipients
The Transfers tab inside each voice AI agent is where you define who the agent can route calls to. You can add recipients one-by-one manually, or upload a list in bulk via CSV/XLSX.Where to find the Transfers tab
Open the voice AI agent you want to configure transfers on. Inside the agent, look at the top navigation bar — the available tabs include Call Flows, Analytics, Knowledge, Call Logs, SMS Configuration, Integrations, and Transfers. Click the Transfers tab to open the configuration view.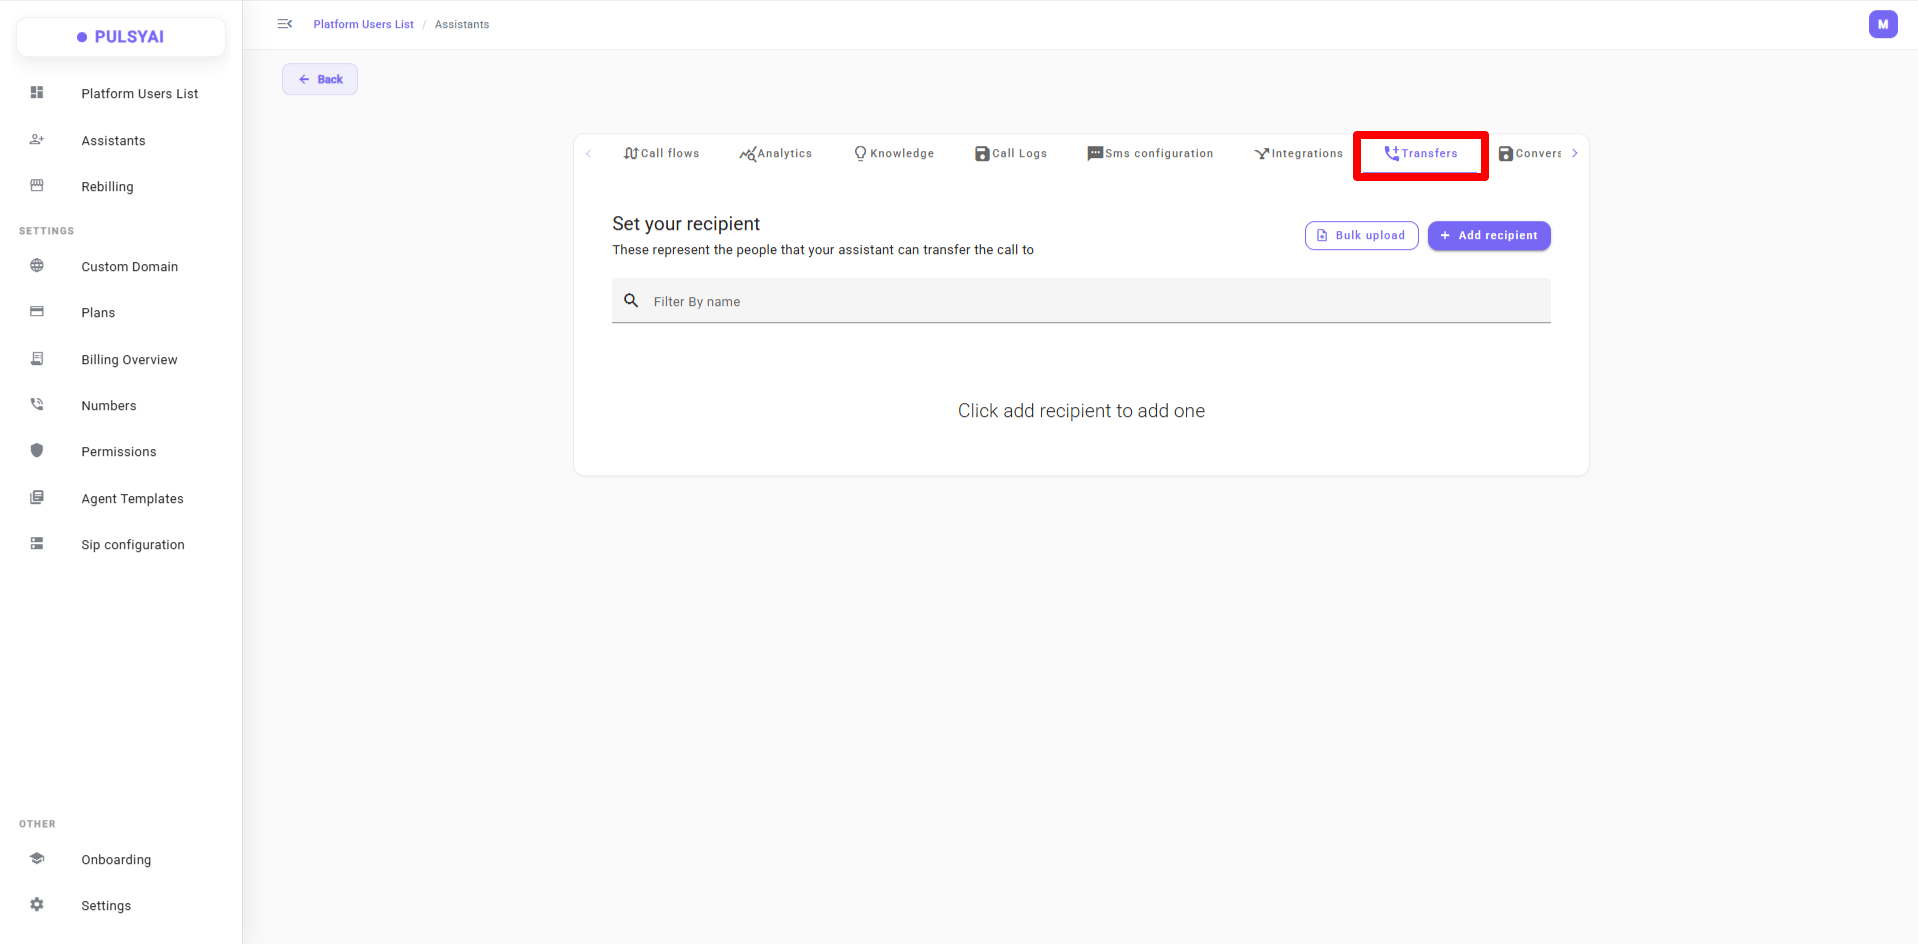
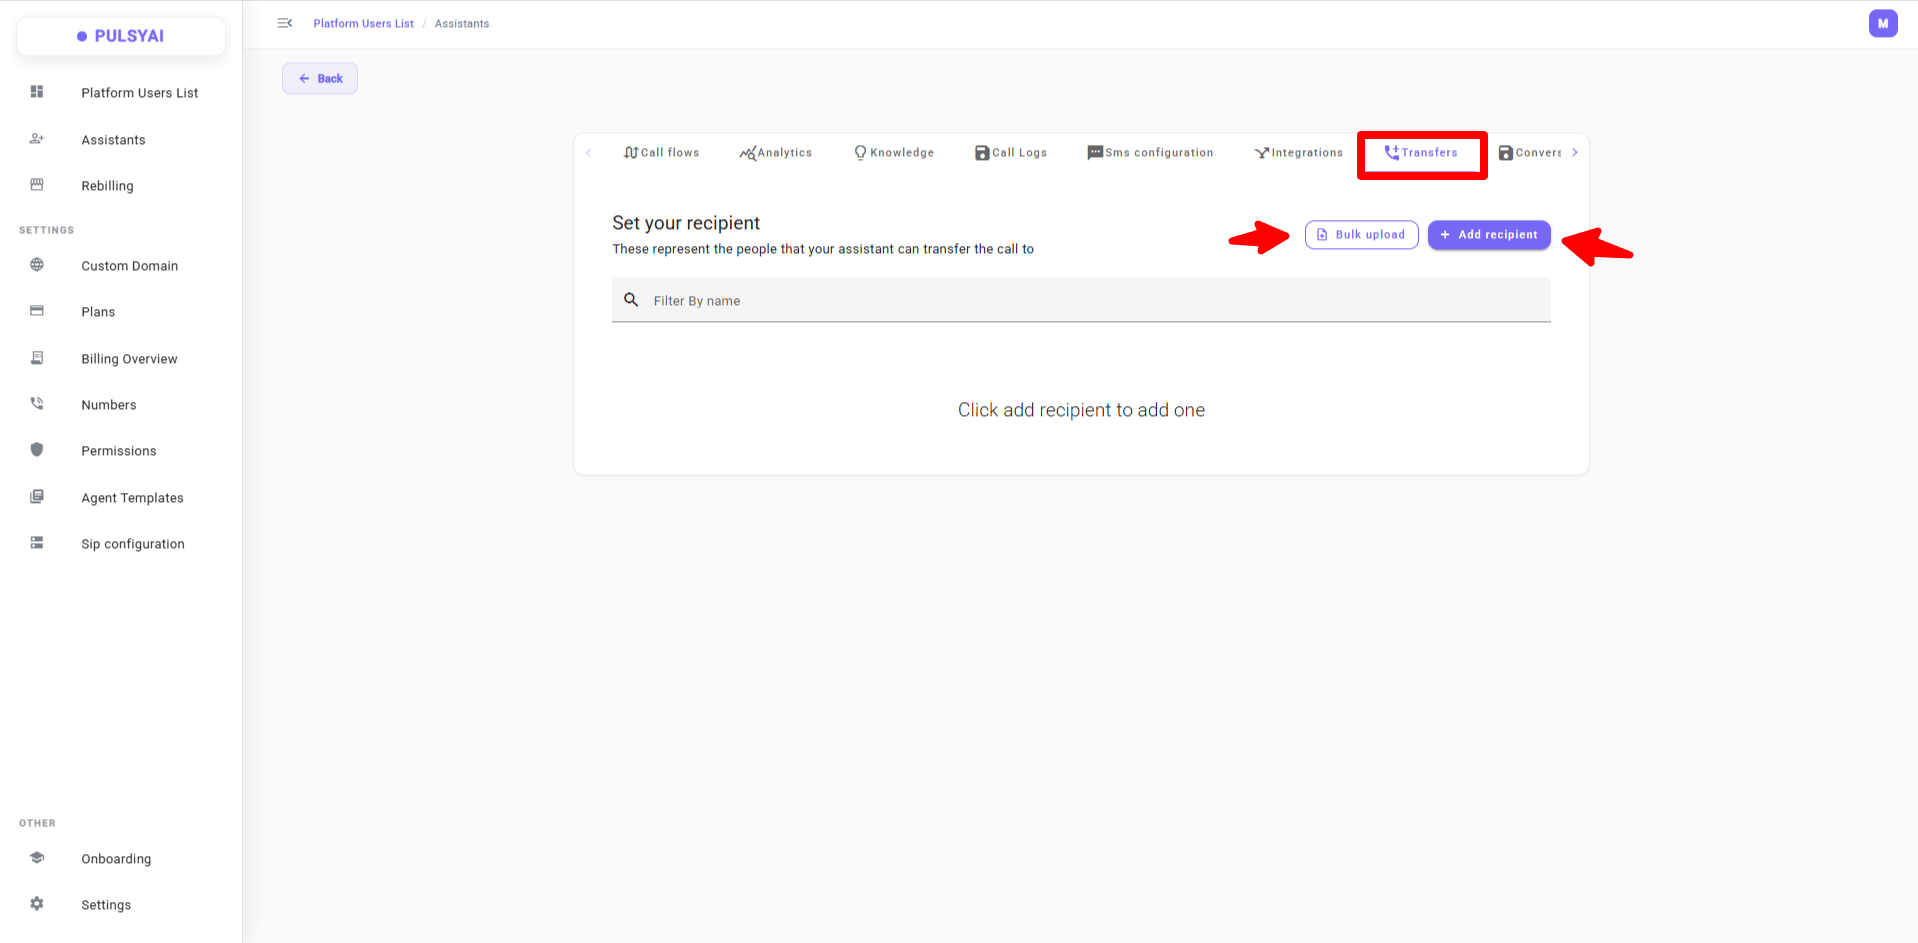
Adding a recipient manually
Click + Add recipient in the top right of the Transfers tab. A modal opens asking for two fields: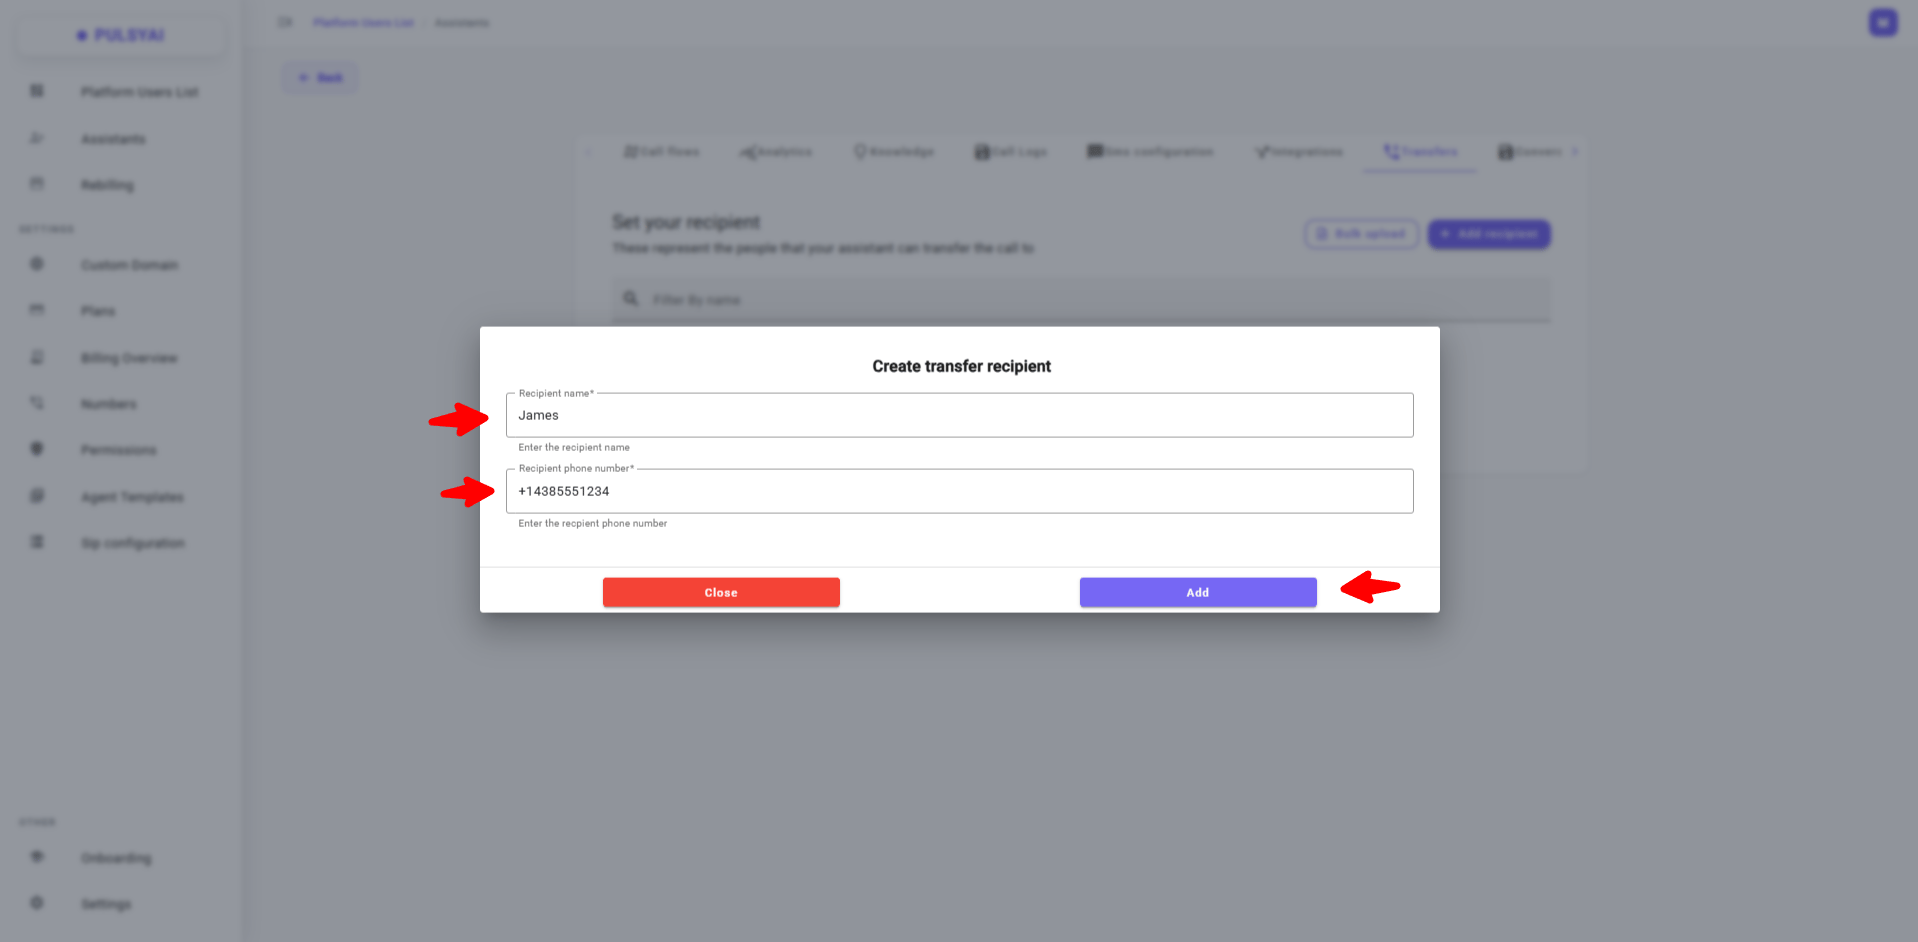
- Recipient name — A descriptive label for this destination. This is used inside your prompt to tell the agent which recipient to transfer to (for example, “James”, “Billing team”, “Sales overflow line”). Choose names that are easy to reference in natural conversation.
- Recipient phone number — The phone number the call should be transferred to, including country code.
Bulk upload via CSV or XLSX
For clients with many destinations — call centers with dozens of agents, multi-location service businesses, or sales teams that need every rep available as a transfer target — use the Bulk upload button at the top right of the Transfers tab to import recipients from a.csv or .xlsx file.
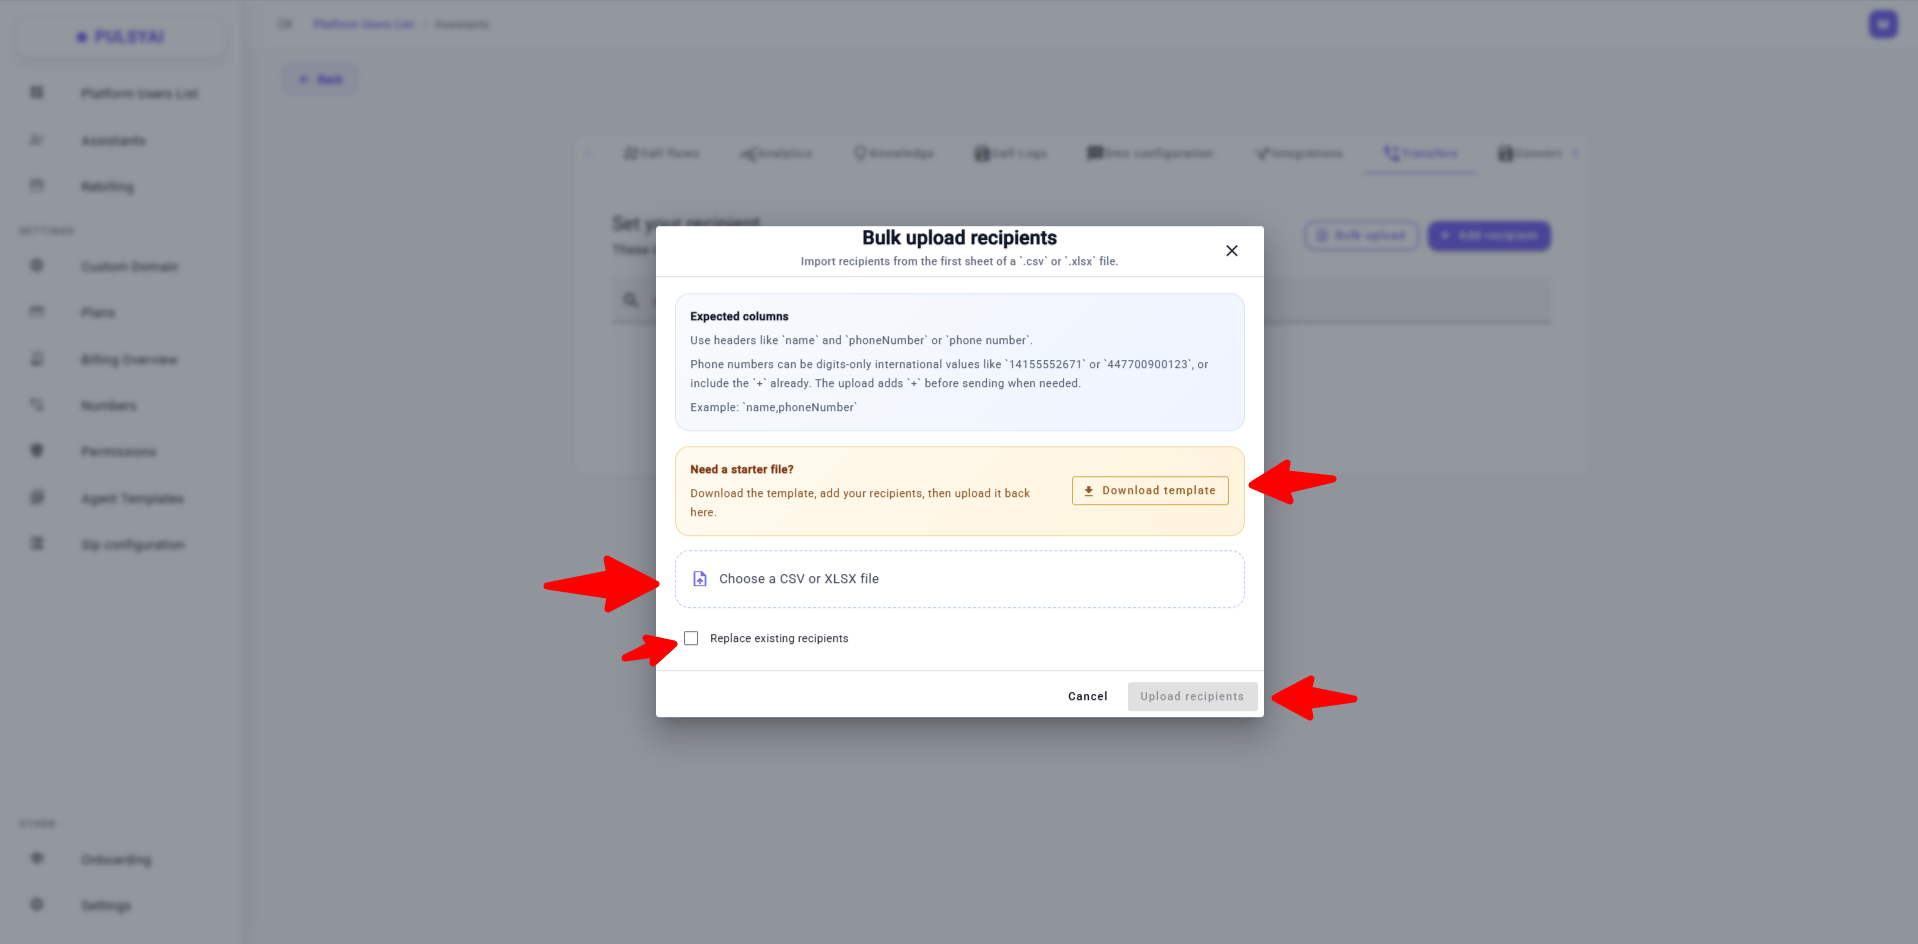
- Required columns —
nameandphoneNumber(orphone number). The upload accepts either spelling for the phone column. - Phone number format — Digits-only international values like
14155552671or447700900123, OR include the+prefix already (+14155552671). The upload automatically adds+before sending when needed, but country codes themselves must always be present in the digits. - Starter template — Click Download template inside the modal to grab a pre-formatted CSV with the correct column headers — fill it with your recipient list and upload it back.
Connecting Transfers to Call Flows
Recipients in the Transfers tab are only half the configuration. The other half lives inside the agent’s Call Flow tab, where you write the prompt — the script directives that tell the agent when to actually fire a transfer. This works the same way as every other function call in PulsyAI — SMS messages (live or post-call), bookings, transfers all follow the same pattern:- The agent asks the customer a confirmation question — for example, “Would you like me to transfer you to a representative right now?”
- The customer confirms (“yes”, “please”, “go ahead”).
- The directive in your prompt fires the function call — and PulsyAI executes the transfer to the configured recipient.
Ready-to-use transfer directive
Below is the exact directive block we recommend including in any agent prompt that supports transfers. This is production-tested wording that fires reliably across customer phrasings. Copy it into your Call Flow prompt as-is — only customizing the specific recipient name(s) and the customer-facing response wording if your client wants different language.Customizing the trigger conditions to your recipients
The trigger conditions in the directive above reference a specific recipient name as an example (“I need to speak to James”). When you implement this in your own agent, replaceJames with the actual name(s) of your configured recipients. If you have a recipient named Louise, your agent should recognize “I need to speak to Louise” as a trigger.
The other listed triggers (“I want to speak to someone”, “Transfer me”, “Get me a real person”, etc.) cover the more generic “I want a human” intent and should stay as-is — these catch the customers who don’t know any specific name and just want to escape the AI.
Add as many variations of “I want to talk to a human” as your client’s audience phrases it in. The more variations the directive covers, the more reliably the trigger fires across real conversations.
Multi-recipient configurations
The setup above assumes a single recipient — the agent transfers everyone to the same destination. For clients with department-based routing (sales / billing / technical / customer service), you’ll configure multiple recipients and adjust the prompt directive so the agent knows which one to route to.Single recipient — straightforward routing
When there’s only one transfer destination configured, the directive above works as-is. The agent confirms the customer wants a transfer, fires the function call, and the call routes to the only available recipient. Simplest possible setup, best for clients with a single closing team or a single shared support line.Multiple recipients — department-based routing
When you’ve added multiple recipients (for example James for the technical department, Louise for billing, Maria for sales), the agent needs to know which recipient to route to based on what the customer is asking about. The prompt directive needs to be expanded to handle this routing. The pattern is:- The agent listens for the topic of the customer’s concern (technical issue, billing question, sales inquiry, etc.).
- The agent confirms the transfer with a department-specific framing — “I’m going to transfer you to James in our technical department, would you like me to go ahead?”.
- The directive fires the transfer to the correct recipient based on the matched department.
- List the available departments at the top of the directive so the agent knows the full routing table.
- Map each department to keywords or topics the customer might mention (technical → “broken”, “not working”; billing → “charge”, “invoice”; sales → “buy”, “upgrade”).
- Always confirm the transfer by stating who the customer is being routed to (“I’m going to connect you with James in our technical department”) before firing the function call.
- Ask a clarifying question if the customer’s intent is ambiguous, rather than guessing the department.
Best practices
A few patterns to keep in mind when configuring transfers in production:- Test every recipient before going live. Add a recipient, write the directive, and call your own agent to trigger the transfer. Verify the call routes to the correct destination before launching with real customers.
- Use natural recipient names. Recipient names appear inside your prompt as routing keywords — keep them short, distinct, and conversational.
JamesandLouisework;Recipient_001andBackup_Transfer_Number_3don’t. - Don’t transfer for everything. Transfers work best when they’re a deliberate handoff at peak intent (closing teams, escalations, specific department requests). Transferring for every minor question erodes the customer experience and wastes human team time.
- Keep the confirmation step. Always have the agent ask before transferring, even if the customer is clearly asking for a human. The ask-then-confirm pattern eliminates accidental transfers and ensures the customer is mentally prepared for the channel change.
Next steps
Principle 9: AI prequalifies, human closes
The strategic reasoning behind warm transfers — why human closing beats AI closing for the foreseeable future, and when warm transfer is the right configuration versus a scheduled callback.
Speed-to-lead warm transfer pro tip
How to combine transfers with the outbound speed-to-lead playbook — instant transfer to live closers while the lead is at peak intent.