> ## Documentation Index
> Fetch the complete documentation index at: https://docs.pulsyai.com/llms.txt
> Use this file to discover all available pages before exploring further.
# Stripe Setup
> Connect your Stripe account to PulsyAI so end-clients pay you directly. Step-by-step guide to Stripe Connect, API keys, and rebilling configuration.
Stripe Setup connects your Stripe account to PulsyAI so your end-clients are billed directly by you on your own pricing plans — with payments flowing into your bank account, not PulsyAI's.
PulsyAI uses **Stripe Connect** to set up your payment processing. This means you create your own merchant account directly with Stripe, you control your funds end-to-end, and PulsyAI never touches the money — it only triggers the billing events on your behalf.
## Where to find Stripe Setup
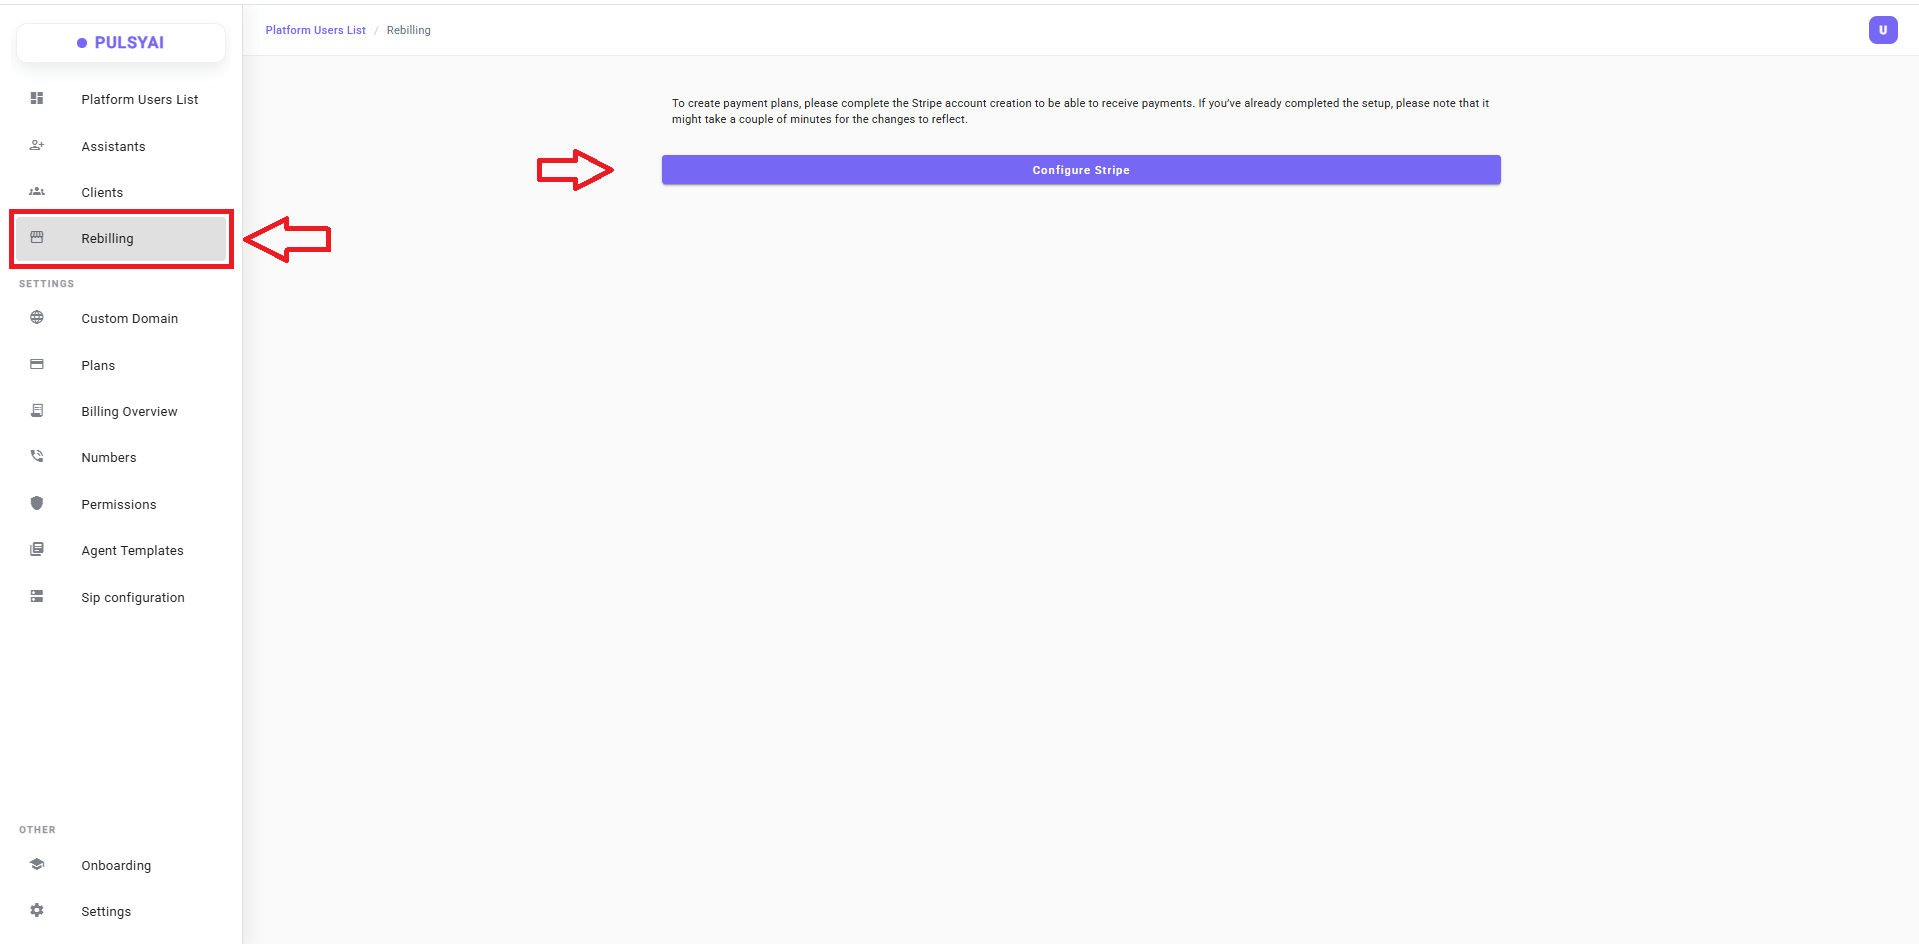
Stripe Setup is configured from the **Rebilling** section in the white-label admin sidebar. Click **Rebilling** in the left navigation — if your Stripe account is not yet configured, you'll see a prompt and a **Configure Stripe** button.
 ## Before you start
To complete Stripe's onboarding, you'll need the following ready:
* A valid email address (Stripe uses this as your account login).
* Your **business details** — legal name, address, tax identification number, and incorporation information if applicable.
* A **government-issued ID** for identity verification (required by financial regulations).
* A **bank account** in your business's name to receive payouts.
* Roughly **10 to 15 minutes** to complete the onboarding form.
If you already have a Stripe account, you can use the same email address — Stripe will recognize it during onboarding.
## Set up your Stripe account
Click **Rebilling** in the left sidebar of your white-label admin. You'll see a message explaining that Stripe must be configured before you can create payment plans, along with a **Configure Stripe** button.
Click the **Configure Stripe** button. You'll be redirected to Stripe's secure onboarding flow at `connect.stripe.com`, where Stripe takes over the rest of the setup.
## Before you start
To complete Stripe's onboarding, you'll need the following ready:
* A valid email address (Stripe uses this as your account login).
* Your **business details** — legal name, address, tax identification number, and incorporation information if applicable.
* A **government-issued ID** for identity verification (required by financial regulations).
* A **bank account** in your business's name to receive payouts.
* Roughly **10 to 15 minutes** to complete the onboarding form.
If you already have a Stripe account, you can use the same email address — Stripe will recognize it during onboarding.
## Set up your Stripe account
Click **Rebilling** in the left sidebar of your white-label admin. You'll see a message explaining that Stripe must be configured before you can create payment plans, along with a **Configure Stripe** button.
Click the **Configure Stripe** button. You'll be redirected to Stripe's secure onboarding flow at `connect.stripe.com`, where Stripe takes over the rest of the setup.
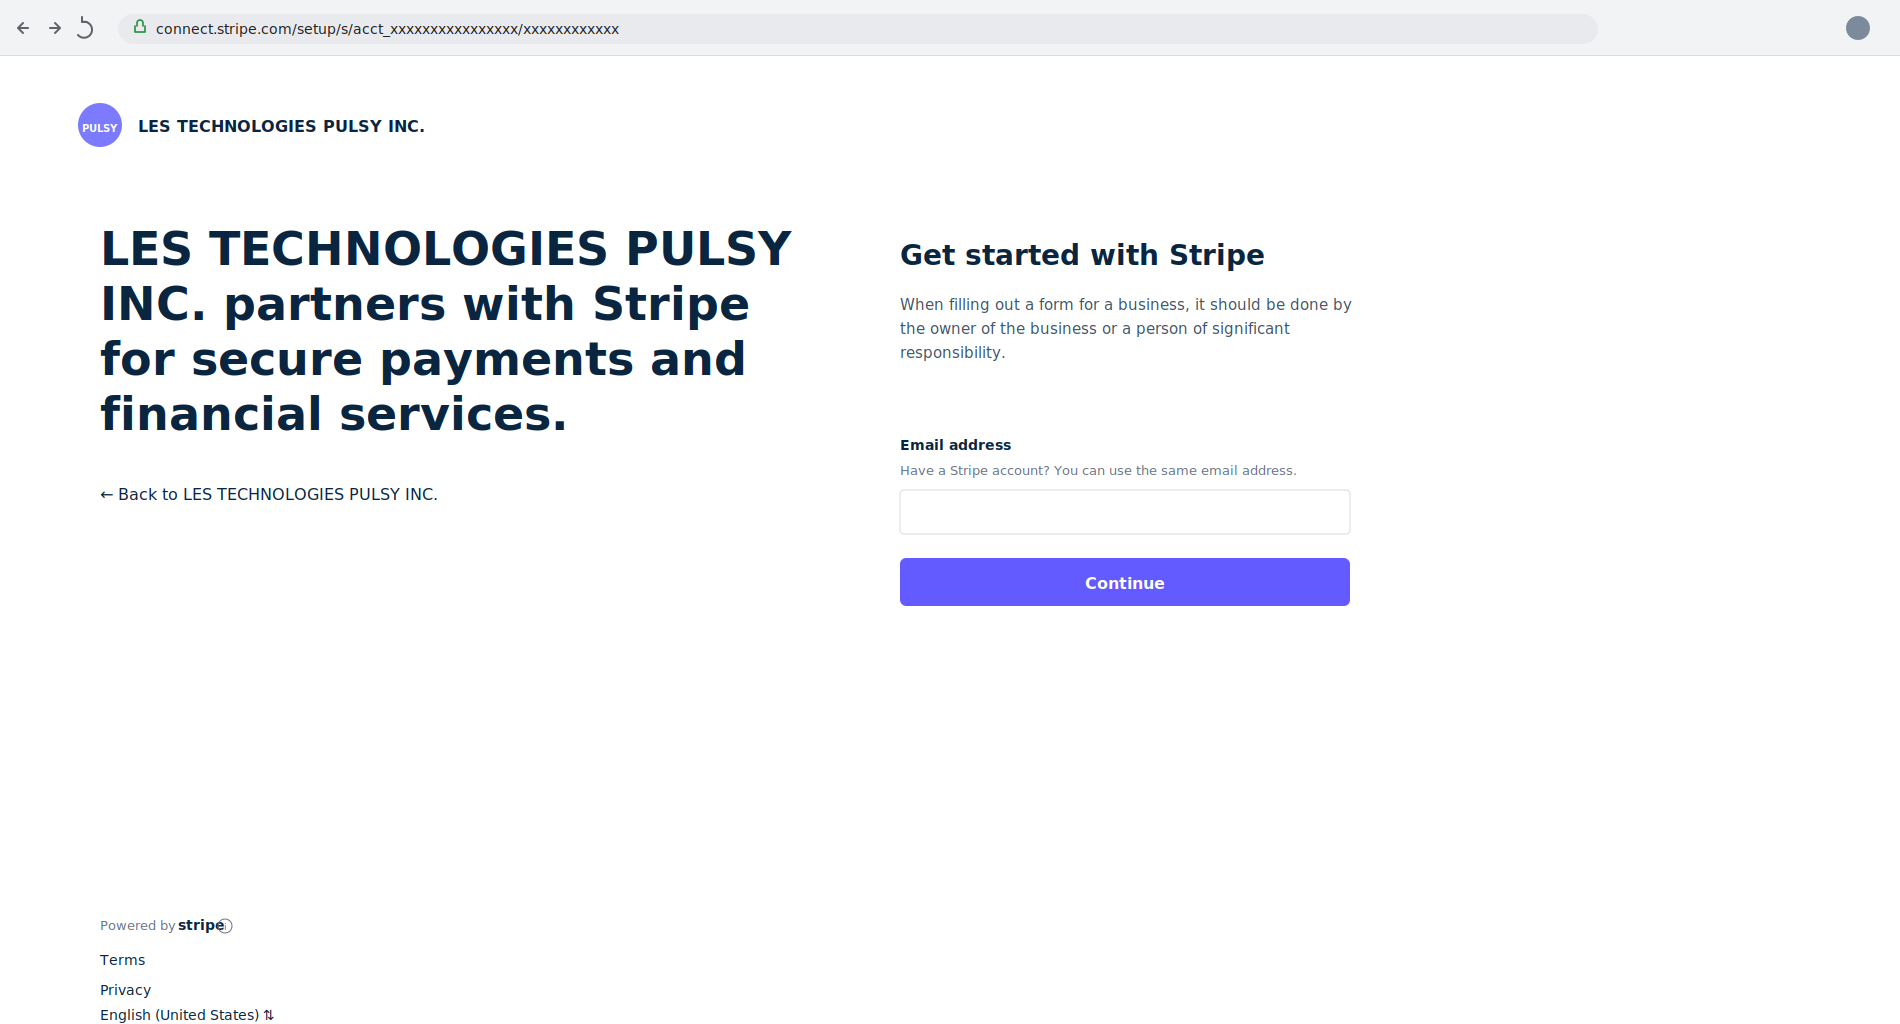 Stripe will guide you through a series of questions about your business — these are required by Stripe's compliance and Know-Your-Customer (KYC) standards, and they vary slightly by country.
Typical information requested:
* Business name, address, and type (sole proprietorship, corporation, LLC, etc.)
* Tax identification number
* Personal information for the business owner or representative
* Bank account details for receiving payouts
* Identity verification documents
These questions are part of **Stripe's own onboarding flow** — not PulsyAI. The information you provide goes directly to Stripe and is subject to Stripe's privacy policy and terms of service. PulsyAI does not see, store, or have access to the data you submit during Stripe onboarding.
Once Stripe confirms your onboarding is complete, navigate back to the PulsyAI Rebilling page and **refresh your browser**. Your connected Stripe account is now linked to your PulsyAI white-label platform.
Stripe verification can take a couple of minutes to propagate to PulsyAI. If your account isn't recognized immediately after refreshing, wait a few minutes and refresh again. This is normal — Stripe's verification systems run asynchronously.
## After successful setup
Once your Stripe account is connected and verified, you're ready to start charging your end-clients. The next step is to create the subscription plans they'll see when they sign up to your white-labeled platform.
Keep your Stripe dashboard credentials handy — even after setup, you may need to log into Stripe directly to manage payouts, refunds, dispute resolution, tax reporting, and other payment-related operations. PulsyAI handles plan creation and subscription triggers, but Stripe remains the source of truth for everything money-related.
## What if I need to update my Stripe details later?
For changes to your Stripe account — bank account updates, business information edits, tax document submission, identity re-verification — log directly into your Stripe dashboard at `dashboard.stripe.com`. PulsyAI doesn't store or proxy your Stripe details; everything lives in Stripe itself.
## Next step
Create the subscription plans your end-clients will subscribe to on your white-labeled platform.
Stripe will guide you through a series of questions about your business — these are required by Stripe's compliance and Know-Your-Customer (KYC) standards, and they vary slightly by country.
Typical information requested:
* Business name, address, and type (sole proprietorship, corporation, LLC, etc.)
* Tax identification number
* Personal information for the business owner or representative
* Bank account details for receiving payouts
* Identity verification documents
These questions are part of **Stripe's own onboarding flow** — not PulsyAI. The information you provide goes directly to Stripe and is subject to Stripe's privacy policy and terms of service. PulsyAI does not see, store, or have access to the data you submit during Stripe onboarding.
Once Stripe confirms your onboarding is complete, navigate back to the PulsyAI Rebilling page and **refresh your browser**. Your connected Stripe account is now linked to your PulsyAI white-label platform.
Stripe verification can take a couple of minutes to propagate to PulsyAI. If your account isn't recognized immediately after refreshing, wait a few minutes and refresh again. This is normal — Stripe's verification systems run asynchronously.
## After successful setup
Once your Stripe account is connected and verified, you're ready to start charging your end-clients. The next step is to create the subscription plans they'll see when they sign up to your white-labeled platform.
Keep your Stripe dashboard credentials handy — even after setup, you may need to log into Stripe directly to manage payouts, refunds, dispute resolution, tax reporting, and other payment-related operations. PulsyAI handles plan creation and subscription triggers, but Stripe remains the source of truth for everything money-related.
## What if I need to update my Stripe details later?
For changes to your Stripe account — bank account updates, business information edits, tax document submission, identity re-verification — log directly into your Stripe dashboard at `dashboard.stripe.com`. PulsyAI doesn't store or proxy your Stripe details; everything lives in Stripe itself.
## Next step
Create the subscription plans your end-clients will subscribe to on your white-labeled platform.