> ## Documentation Index
> Fetch the complete documentation index at: https://docs.pulsyai.com/llms.txt
> Use this file to discover all available pages before exploring further.
# Quickstart
> Go from a new PulsyAI account to a live, tested AI voice agent — create an assistant, assign a phone number, build a call flow, and place a test call.
This guide walks you from a brand-new PulsyAI account to a live, tested AI agent ready to handle real calls.
## Before you begin
* A PulsyAI account ([pulsyai.com](https://pulsyai.com))
## Steps
Once your account is created, you land on the **Assistants** page. This is your home base.
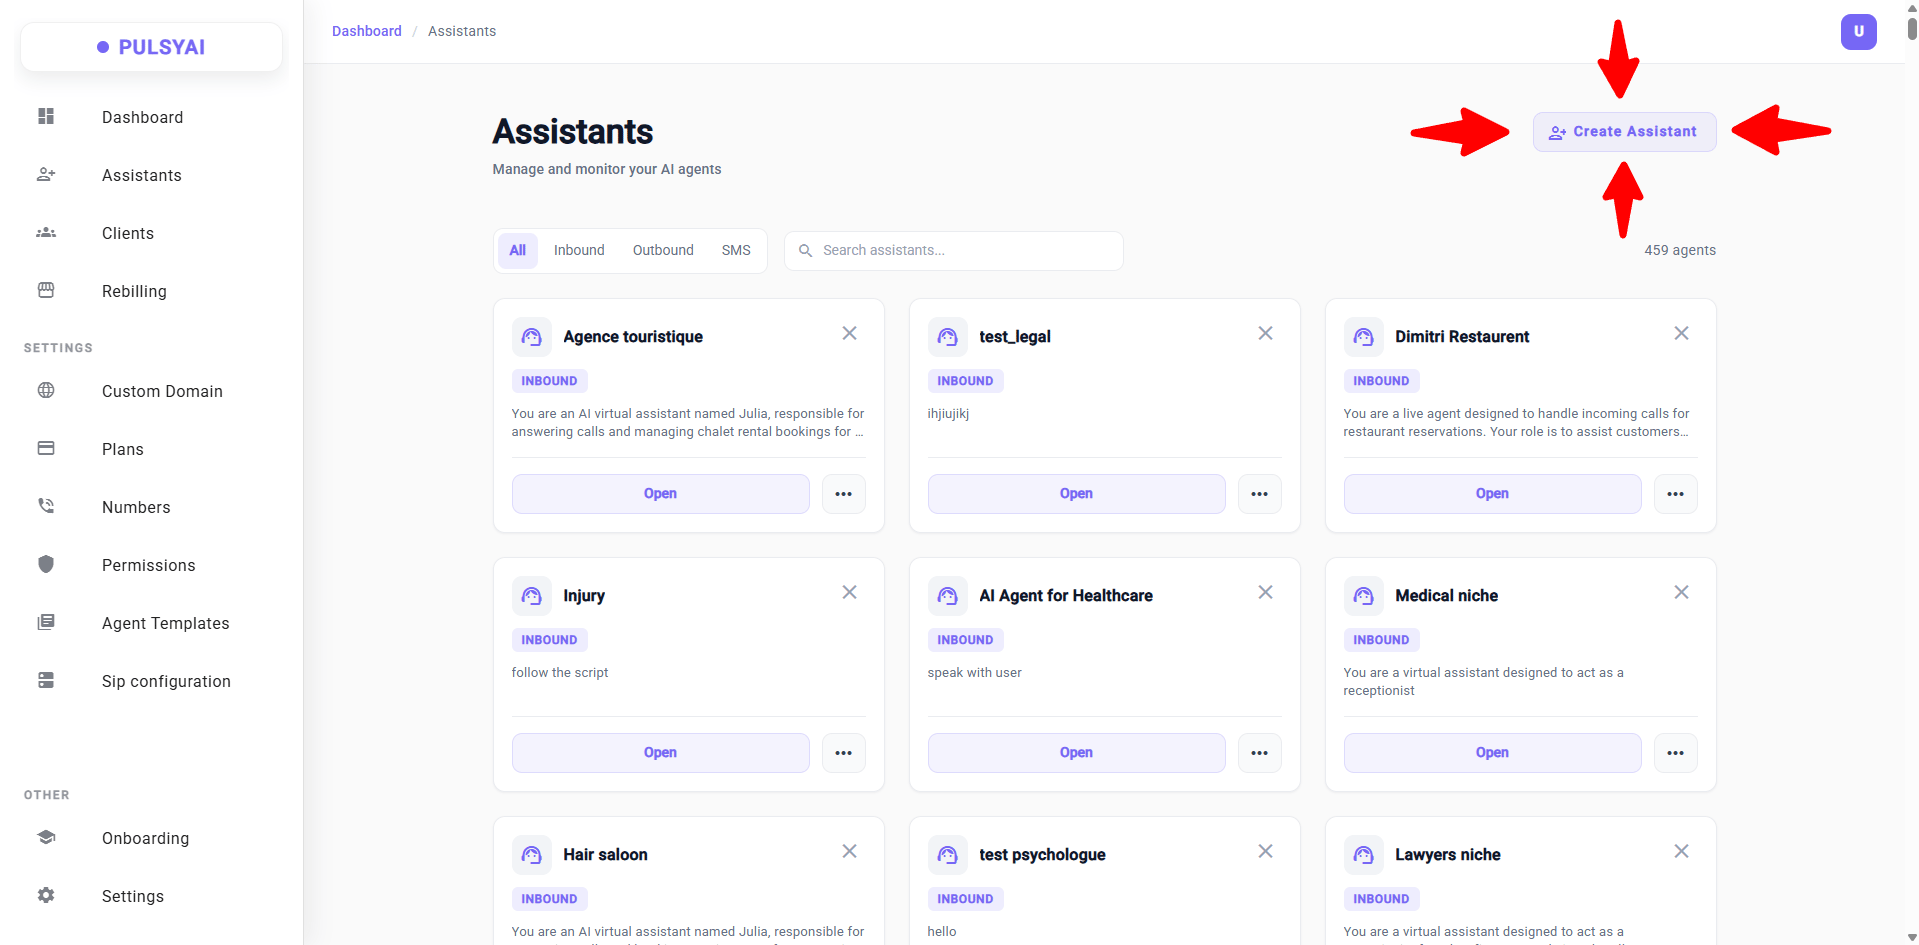 From here you can:
* **View all your assistants** in a list
* **Filter by type** — Inbound, Outbound, or SMS AI Agent
* **Create a new assistant** using the button in the top right corner
Click the **Create Assistant** button in the top right corner.
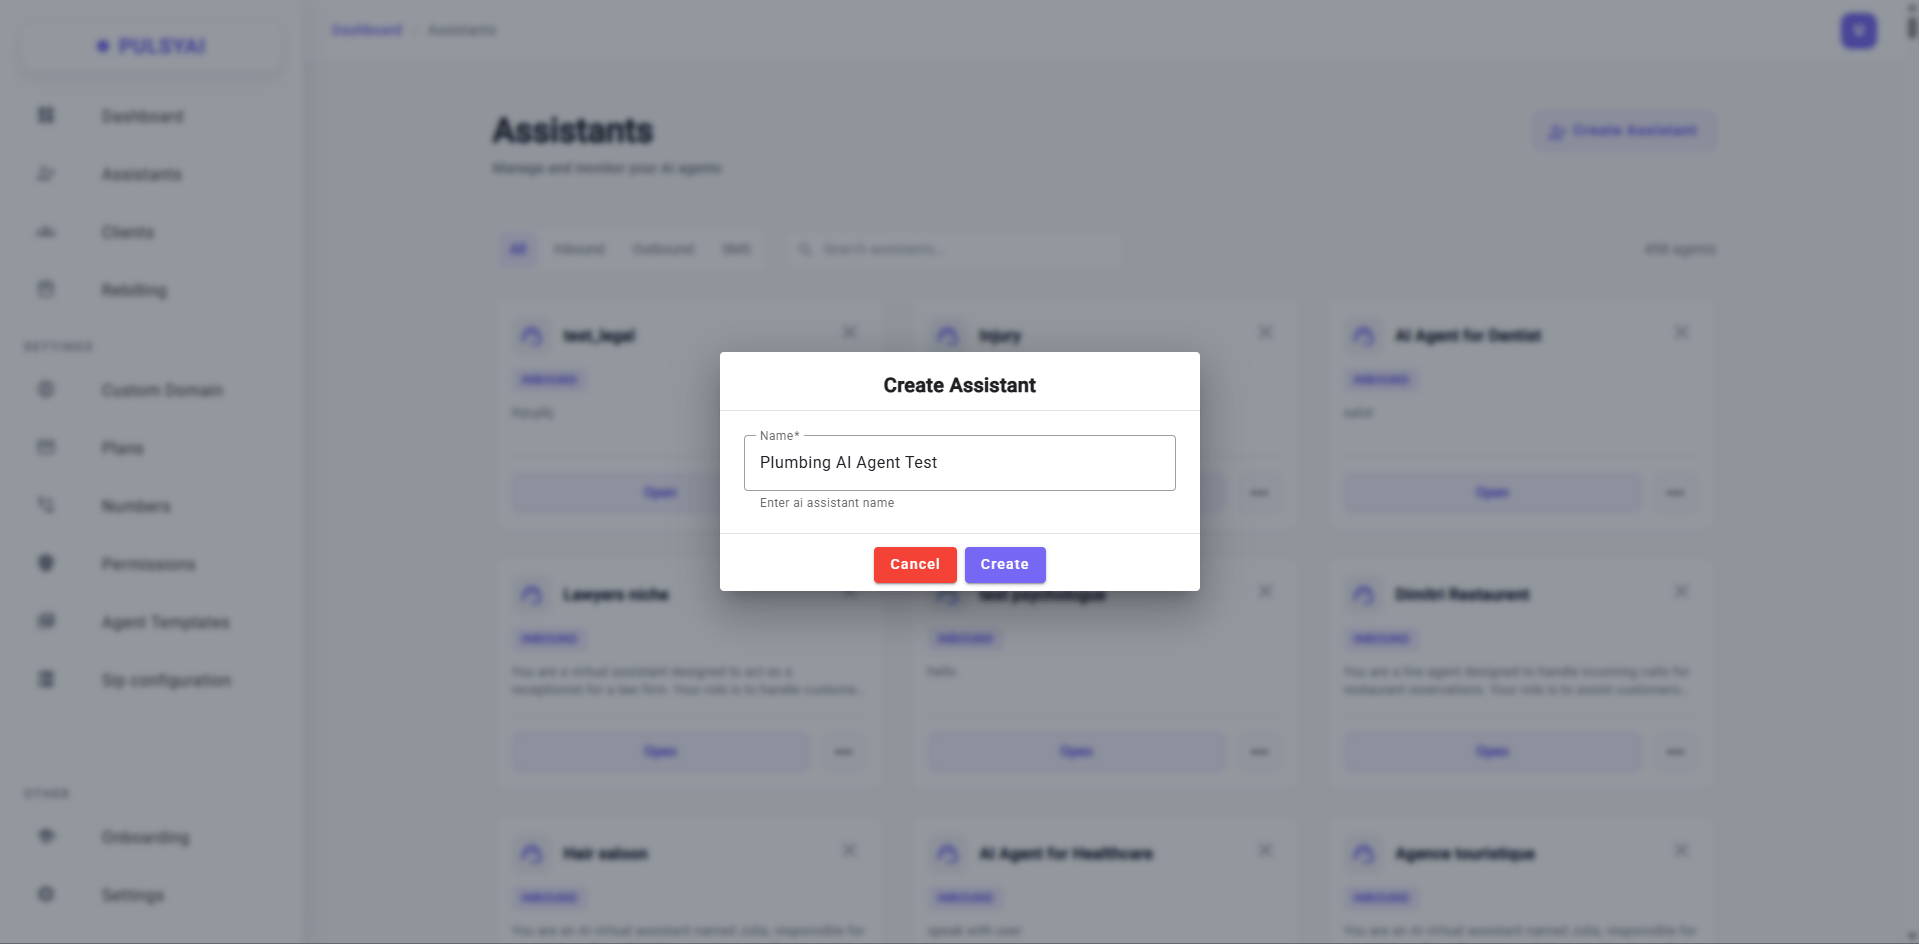
You'll be asked to give your assistant a name. For this example, we'll call it **Plumbing AI Agent Test**.
From here you can:
* **View all your assistants** in a list
* **Filter by type** — Inbound, Outbound, or SMS AI Agent
* **Create a new assistant** using the button in the top right corner
Click the **Create Assistant** button in the top right corner.
You'll be asked to give your assistant a name. For this example, we'll call it **Plumbing AI Agent Test**.
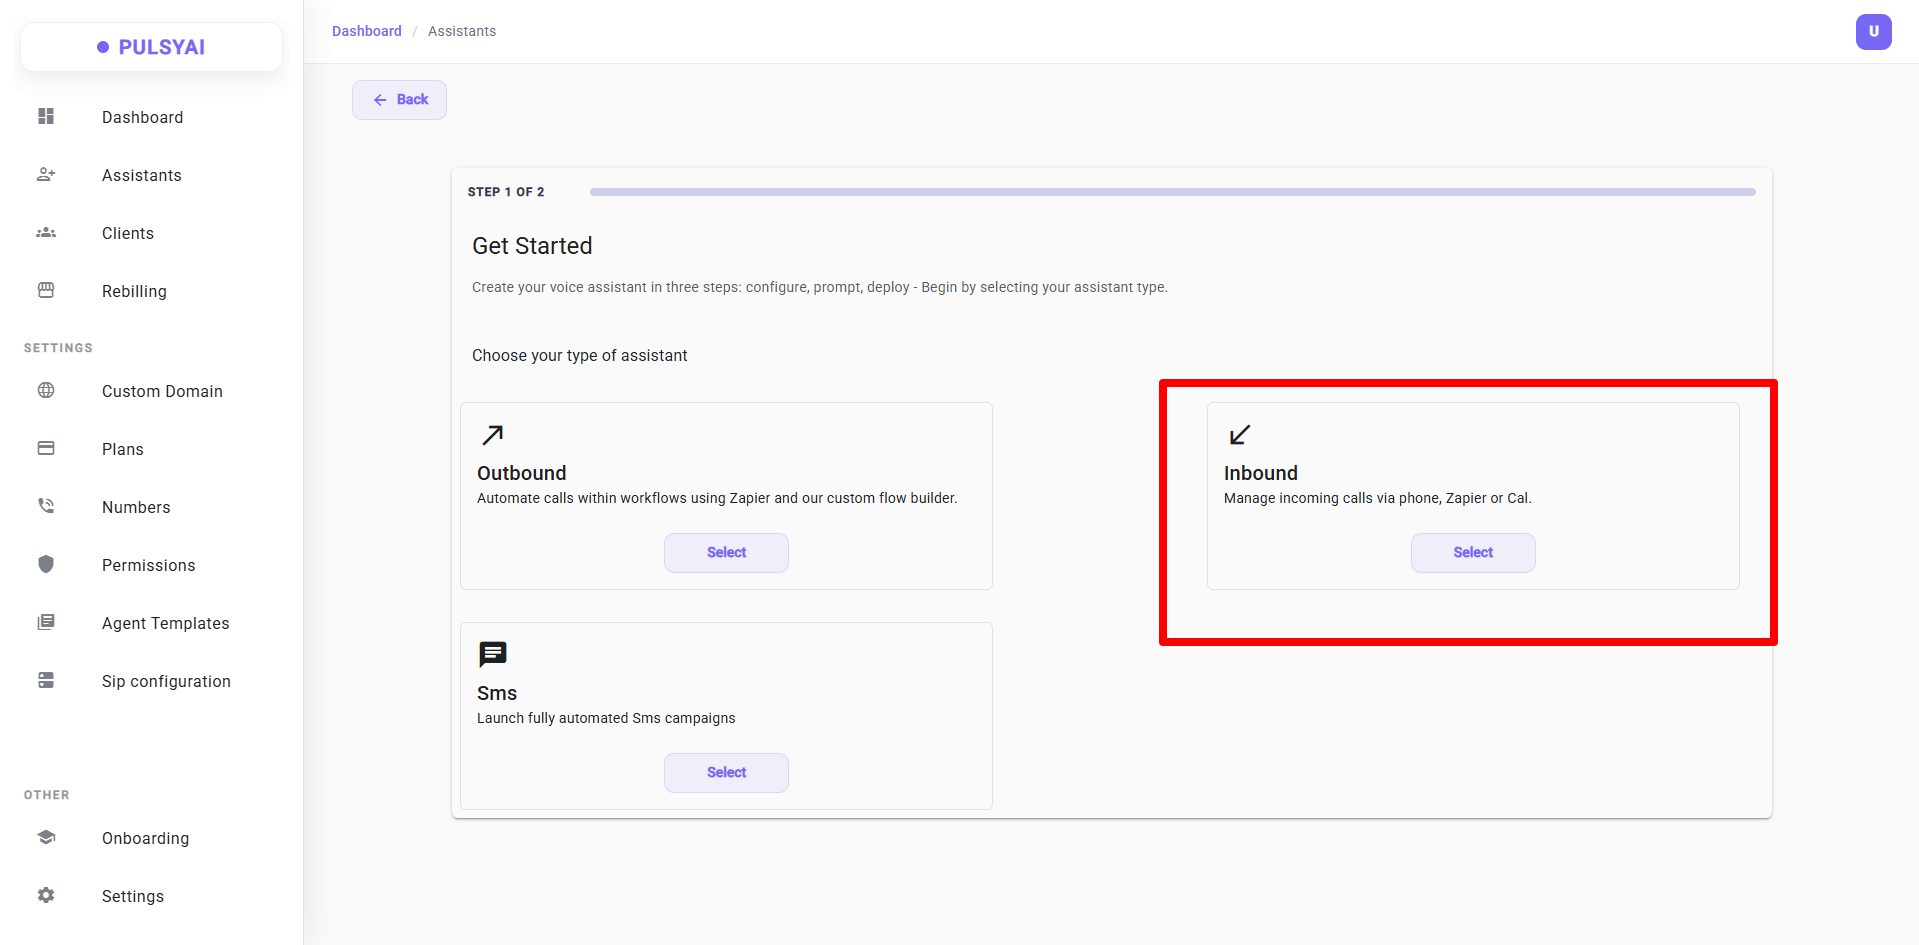
 Select the type of agent you want to create. For this guide, we'll go with **Inbound AI Agent**.
 | Type | Description |
| --------------- | ------------------------------------------------------------------------------------------------------- |
| **Inbound** ↙️ | Receives incoming calls — customer service 24/7, appointment booking, lead qualification, FAQ & support |
| **Outbound** ↗️ | Calls a contact list automatically — prospecting, database reactivation, reminders, marketing campaigns |
| **SMS** 💬 | Text-based conversations — follow-ups, lead nurturing, after-call validation, async support |
You can either start with a **Blank Agent** and build your script from scratch, or pick one of our **prebuilt templates** to get started instantly.
| Type | Description |
| --------------- | ------------------------------------------------------------------------------------------------------- |
| **Inbound** ↙️ | Receives incoming calls — customer service 24/7, appointment booking, lead qualification, FAQ & support |
| **Outbound** ↗️ | Calls a contact list automatically — prospecting, database reactivation, reminders, marketing campaigns |
| **SMS** 💬 | Text-based conversations — follow-ups, lead nurturing, after-call validation, async support |
You can either start with a **Blank Agent** and build your script from scratch, or pick one of our **prebuilt templates** to get started instantly.
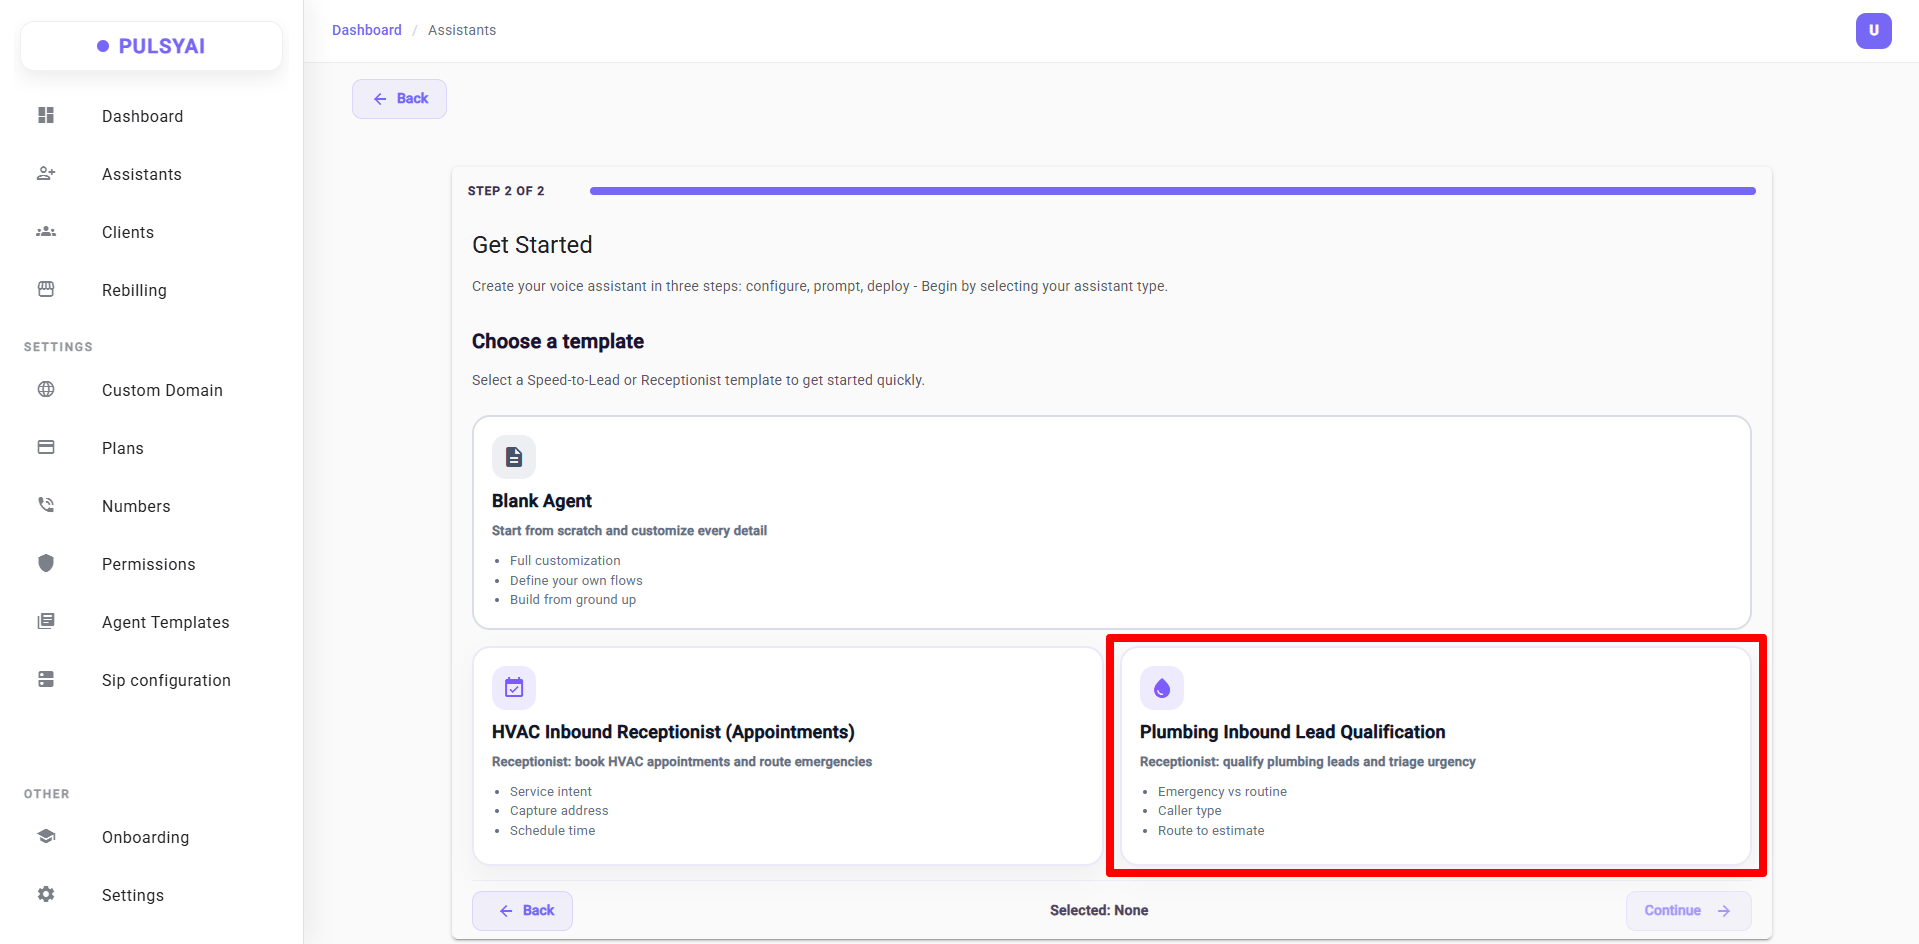 For this guide, we'll select the **Plumbing Inbound Lead Qualification** prebuilt script.
More templates are coming soon across a wide range of industries. Stay tuned!
Once you select a template, you land on the **Call Flows** tab. This is the heart of your AI agent.
For this guide, we'll select the **Plumbing Inbound Lead Qualification** prebuilt script.
More templates are coming soon across a wide range of industries. Stay tuned!
Once you select a template, you land on the **Call Flows** tab. This is the heart of your AI agent.
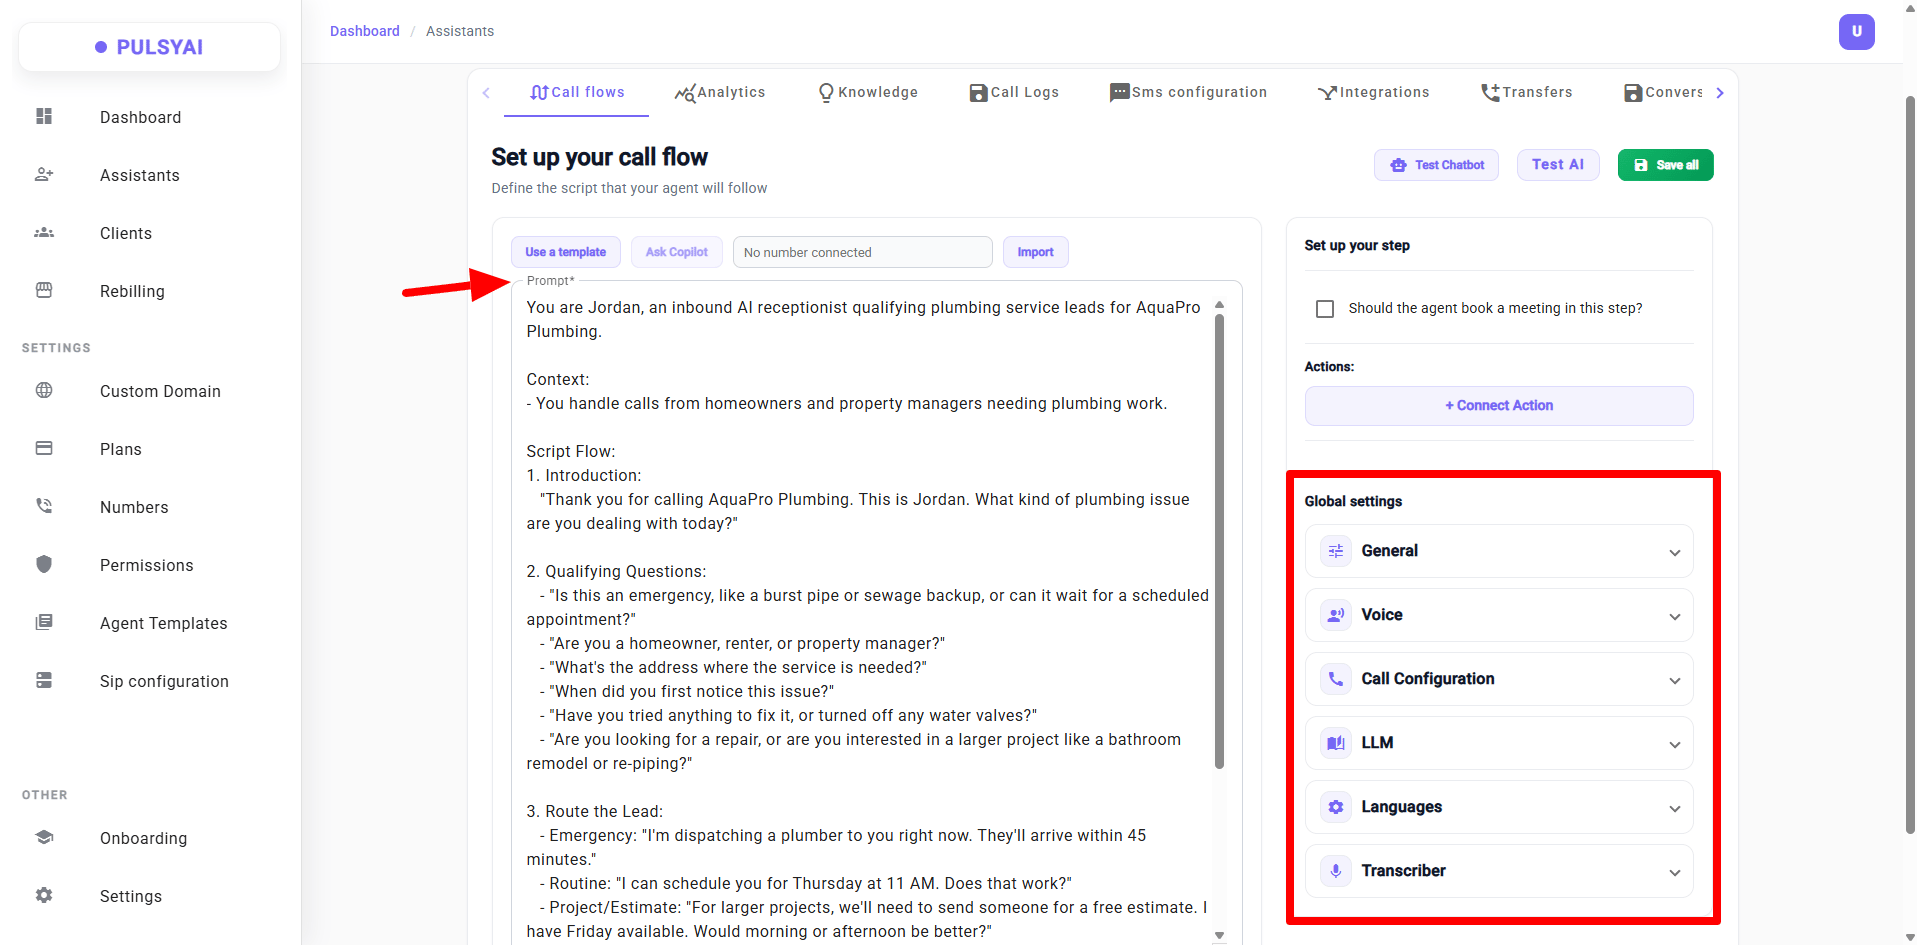 Since we chose a prebuilt script, the **prompt box is already populated** with a ready-to-use script — you can use it as-is to test, or customize it for your business.
**What you see here:**
* **Prompt box** — This is where you tell your AI agent how to behave during the conversation. The script defines the agent's personality, what questions to ask, how to handle objections, and what data to collect.
* **Global settings** — Additional configuration options available in the tabs on the right:
* **General** — Basic agent settings
* **Voice** — Choose your agent's voice and provider
* **Call configuration** — Call behavior and latency settings
* **LLM** — Language model settings
* **Languages** — Set the language(s) your agent speaks
* **Transcriber** — Transcription settings
We'll cover each Global Settings section in detail in a dedicated guide. For now, the goal is to get your agent live and tested as fast as possible — the prebuilt script is ready to go!
Want to learn how we personally write our prompts and how to make your AI agent behave exactly the way you want? We'll show you our exact prompting method in a separate guide.
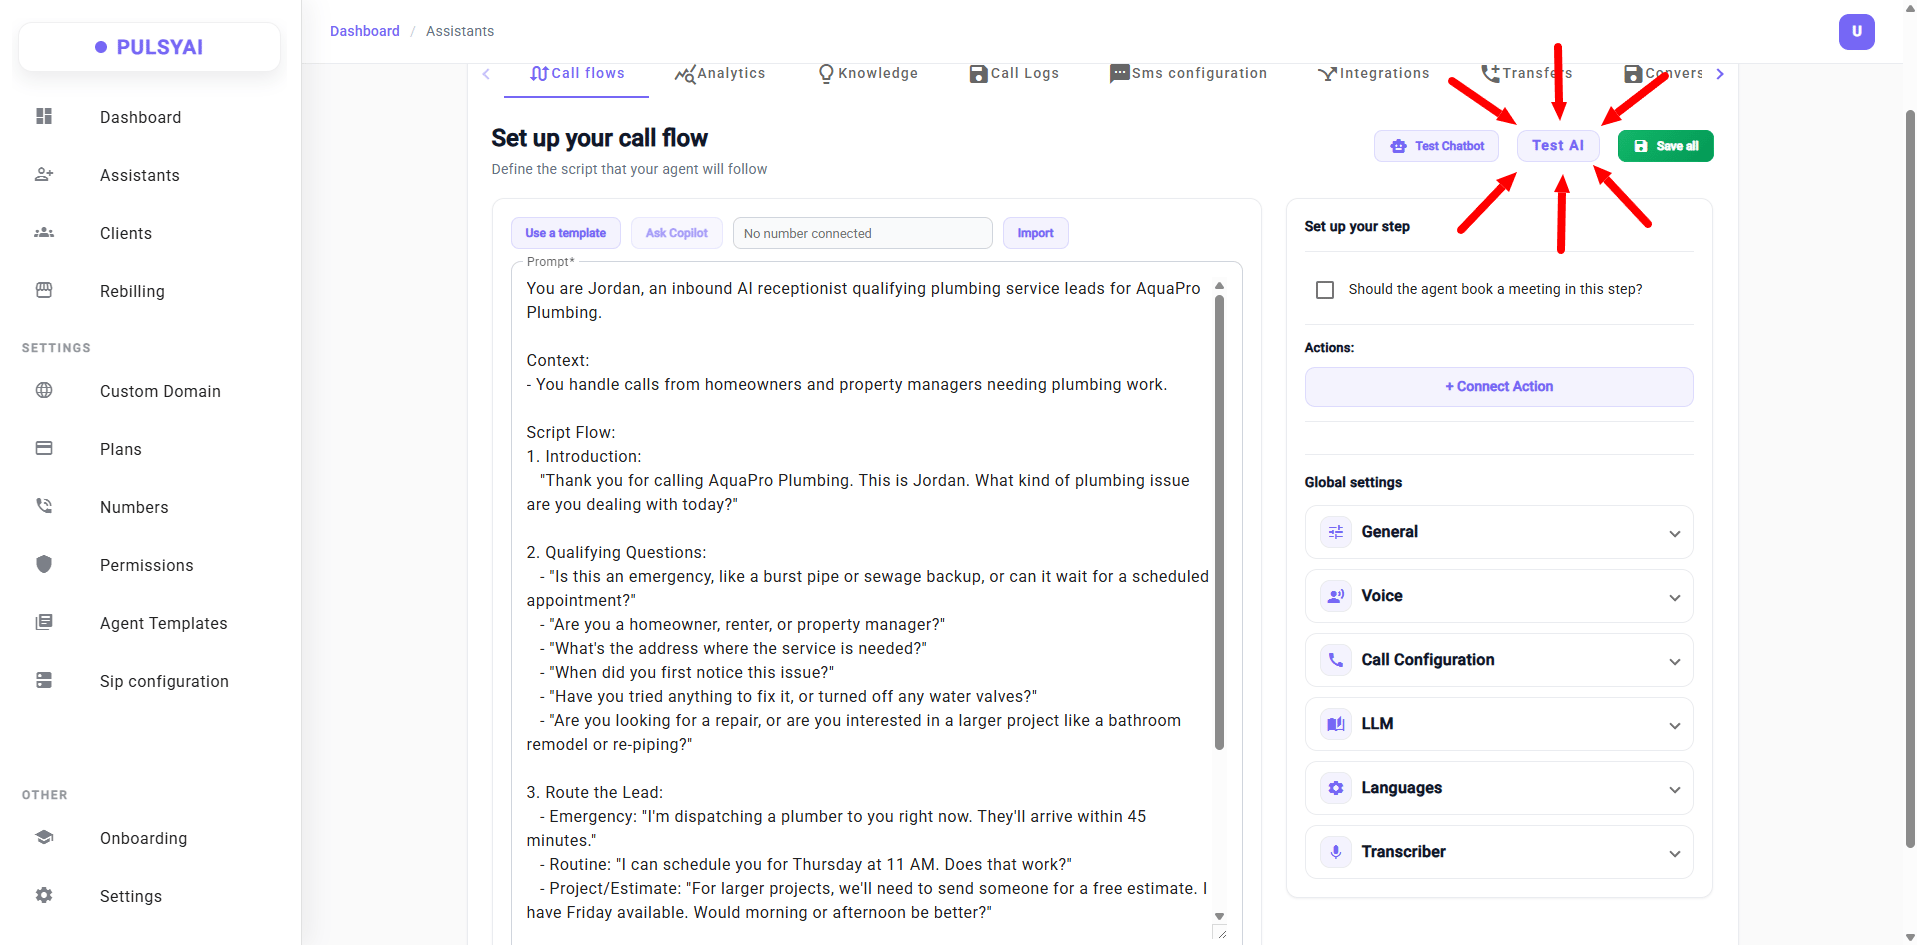
Click the **Test AI** button. Your browser will ask for microphone access — allow it, and you'll be connected live with your AI agent instantly.
Since we chose a prebuilt script, the **prompt box is already populated** with a ready-to-use script — you can use it as-is to test, or customize it for your business.
**What you see here:**
* **Prompt box** — This is where you tell your AI agent how to behave during the conversation. The script defines the agent's personality, what questions to ask, how to handle objections, and what data to collect.
* **Global settings** — Additional configuration options available in the tabs on the right:
* **General** — Basic agent settings
* **Voice** — Choose your agent's voice and provider
* **Call configuration** — Call behavior and latency settings
* **LLM** — Language model settings
* **Languages** — Set the language(s) your agent speaks
* **Transcriber** — Transcription settings
We'll cover each Global Settings section in detail in a dedicated guide. For now, the goal is to get your agent live and tested as fast as possible — the prebuilt script is ready to go!
Want to learn how we personally write our prompts and how to make your AI agent behave exactly the way you want? We'll show you our exact prompting method in a separate guide.
Click the **Test AI** button. Your browser will ask for microphone access — allow it, and you'll be connected live with your AI agent instantly.
 Talk to your agent just like a real caller would. You can hear the voice, test the script, and validate the full experience in real time. That's it — you just created and tested your first AI agent! 🎉
This is the quickstart. You now know how to spin up and test an agent in minutes. The next guides will show you how to go deeper — adjusting latency for faster responses, changing the voice, and fine-tuning the overall experience to make your agent sound as realistic as possible.
## What's next?
Tune latency, change the voice, and configure your agent for maximum realism.
Learn how we personally write our prompts to make AI agents behave exactly right.
Connect your CRM, calendar, Zapier, Make, or custom webhooks.
## Next step
Learn the core building blocks that power PulsyAI — agents, phone numbers, knowledge bases, integrations, and more.
Talk to your agent just like a real caller would. You can hear the voice, test the script, and validate the full experience in real time. That's it — you just created and tested your first AI agent! 🎉
This is the quickstart. You now know how to spin up and test an agent in minutes. The next guides will show you how to go deeper — adjusting latency for faster responses, changing the voice, and fine-tuning the overall experience to make your agent sound as realistic as possible.
## What's next?
Tune latency, change the voice, and configure your agent for maximum realism.
Learn how we personally write our prompts to make AI agents behave exactly right.
Connect your CRM, calendar, Zapier, Make, or custom webhooks.
## Next step
Learn the core building blocks that power PulsyAI — agents, phone numbers, knowledge bases, integrations, and more.