> ## Documentation Index
> Fetch the complete documentation index at: https://docs.pulsyai.com/llms.txt
> Use this file to discover all available pages before exploring further.
# Phone Numbers
> Purchase numbers in-app or import existing numbers from Twilio, Telnyx, or your own carrier via SIP trunk, then assign them to your PulsyAI assistants.
Phone numbers are assigned to your assistants. You can purchase numbers directly inside PulsyAI, or import existing numbers from Twilio, Telnyx, or your own carrier via SIP trunk. All numbers are managed under **Numbers** in the main menu.
***
## E.164 Format
All imported phone numbers must be entered in **E.164 format**. This means the number starts with a `+` sign, followed by the country code, followed by the number — with no spaces, dashes, or parentheses.
| Country | Example |
| ---------------------- | --------------- |
| United States / Canada | `+14385950345` |
| United Kingdom | `+447911123456` |
| France | `+33612345678` |
The country code `+1` covers both the United States and Canada. Other countries use their own code, such as `+44` for the UK or `+33` for France.
***
## Buying a Number In-App
The fastest way to get a phone number is to buy one directly inside PulsyAI through the built-in store. No external provider account is required.
Navigate to **Numbers** in the main menu.
Filter by country, and optionally enter specific digits or an area code to narrow results.
Select an available number and confirm the purchase. The number is added to your account, ready to assign to an agent.
Phone numbers purchased directly in PulsyAI can only be used for **inbound AI agents** — not outbound — as a security measure. To get a number for an outbound agent, import a number from Twilio or Telnyx, or connect your own carrier via SIP trunk.
***
## Two Ways to Import a Phone Number
There are two entry points to open the import modal.
### Option 1 — From the Numbers section
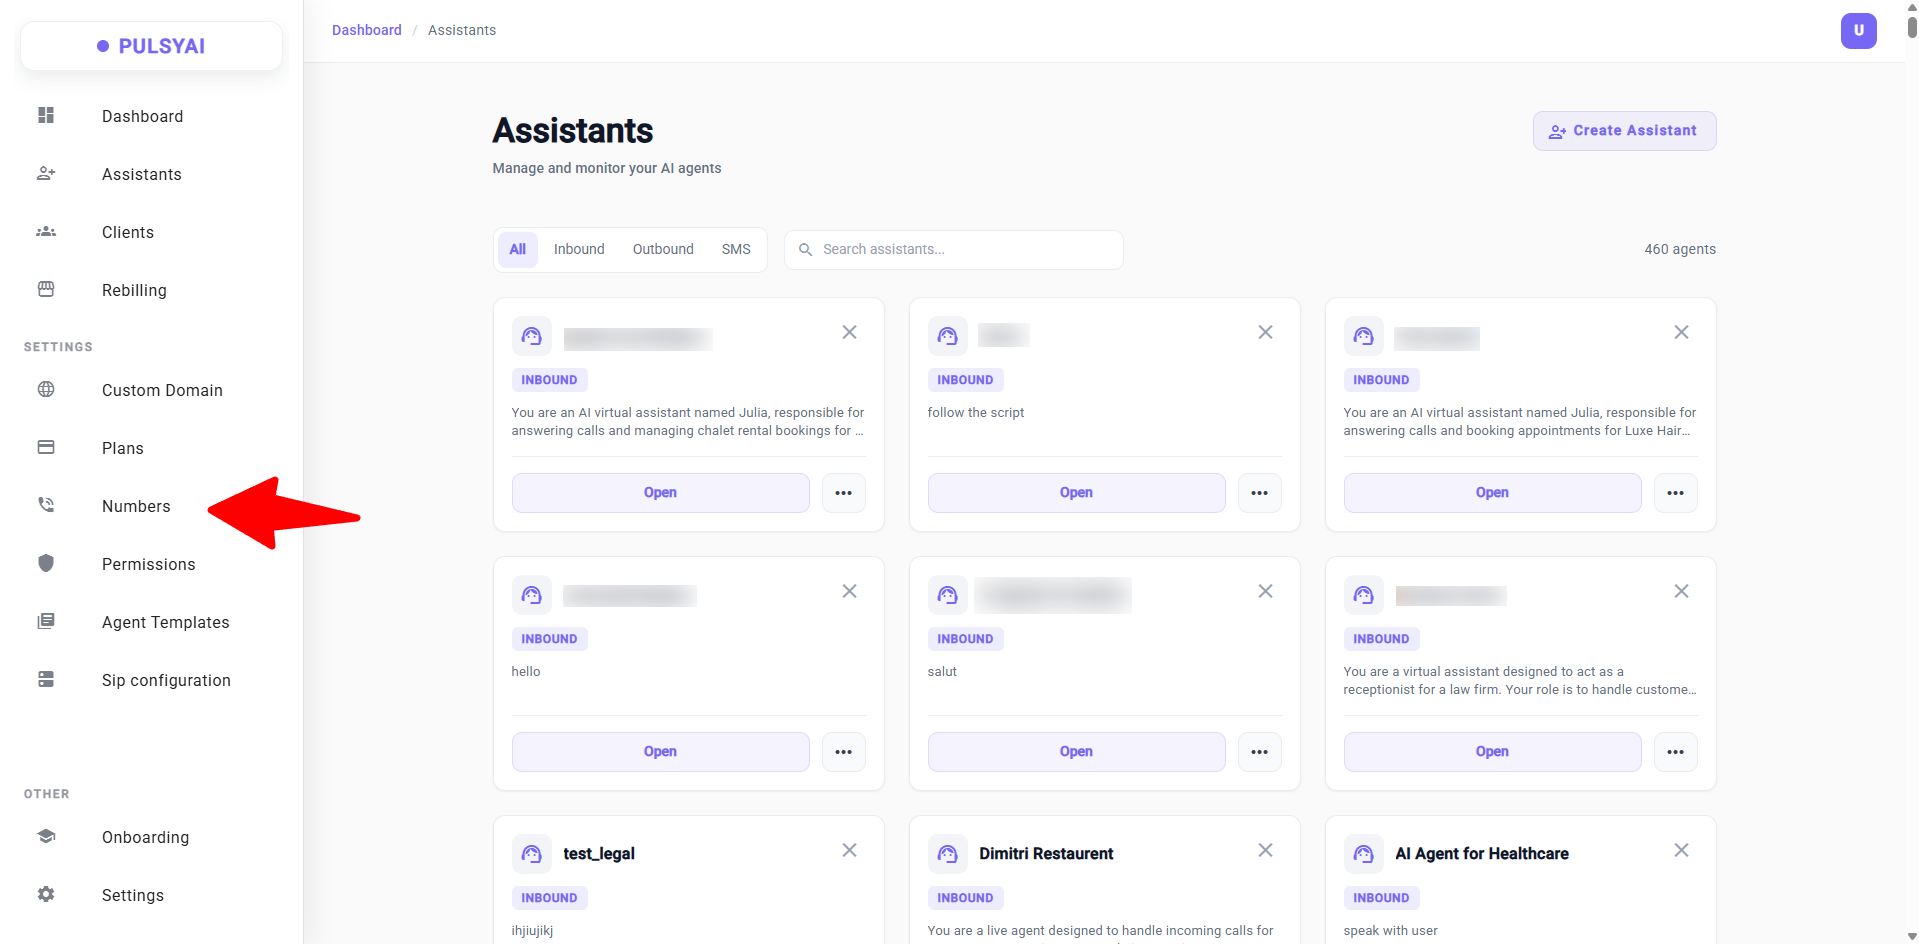
Navigate to the **Numbers** section in the left sidebar. This is the dedicated area for managing all phone numbers across your account.
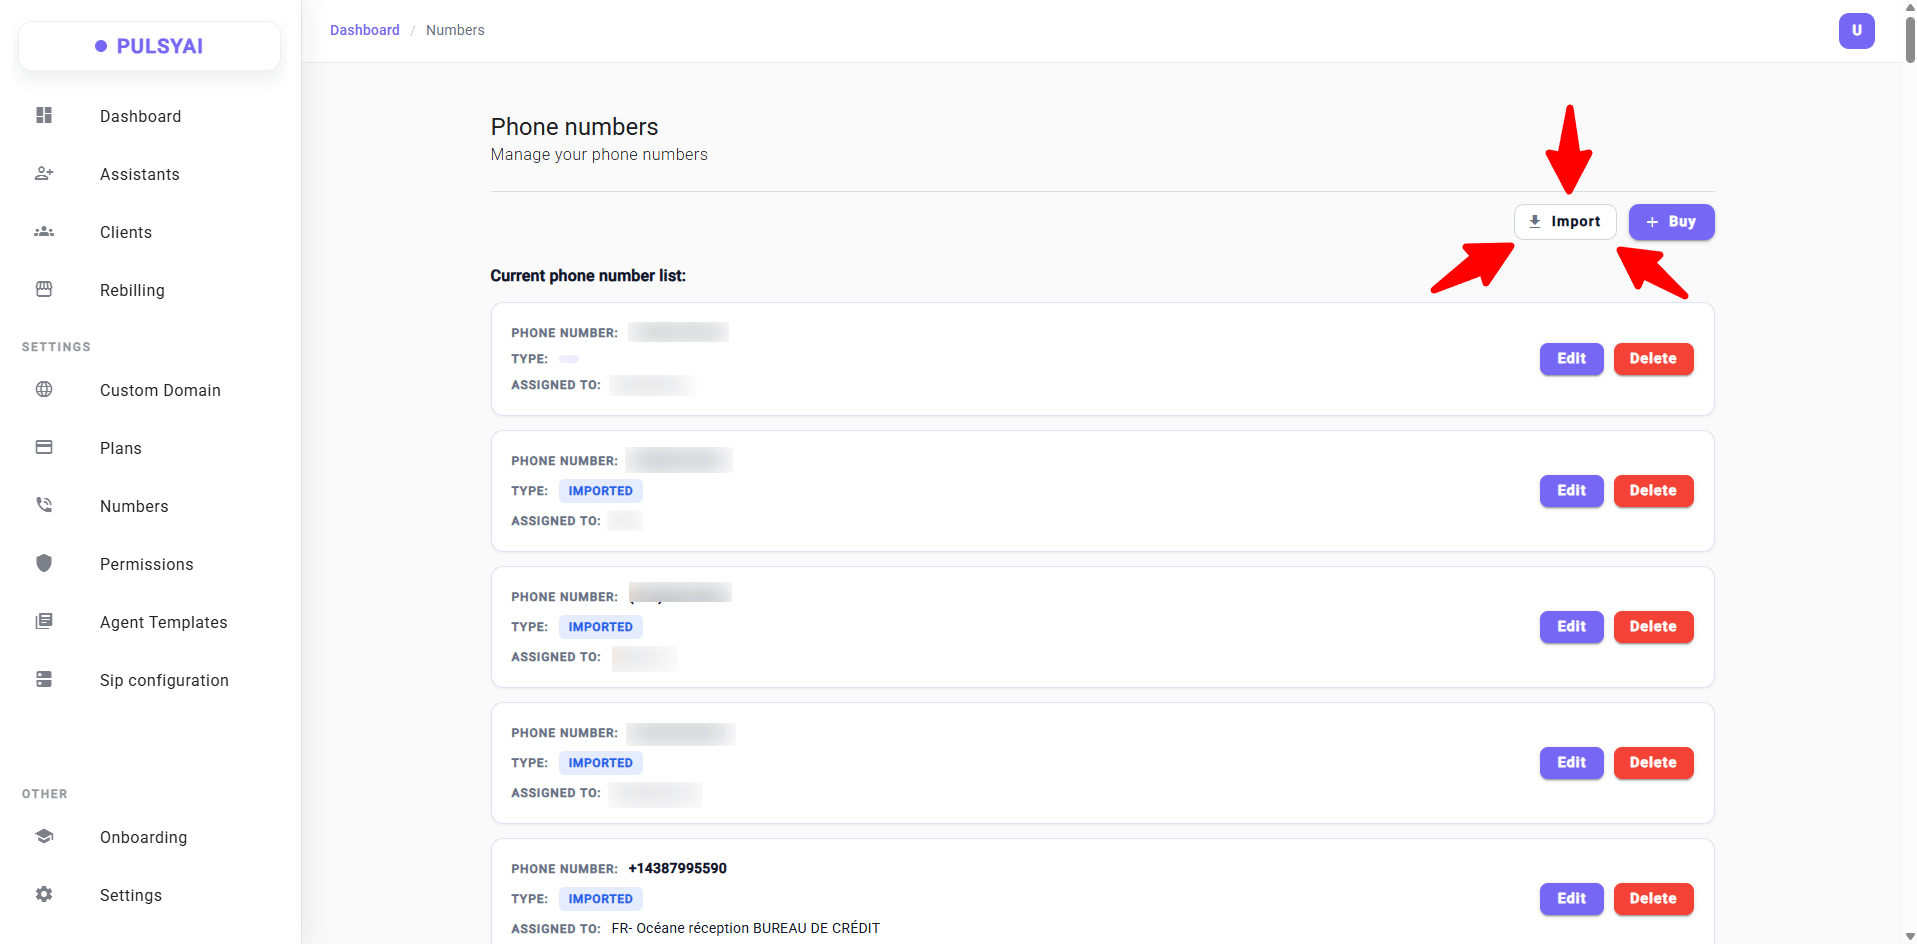
Once inside, you will land on the Numbers page where all your existing numbers are listed. Click **Import** to open the import modal.
 ### Option 2 — From within an AI Assistant
You can also import a number directly from inside an assistant. Open the assistant, go to the **Call Flows** tab, and you will find the option to assign or import a phone number from there.
### Option 2 — From within an AI Assistant
You can also import a number directly from inside an assistant. Open the assistant, go to the **Call Flows** tab, and you will find the option to assign or import a phone number from there.
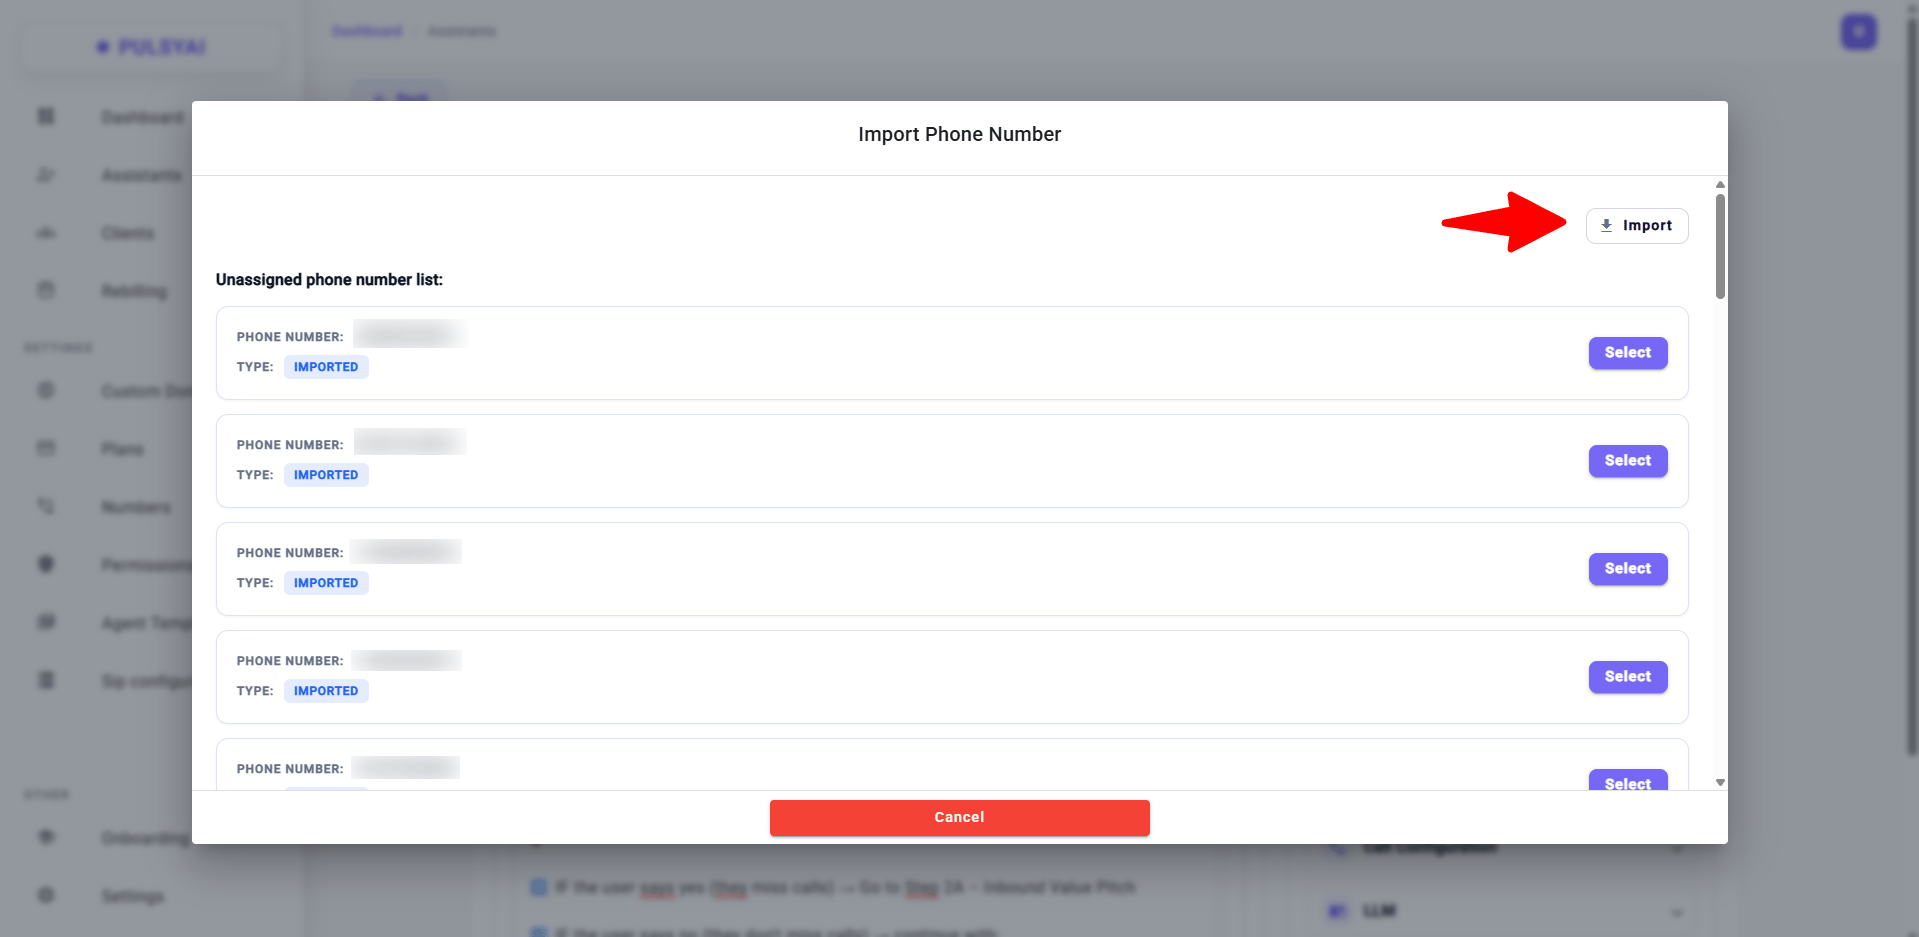
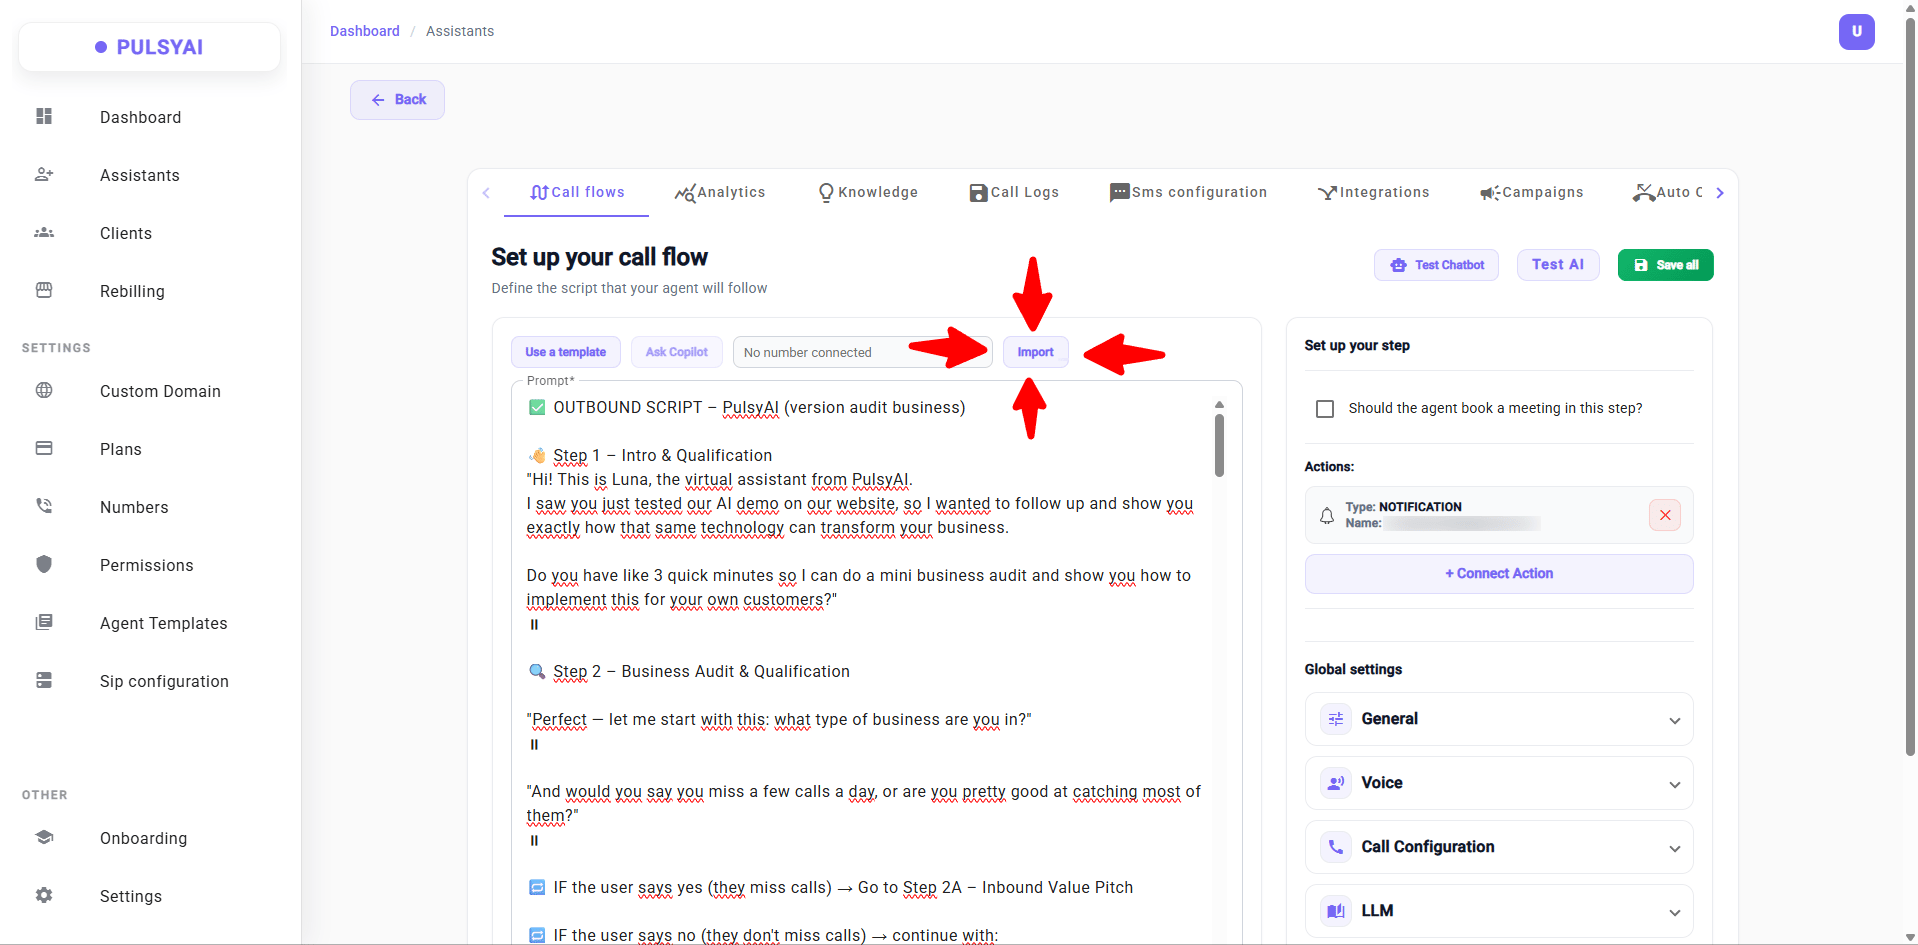 Click **Import** to open the same import modal.
 ***
## Twilio
In the import modal, select the **Twilio** tab. Fill in the following 4 fields:
***
## Twilio
In the import modal, select the **Twilio** tab. Fill in the following 4 fields:
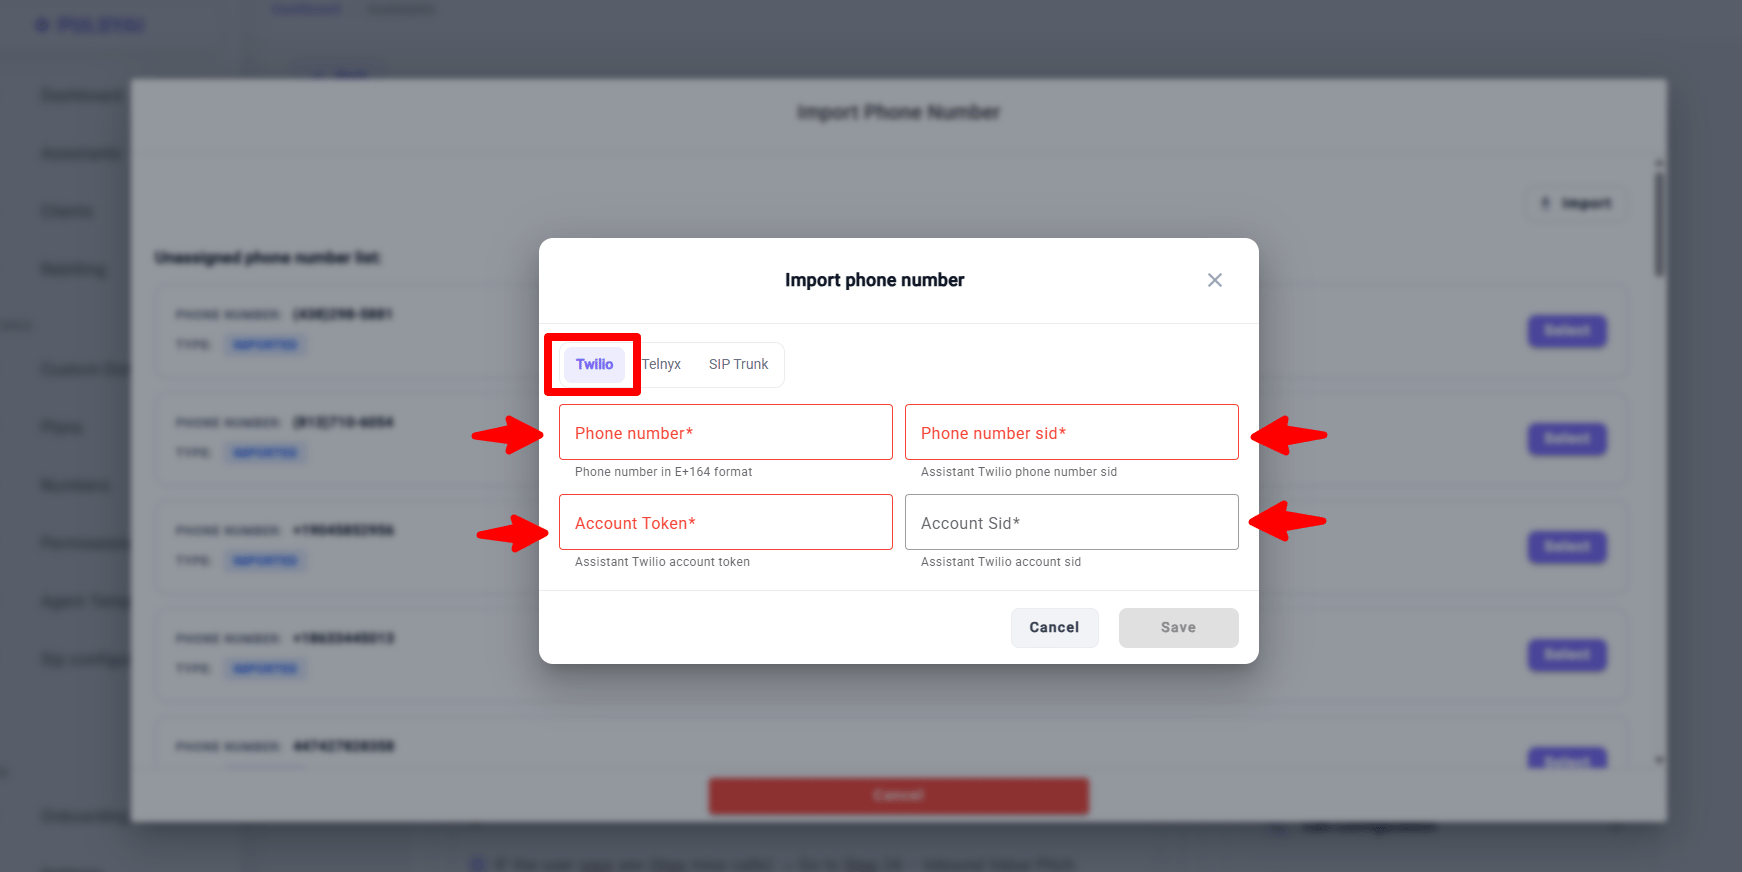 Here is where to find each value in your Twilio account.
### Step 1 — Purchase a phone number in Twilio
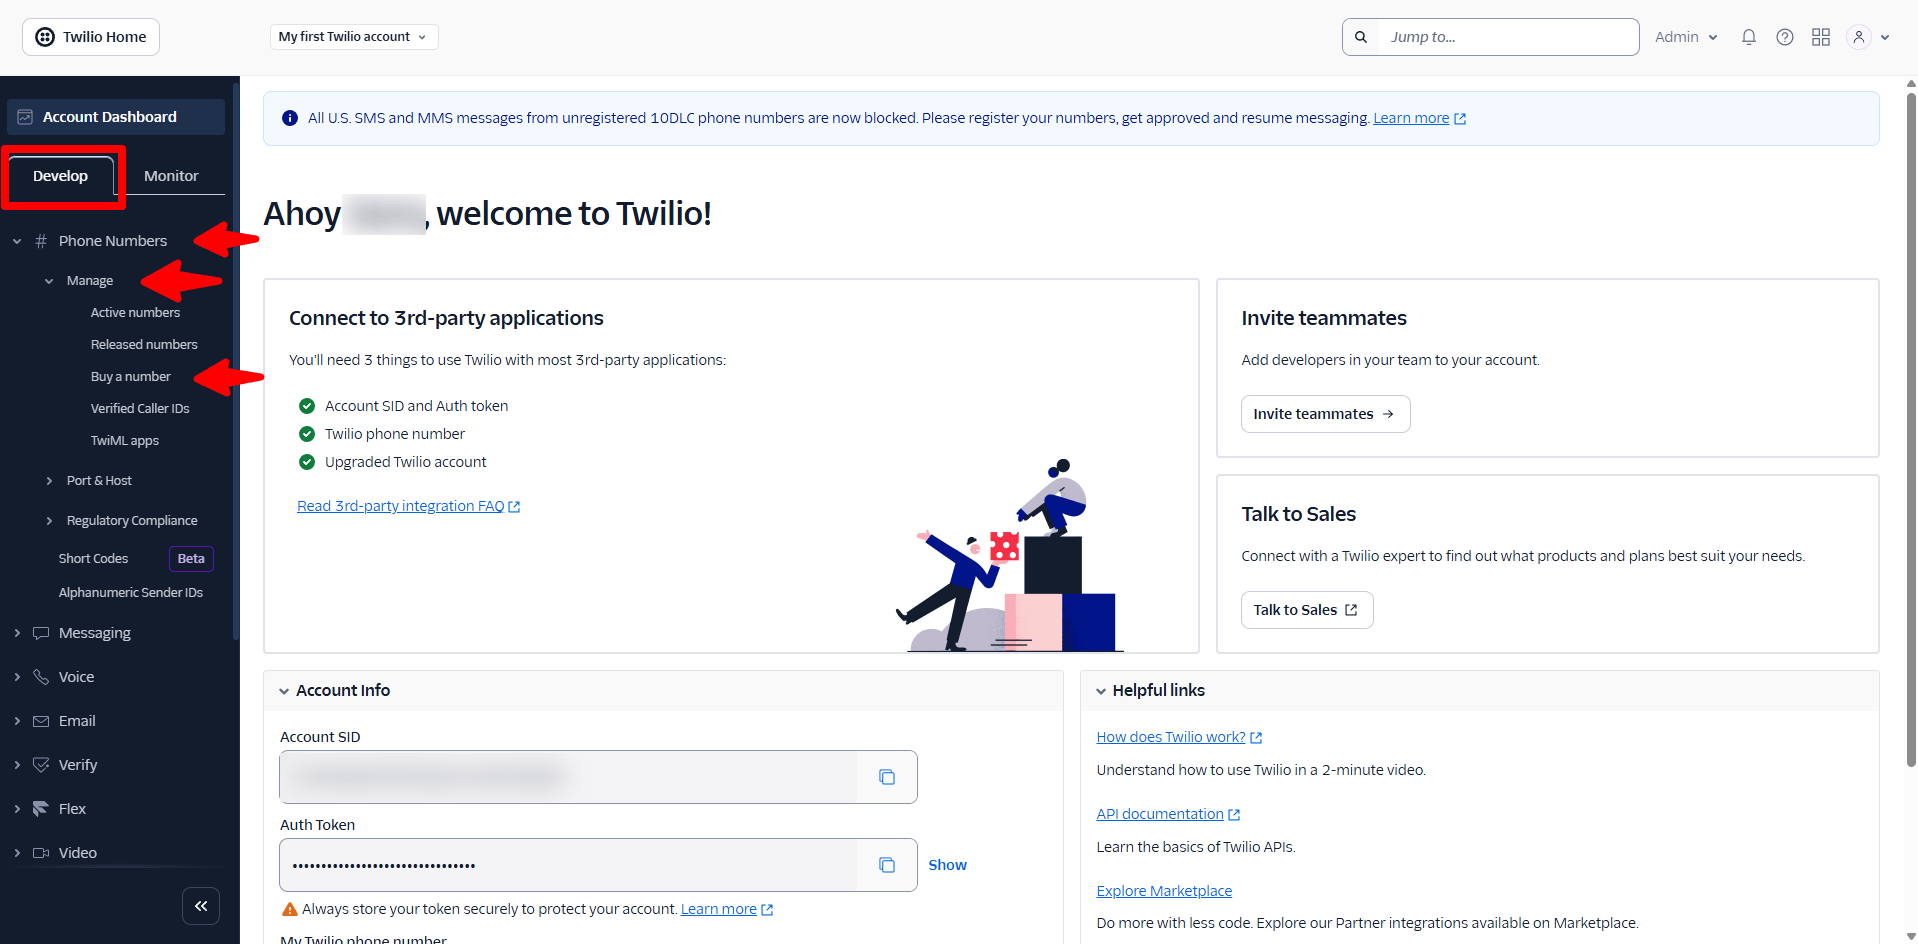
Before importing, you need an active phone number in your Twilio account. In the Twilio console, go to **Develop → Phone Numbers → Buy a Number**.
Here is where to find each value in your Twilio account.
### Step 1 — Purchase a phone number in Twilio
Before importing, you need an active phone number in your Twilio account. In the Twilio console, go to **Develop → Phone Numbers → Buy a Number**.
 On the search page, filter by **country**, and optionally enter specific digits or an area code to narrow results. Click **Search** to see available numbers.
Before clicking **Buy**, make sure the number shows the **Voice** (📞) capability icon — this confirms the number can handle calls. Once you find the right number, click **Buy** to purchase it.
On the search page, filter by **country**, and optionally enter specific digits or an area code to narrow results. Click **Search** to see available numbers.
Before clicking **Buy**, make sure the number shows the **Voice** (📞) capability icon — this confirms the number can handle calls. Once you find the right number, click **Buy** to purchase it.
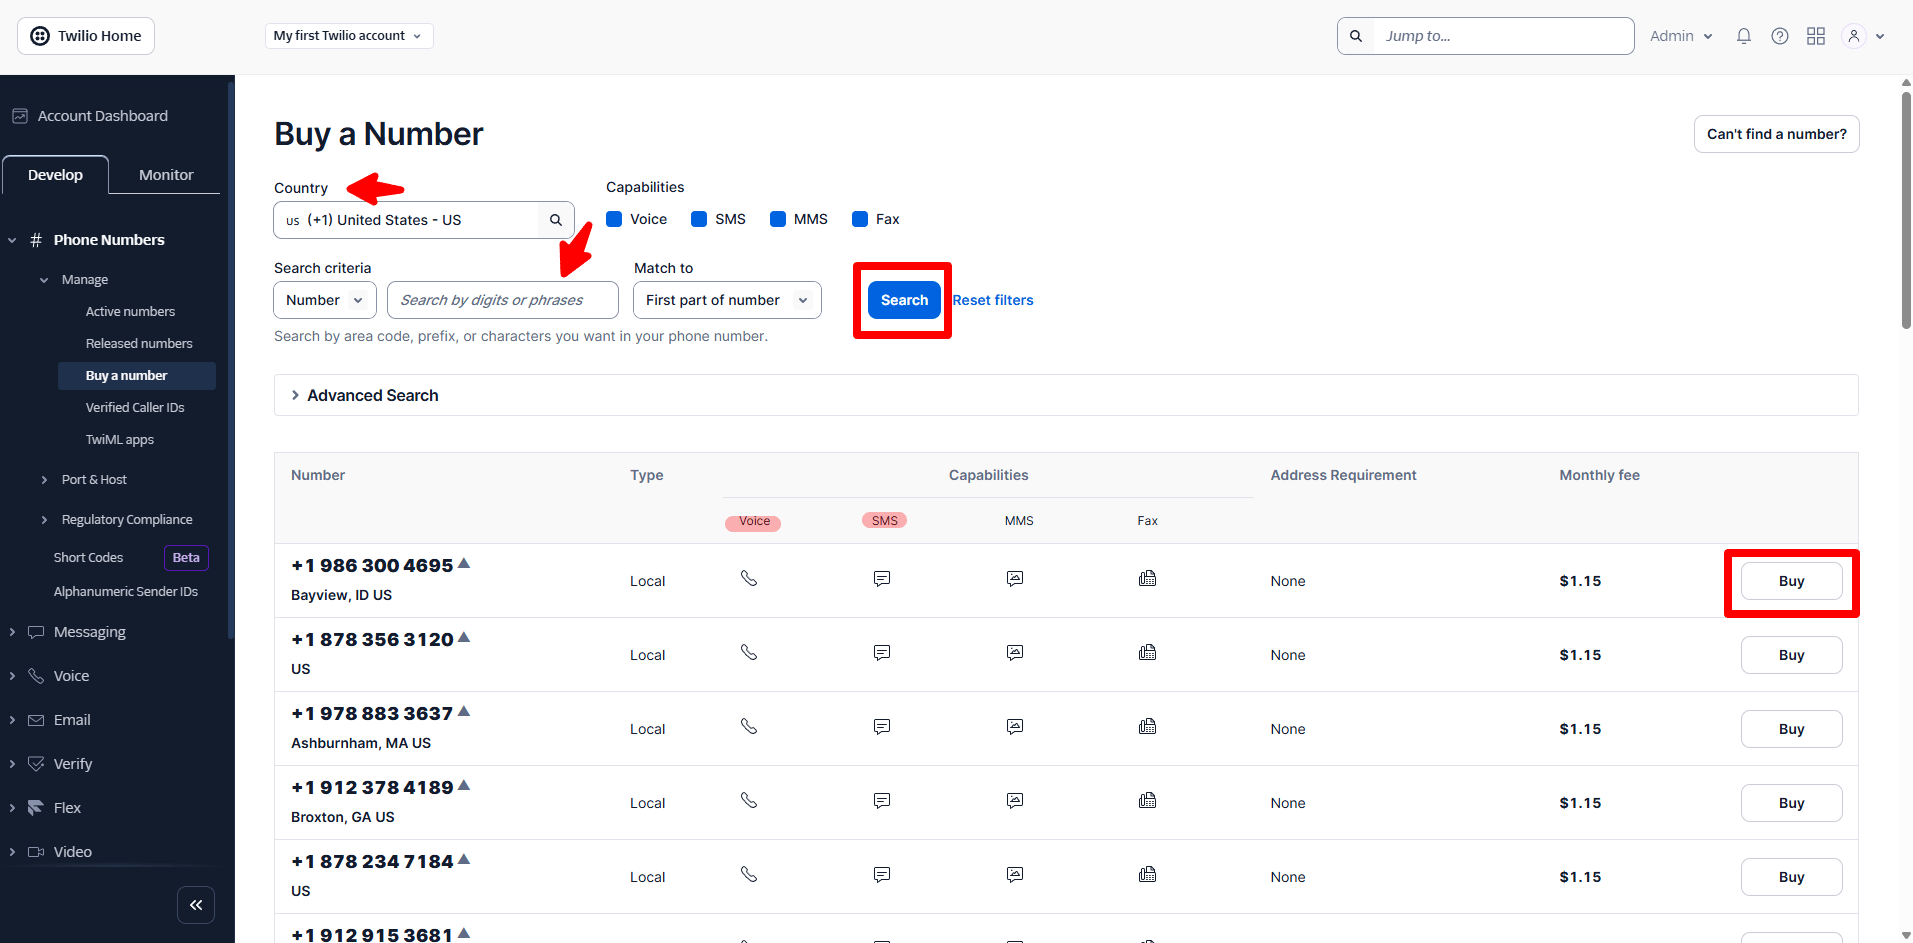 If you also want your assistant to send or receive SMS, make sure the number also shows the **SMS** (💬) capability icon. If you only need voice calls, SMS is not required.
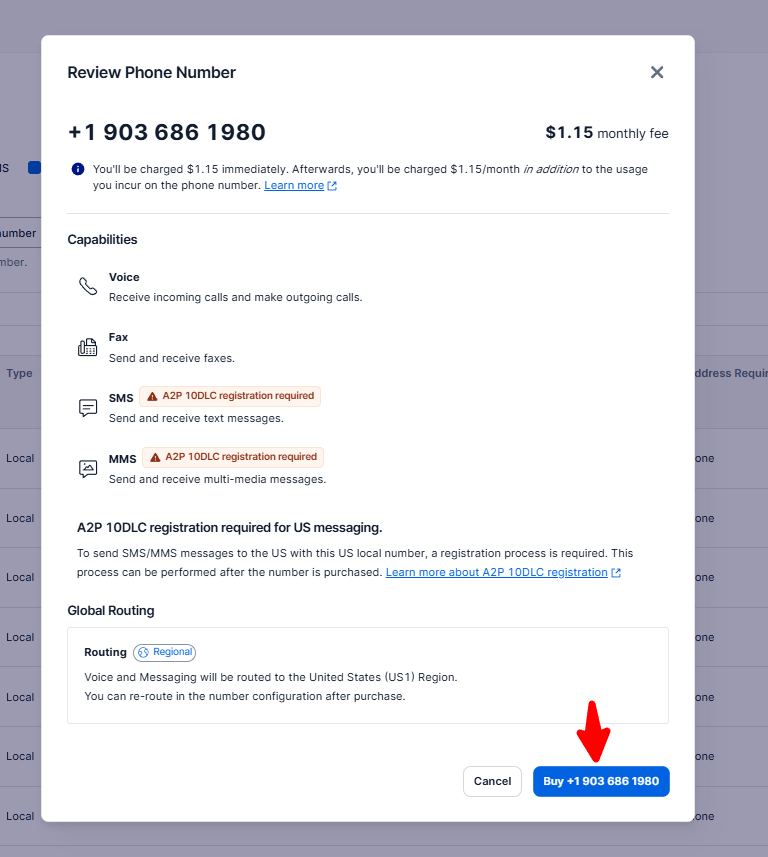
A confirmation screen will appear — click **Buy** once more to confirm the purchase.
If you also want your assistant to send or receive SMS, make sure the number also shows the **SMS** (💬) capability icon. If you only need voice calls, SMS is not required.
A confirmation screen will appear — click **Buy** once more to confirm the purchase.
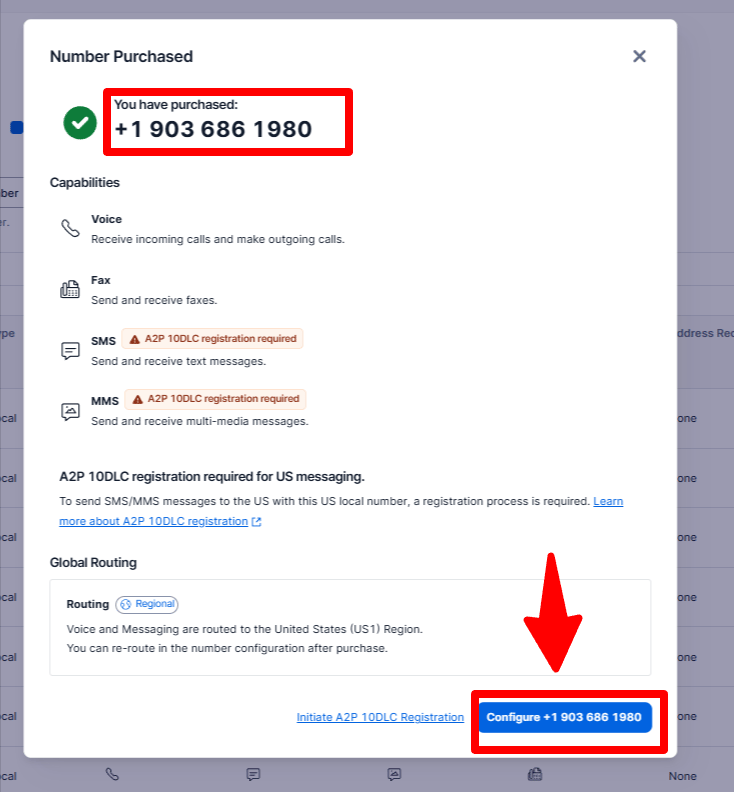
 Once purchased, you will be taken to your active numbers list. Copy the phone number shown (highlighted in the screenshot) and paste it into the **Phone number** field in the PulsyAI import modal. Then click **Configure** to access the number's settings.
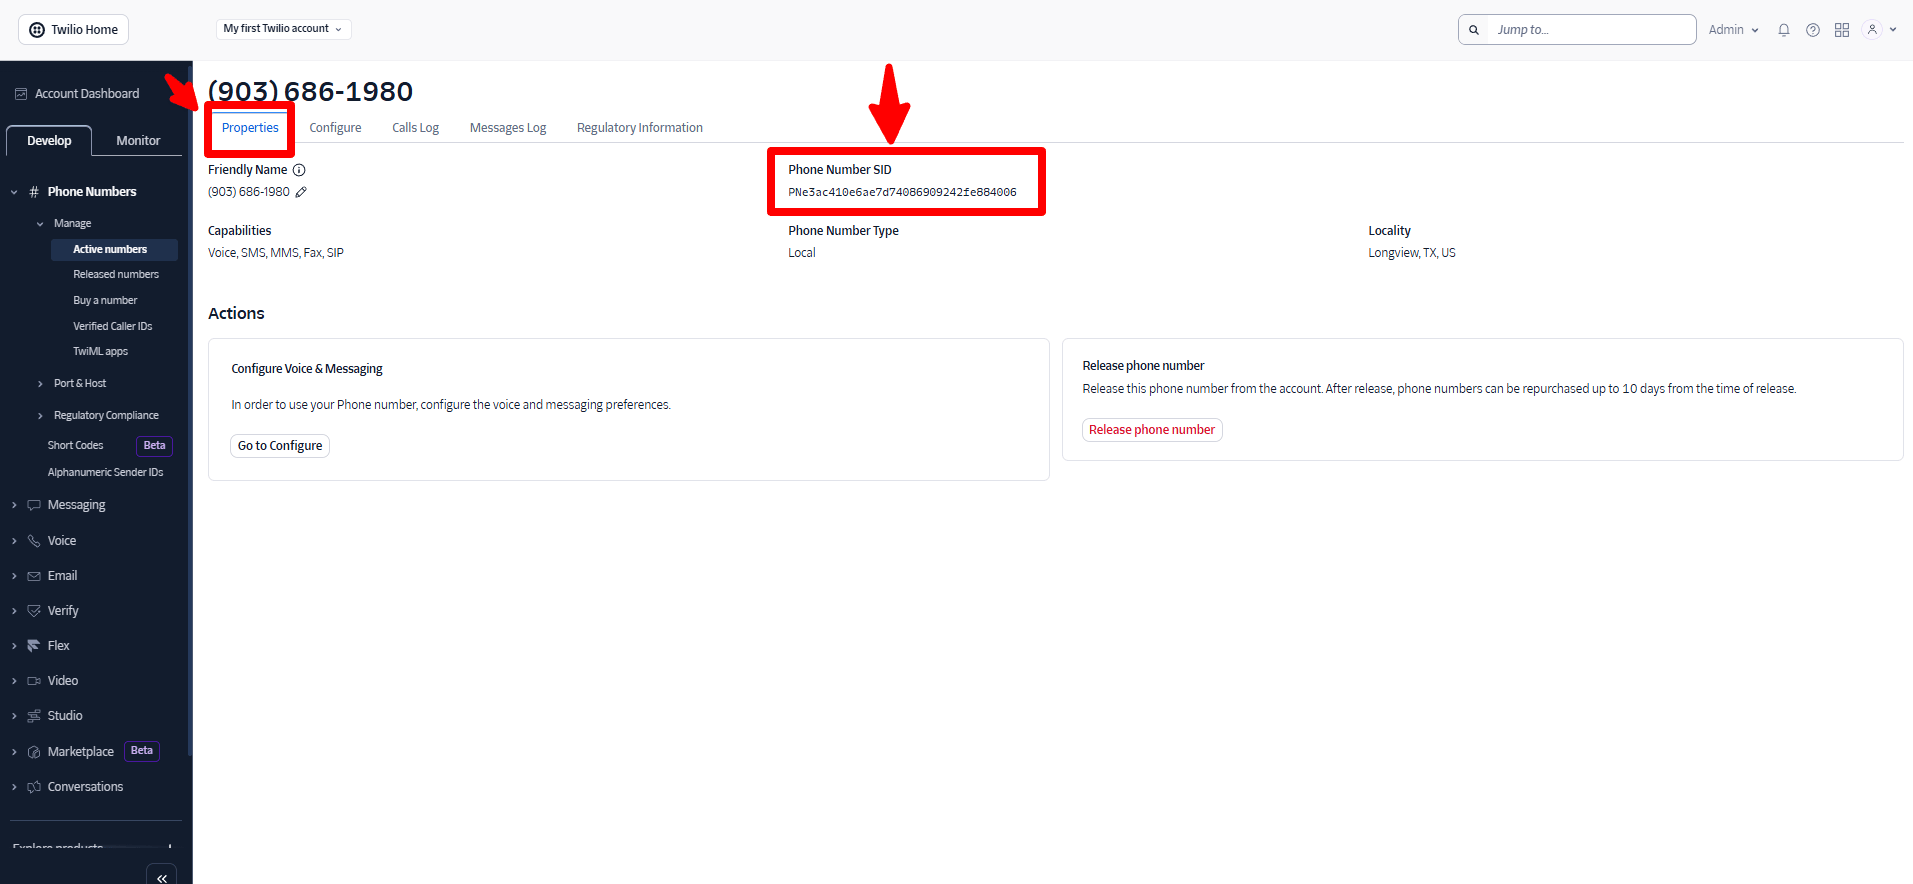
 Inside the number's configuration page, click **Properties**. Your **Phone number SID** is displayed there — copy it and paste it into the corresponding field in PulsyAI.
 ### Step 2 — Get your Account SID and Auth Token
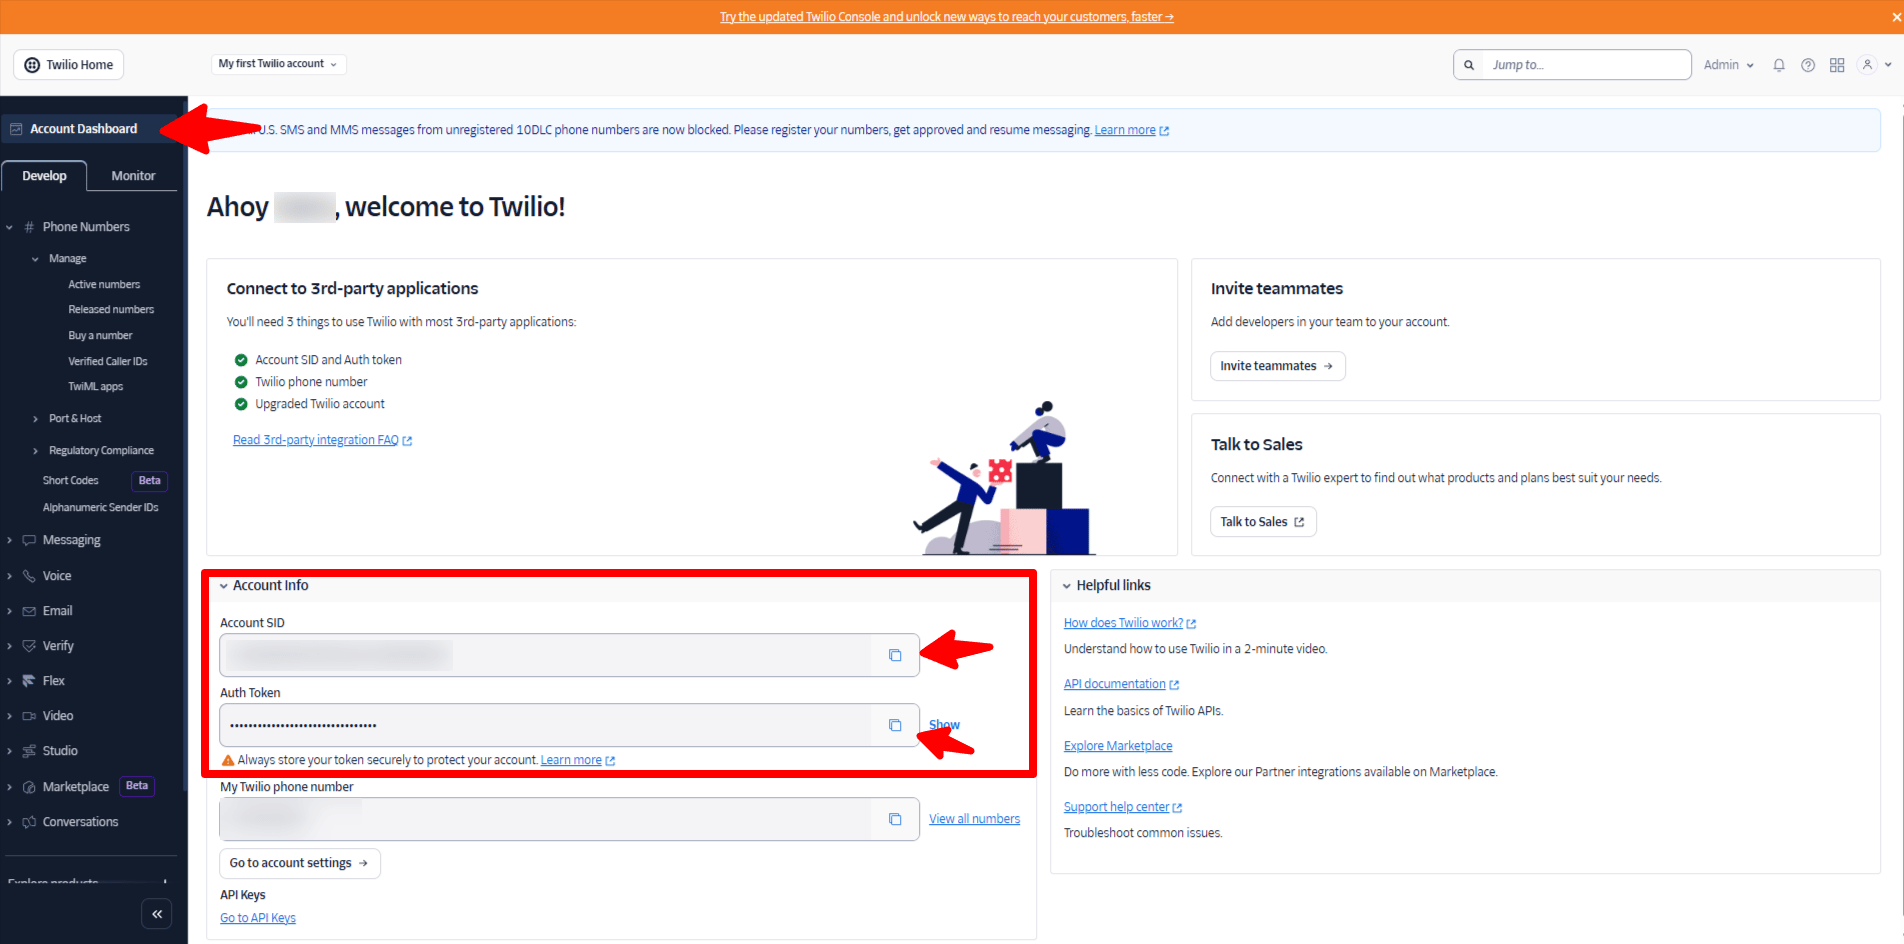
Navigate to the **Account Dashboard** in your Twilio console. Your **Account SID** and **Auth Token** are both displayed there. Click the copy icon (□) next to each value to copy them, then paste them into the corresponding fields in PulsyAI.
### Step 2 — Get your Account SID and Auth Token
Navigate to the **Account Dashboard** in your Twilio console. Your **Account SID** and **Auth Token** are both displayed there. Click the copy icon (□) next to each value to copy them, then paste them into the corresponding fields in PulsyAI.
 ### Step 3 — Save in PulsyAI
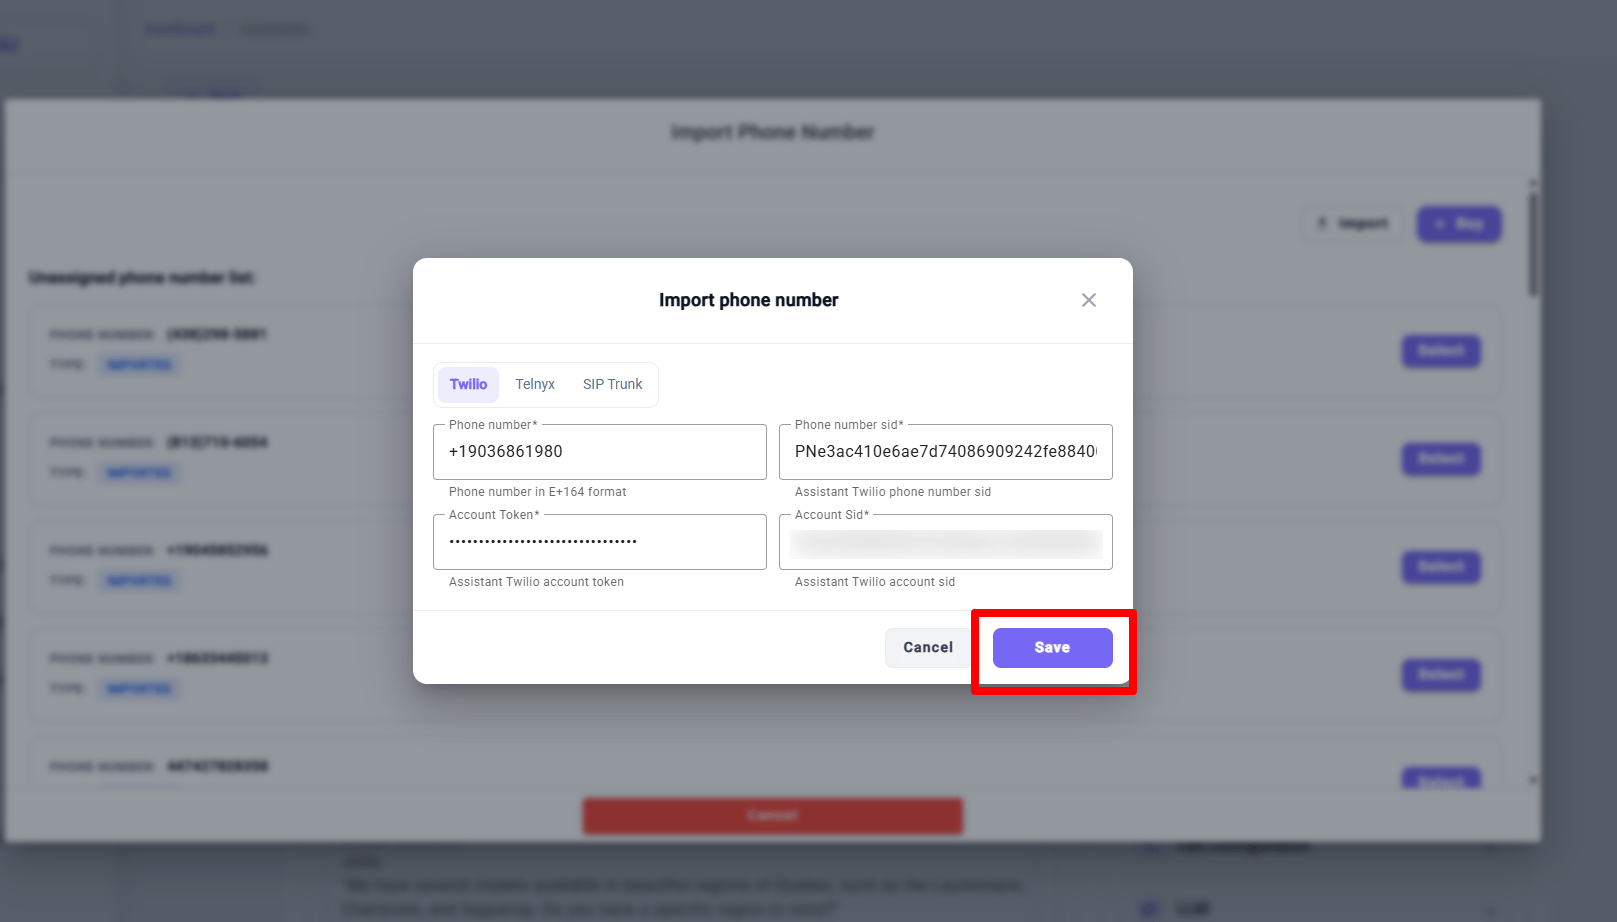
Once all four fields are filled in, click **Save** to complete the import.
### Step 3 — Save in PulsyAI
Once all four fields are filled in, click **Save** to complete the import.
 ### Step 4 — Select the number and assign it to your assistant
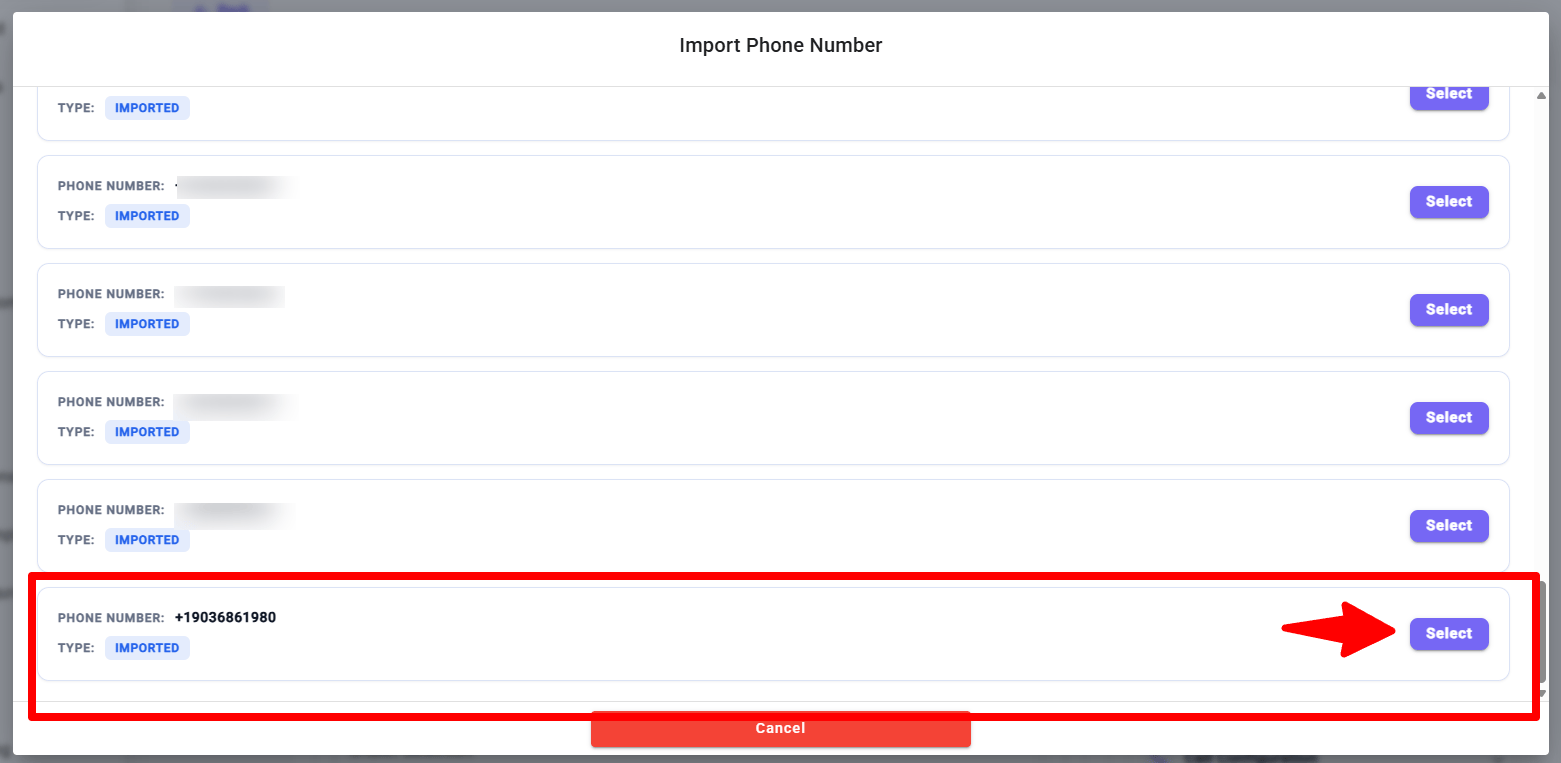
Your imported number now appears in the dropdown. Select it to attach it to your AI agent — and that's it, the number is live.
### Step 4 — Select the number and assign it to your assistant
Your imported number now appears in the dropdown. Select it to attach it to your AI agent — and that's it, the number is live.
 ***
## Telnyx
The **Telnyx** tab requires the following 5 fields:
Enter your Telnyx number in E.164 format (e.g. `+14385950345`).
The unique identifier for your phone number in Telnyx. Found under **Numbers → My Numbers**.
Your Telnyx API key. Found under **Account → API Keys**.
The ID of the Telnyx application connected to your number. Found under **Voice → Applications**.
Required for SMS-enabled numbers. Found under **Messaging → Messaging Profiles**. Format is a UUID.
***
## SIP Trunk
Importing a SIP trunk number is a **two-part process**:
Before importing the number, go to **SIP Configuration** in the main menu and set up your SIP trunk connection. This is where you configure the SIP server credentials and routing.
Once the SIP trunk is configured, go to **Numbers → Import** and select the **SIP Trunk** tab. Enter your phone number in E.164 format and complete the import.
The SIP Trunk tab in the Import modal only asks for the phone number. The SIP trunk itself must be fully configured in **SIP Configuration** first — otherwise the import will not connect correctly.
## Next step
Design how your AI agent handles calls — greetings, scripts, transfers, and edge cases.
***
## Telnyx
The **Telnyx** tab requires the following 5 fields:
Enter your Telnyx number in E.164 format (e.g. `+14385950345`).
The unique identifier for your phone number in Telnyx. Found under **Numbers → My Numbers**.
Your Telnyx API key. Found under **Account → API Keys**.
The ID of the Telnyx application connected to your number. Found under **Voice → Applications**.
Required for SMS-enabled numbers. Found under **Messaging → Messaging Profiles**. Format is a UUID.
***
## SIP Trunk
Importing a SIP trunk number is a **two-part process**:
Before importing the number, go to **SIP Configuration** in the main menu and set up your SIP trunk connection. This is where you configure the SIP server credentials and routing.
Once the SIP trunk is configured, go to **Numbers → Import** and select the **SIP Trunk** tab. Enter your phone number in E.164 format and complete the import.
The SIP Trunk tab in the Import modal only asks for the phone number. The SIP trunk itself must be fully configured in **SIP Configuration** first — otherwise the import will not connect correctly.
## Next step
Design how your AI agent handles calls — greetings, scripts, transfers, and edge cases.