> ## Documentation Index
> Fetch the complete documentation index at: https://docs.pulsyai.com/llms.txt
> Use this file to discover all available pages before exploring further.
# Cal.com
> Connect Cal.com to your PulsyAI voice agent so it can book appointments live during phone calls. Full setup walkthrough: username, Event ID, API key, timezone matching, and Call Flow wiring.
Cal.com is a calendar integration that lets your PulsyAI voice agent book real appointments directly into your Cal.com schedule during a live phone call. It is the most-requested booking integration on PulsyAI — resellers use it to deliver appointment-setting agents for service businesses, clinics, agencies, and any client whose operations live or die by their calendar.
This page walks you through the full setup, from the Cal.com side to the PulsyAI side, including the timezone rules that make or break a booking flow.
The Cal.com integration is configured **per agent** inside the **Integrations** tab of each assistant. It is **step-attached** — once added, you connect it to a specific Call Flow step using **+ Connect Action**.
## Before you start
You'll need:
* An active Cal.com account (free plan is fine for getting started)
* A PulsyAI agent already created
* The agent's LLM set to **GPT-4.1 or smarter** — booking involves multi-step function calls, date parsing, and conditional logic. See the [LLM recommendation table in Prompt Examples](/platform/build-your-agent/prompt-examples) for context.
## Where you'll land in PulsyAI
Before diving into Cal.com, here's what you're working toward. Inside your PulsyAI agent, open the **Integrations** tab and click **+ Add Integration**.
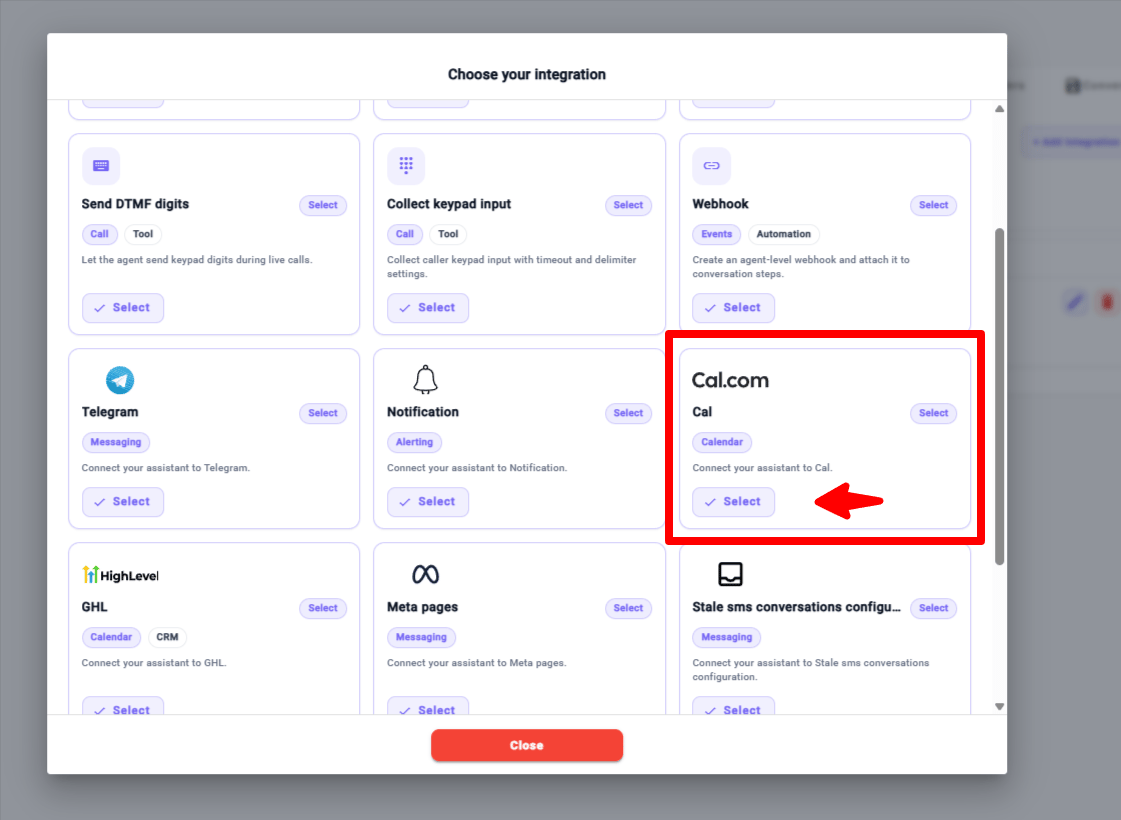 Select **Cal.com** from the integration list. The Cal.com modal opens with five required fields:
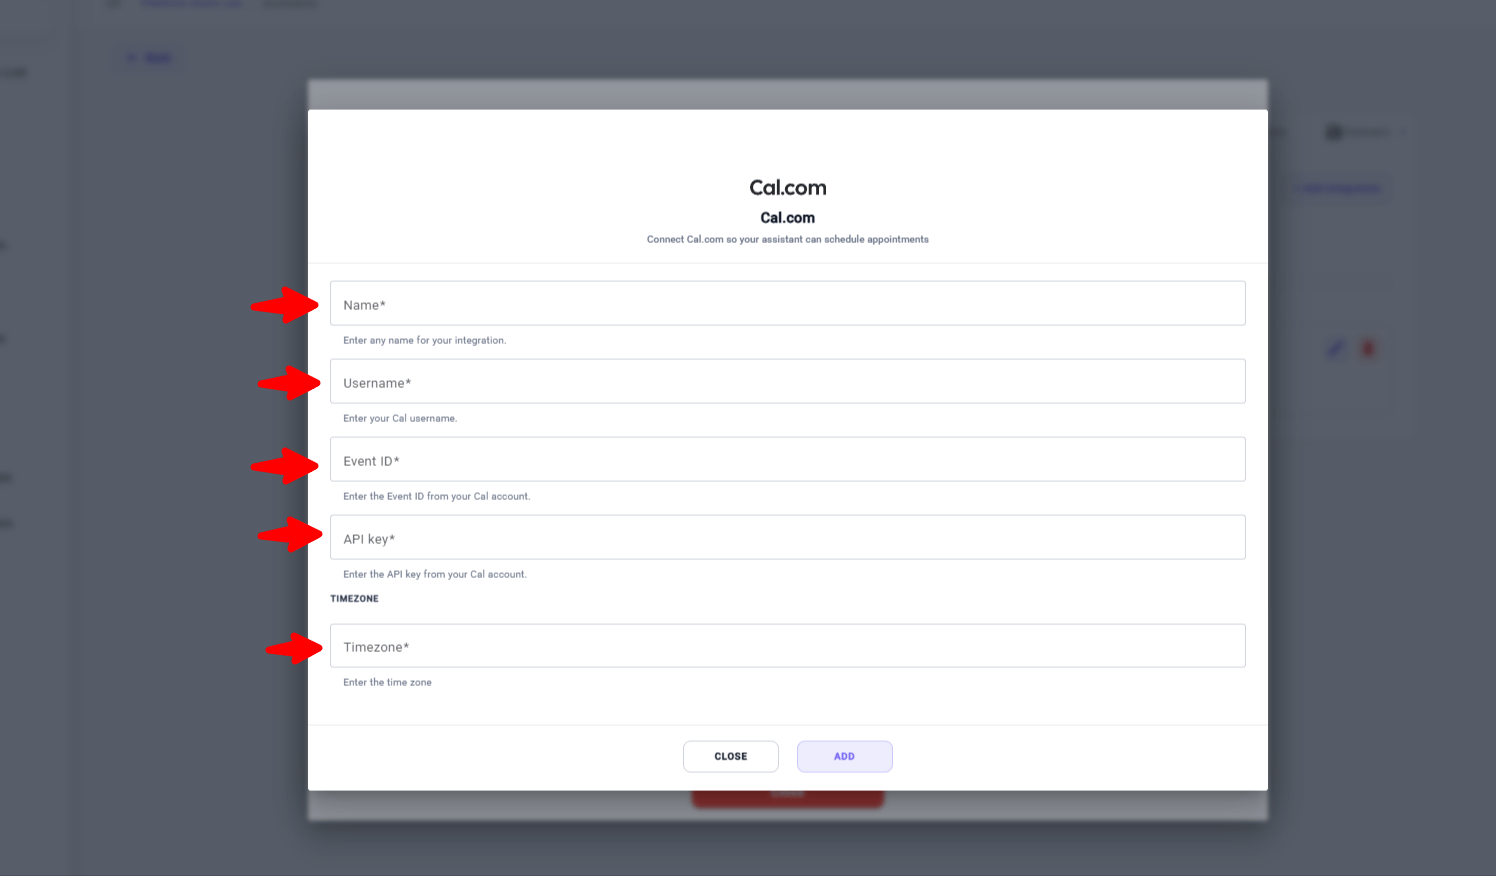 | Field | What you'll collect | Where it comes from |
| ------------ | ----------------------------------------- | ------------------- |
| **Name** | Any label you choose | You pick it |
| **Username** | Your Cal.com username slug | Step 2 below |
| **Event ID** | Numeric ID for the booking type | Step 3 below |
| **API key** | `cal_live_...` authorization key | Step 4 below |
| **Timezone** | IANA timezone matching your Cal.com event | Step 5 below |
The next steps walk you through collecting each value from Cal.com. Once you have all five, you'll come back to this modal, fill them in, and click **ADD**.
## Step 1: Connect your calendar to Cal.com
If this is a new Cal.com account, connect the calendar where bookings should land — Google Calendar, Outlook, Apple Calendar, Zoho, or any of the supported options. This is how bookings made by your PulsyAI agent show up on the actual calendar your client checks every day.
| Field | What you'll collect | Where it comes from |
| ------------ | ----------------------------------------- | ------------------- |
| **Name** | Any label you choose | You pick it |
| **Username** | Your Cal.com username slug | Step 2 below |
| **Event ID** | Numeric ID for the booking type | Step 3 below |
| **API key** | `cal_live_...` authorization key | Step 4 below |
| **Timezone** | IANA timezone matching your Cal.com event | Step 5 below |
The next steps walk you through collecting each value from Cal.com. Once you have all five, you'll come back to this modal, fill them in, and click **ADD**.
## Step 1: Connect your calendar to Cal.com
If this is a new Cal.com account, connect the calendar where bookings should land — Google Calendar, Outlook, Apple Calendar, Zoho, or any of the supported options. This is how bookings made by your PulsyAI agent show up on the actual calendar your client checks every day.
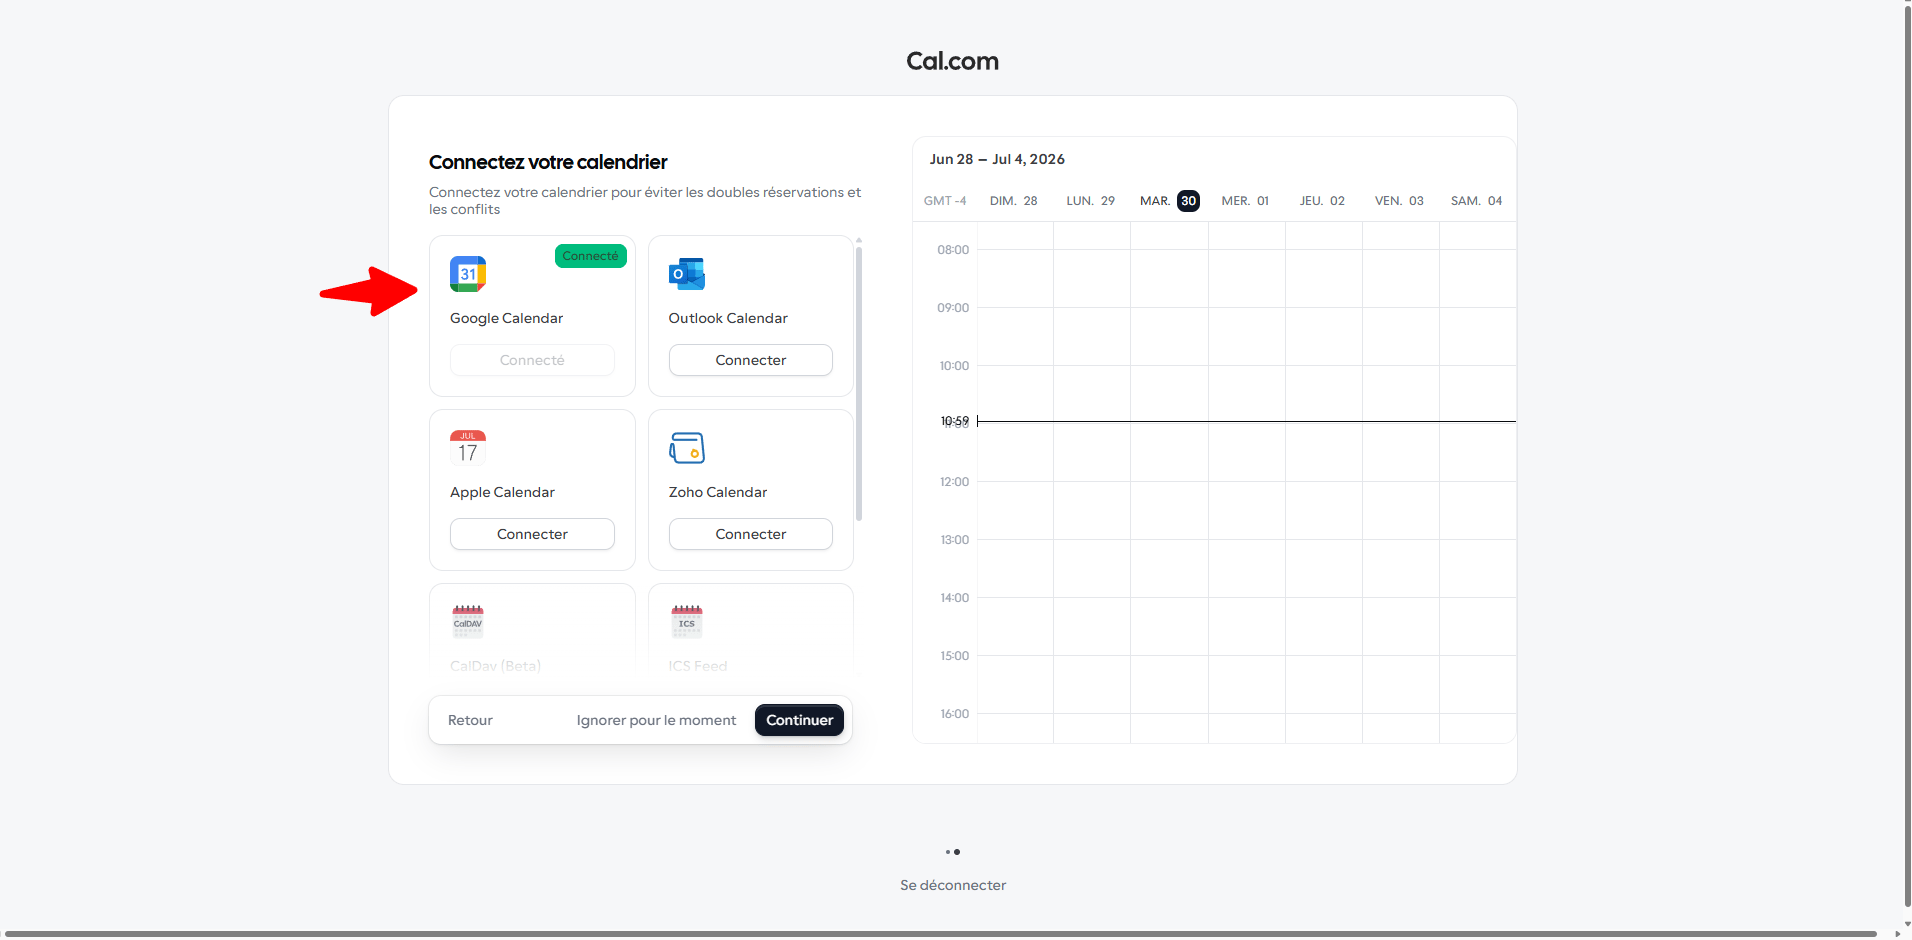 Downstream calendar sync (Google / Outlook / Apple) is handled by **Cal.com itself**, not by PulsyAI. Once your client connects their calendar inside Cal.com, every booking your PulsyAI agent makes flows through automatically.
## Step 2: Find your Cal.com Username
Your Cal.com username is the slug that appears in your public booking URL — `cal.com/[username]`. You can read it directly from the **Event types** page in Cal.com: it appears in the URL slug next to each event type (e.g., `/mb-lgziz3/30min` means the username is `mb-lgziz3`).
Downstream calendar sync (Google / Outlook / Apple) is handled by **Cal.com itself**, not by PulsyAI. Once your client connects their calendar inside Cal.com, every booking your PulsyAI agent makes flows through automatically.
## Step 2: Find your Cal.com Username
Your Cal.com username is the slug that appears in your public booking URL — `cal.com/[username]`. You can read it directly from the **Event types** page in Cal.com: it appears in the URL slug next to each event type (e.g., `/mb-lgziz3/30min` means the username is `mb-lgziz3`).
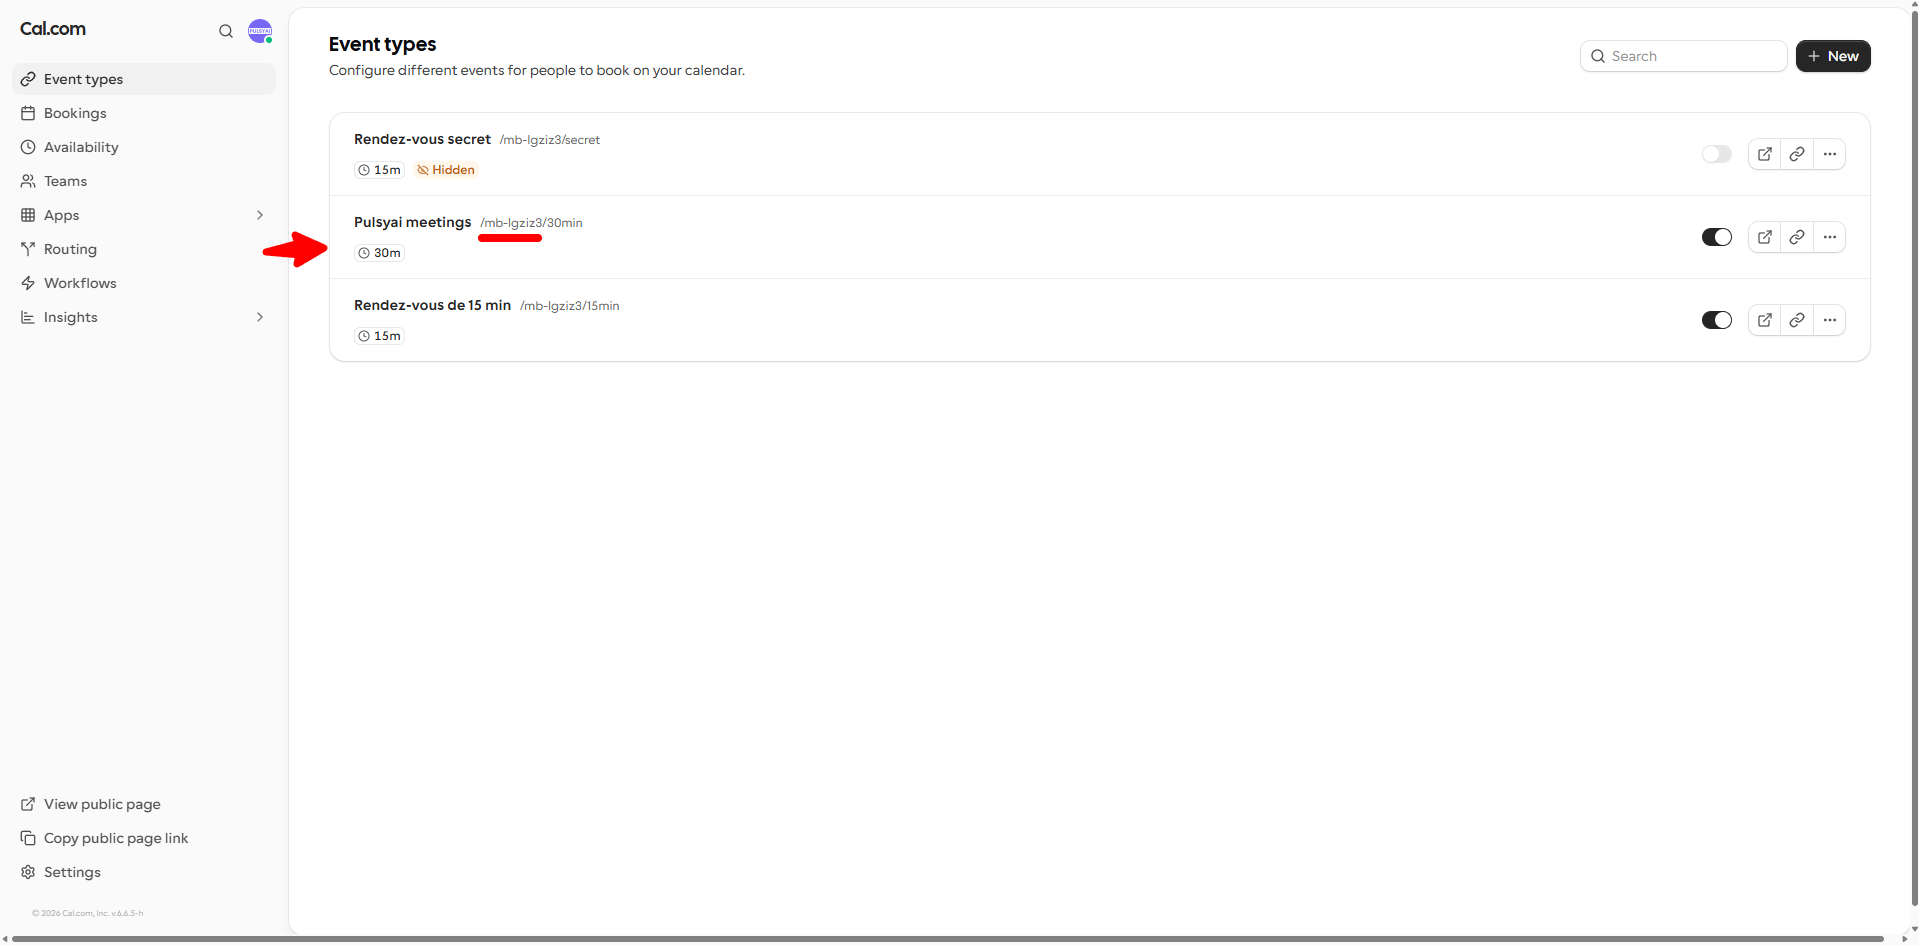 Copy this value — you'll paste it into the **Username** field of the PulsyAI Cal.com modal.
## Step 3: Find your Event ID
Each event type on Cal.com has its own Event ID. This is what tells PulsyAI **which booking type** the agent should offer — a 30-minute consultation, a free quote, a follow-up, etc.
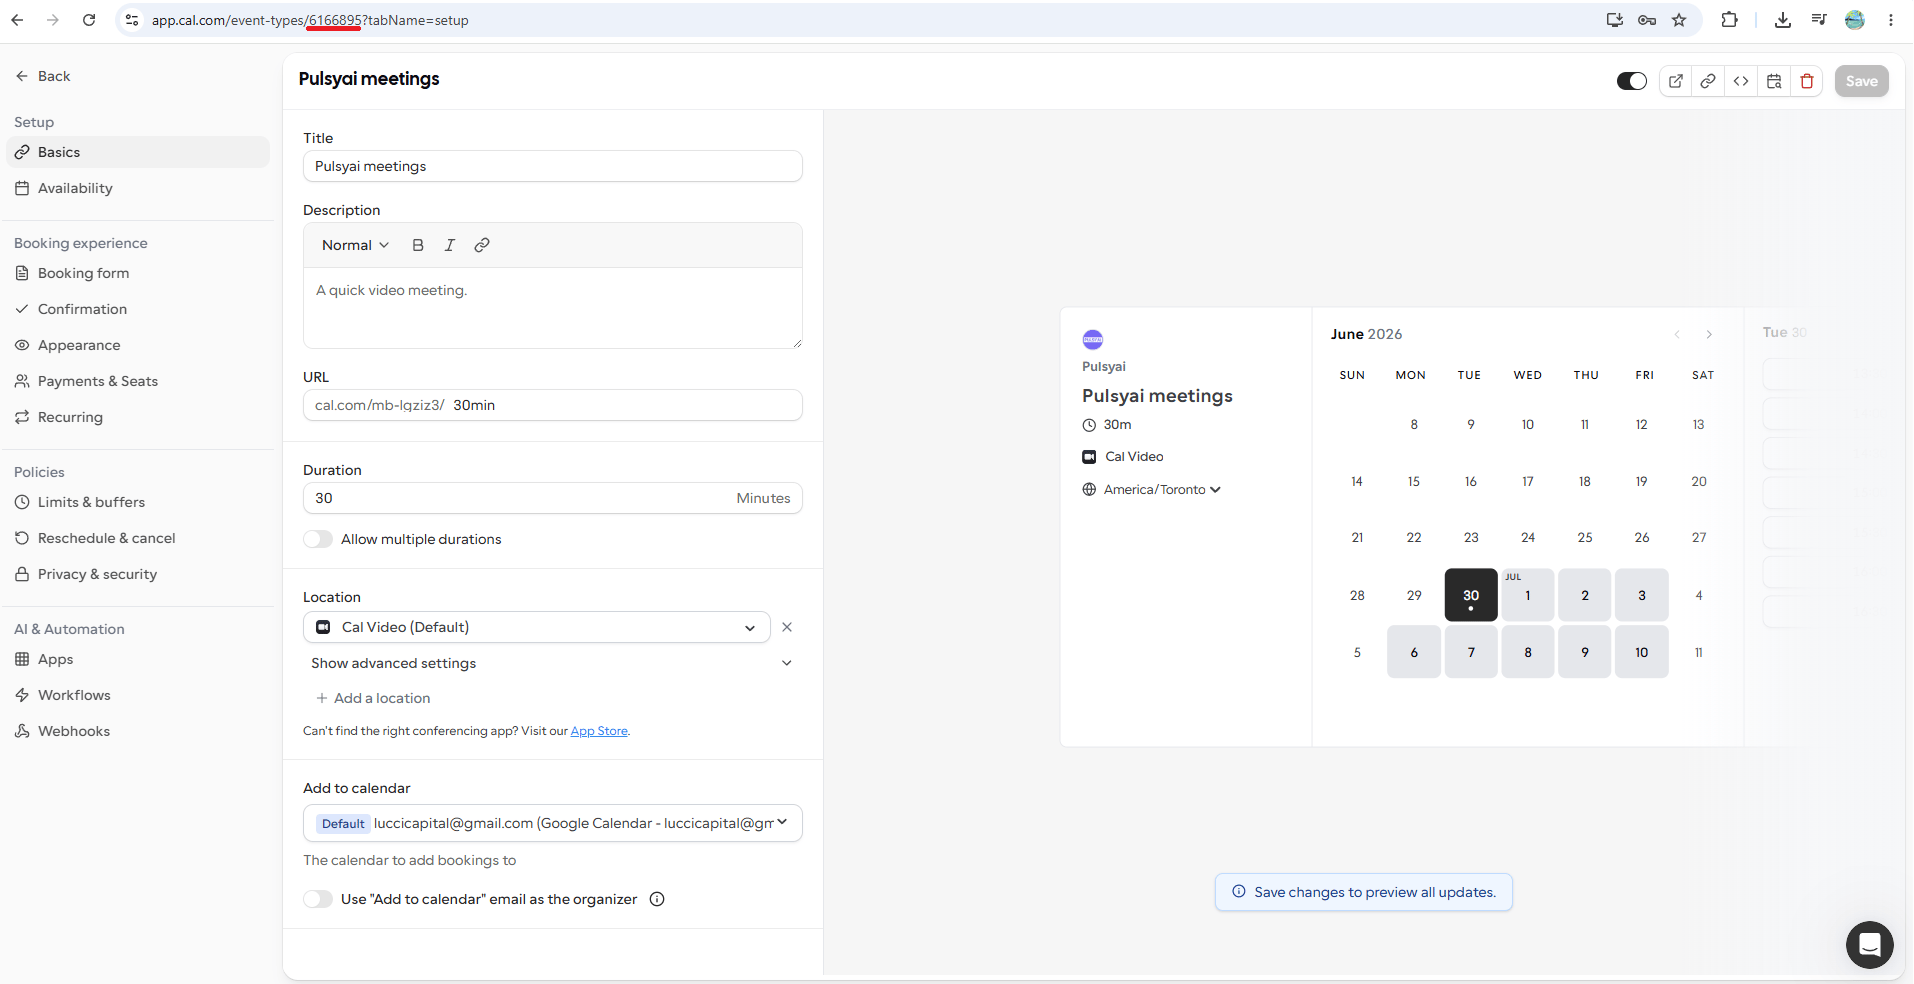
Click the event type you want to use. Cal.com redirects you to that event's configuration page, and the Event ID appears in the browser URL:
```text theme={null}
app.cal.com/event-types/6166895?tabName=setup
```
In the example above, the Event ID is `6166895`. It is always a numeric value.
Copy this value — you'll paste it into the **Username** field of the PulsyAI Cal.com modal.
## Step 3: Find your Event ID
Each event type on Cal.com has its own Event ID. This is what tells PulsyAI **which booking type** the agent should offer — a 30-minute consultation, a free quote, a follow-up, etc.
Click the event type you want to use. Cal.com redirects you to that event's configuration page, and the Event ID appears in the browser URL:
```text theme={null}
app.cal.com/event-types/6166895?tabName=setup
```
In the example above, the Event ID is `6166895`. It is always a numeric value.
 ## Step 4: Generate your Cal.com API key
The API key authorizes PulsyAI to read availability from your Cal.com account and create bookings on your behalf.
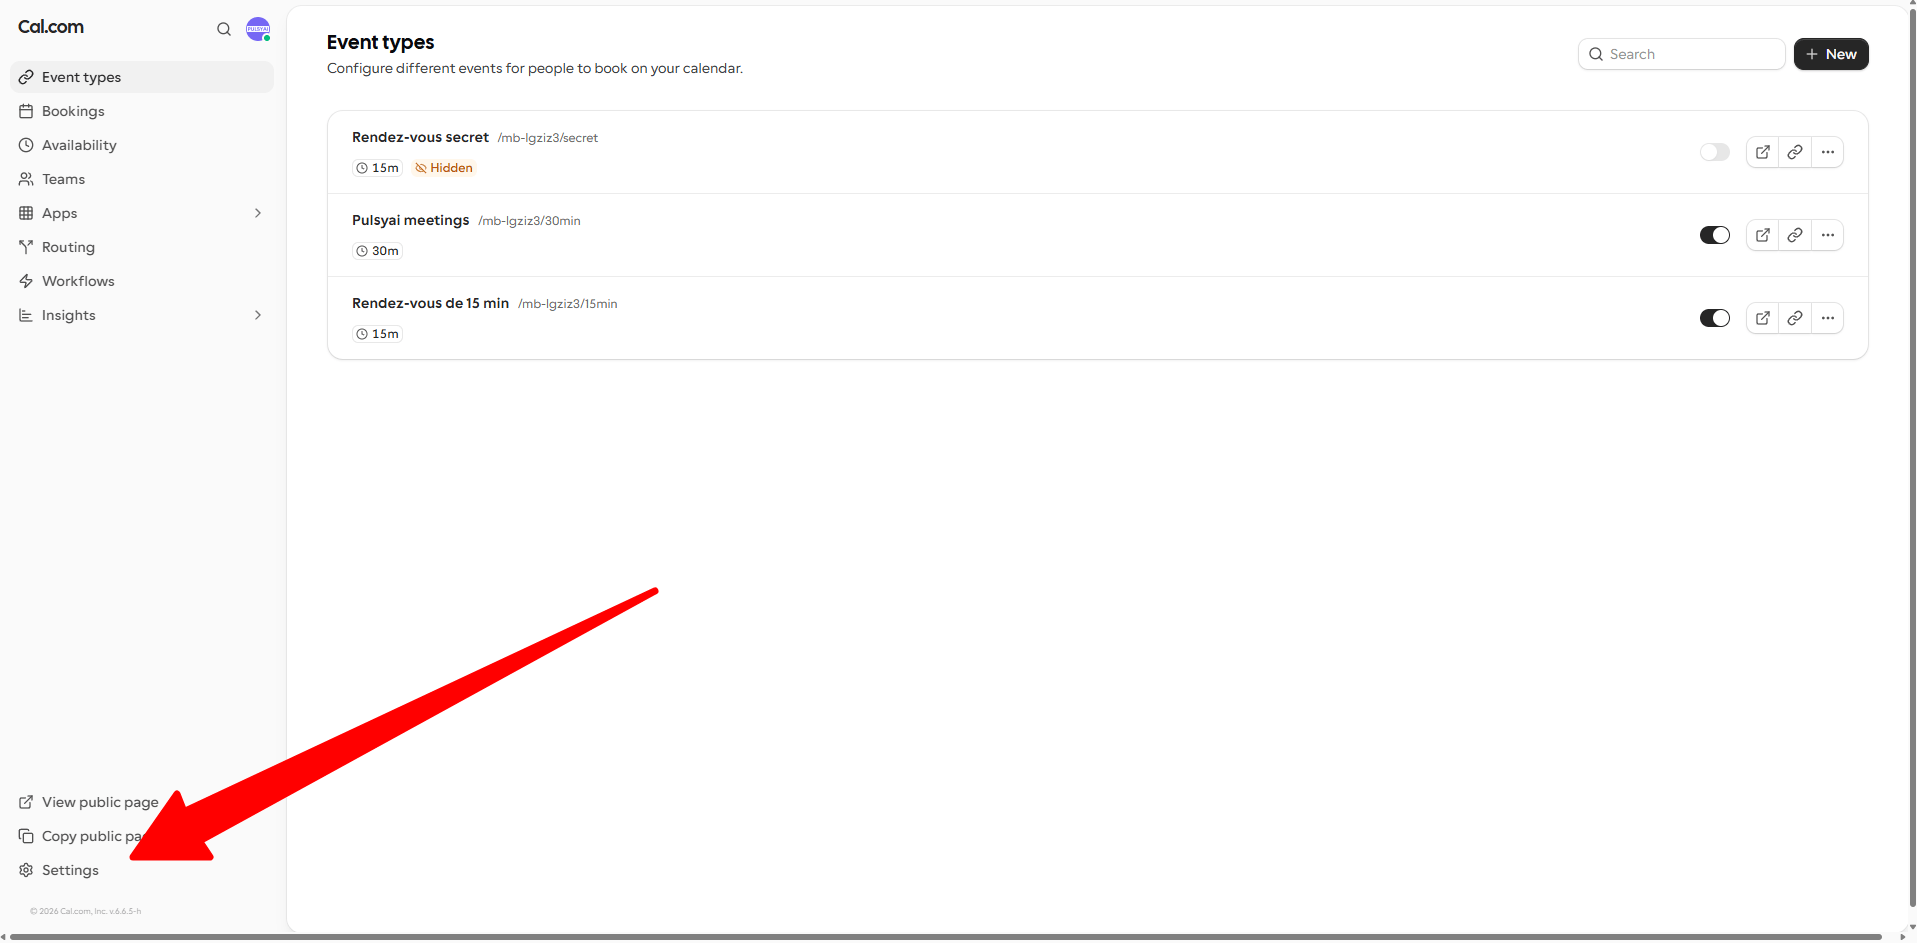
Click **Settings** in the bottom-left of the Cal.com sidebar.
## Step 4: Generate your Cal.com API key
The API key authorizes PulsyAI to read availability from your Cal.com account and create bookings on your behalf.
Click **Settings** in the bottom-left of the Cal.com sidebar.
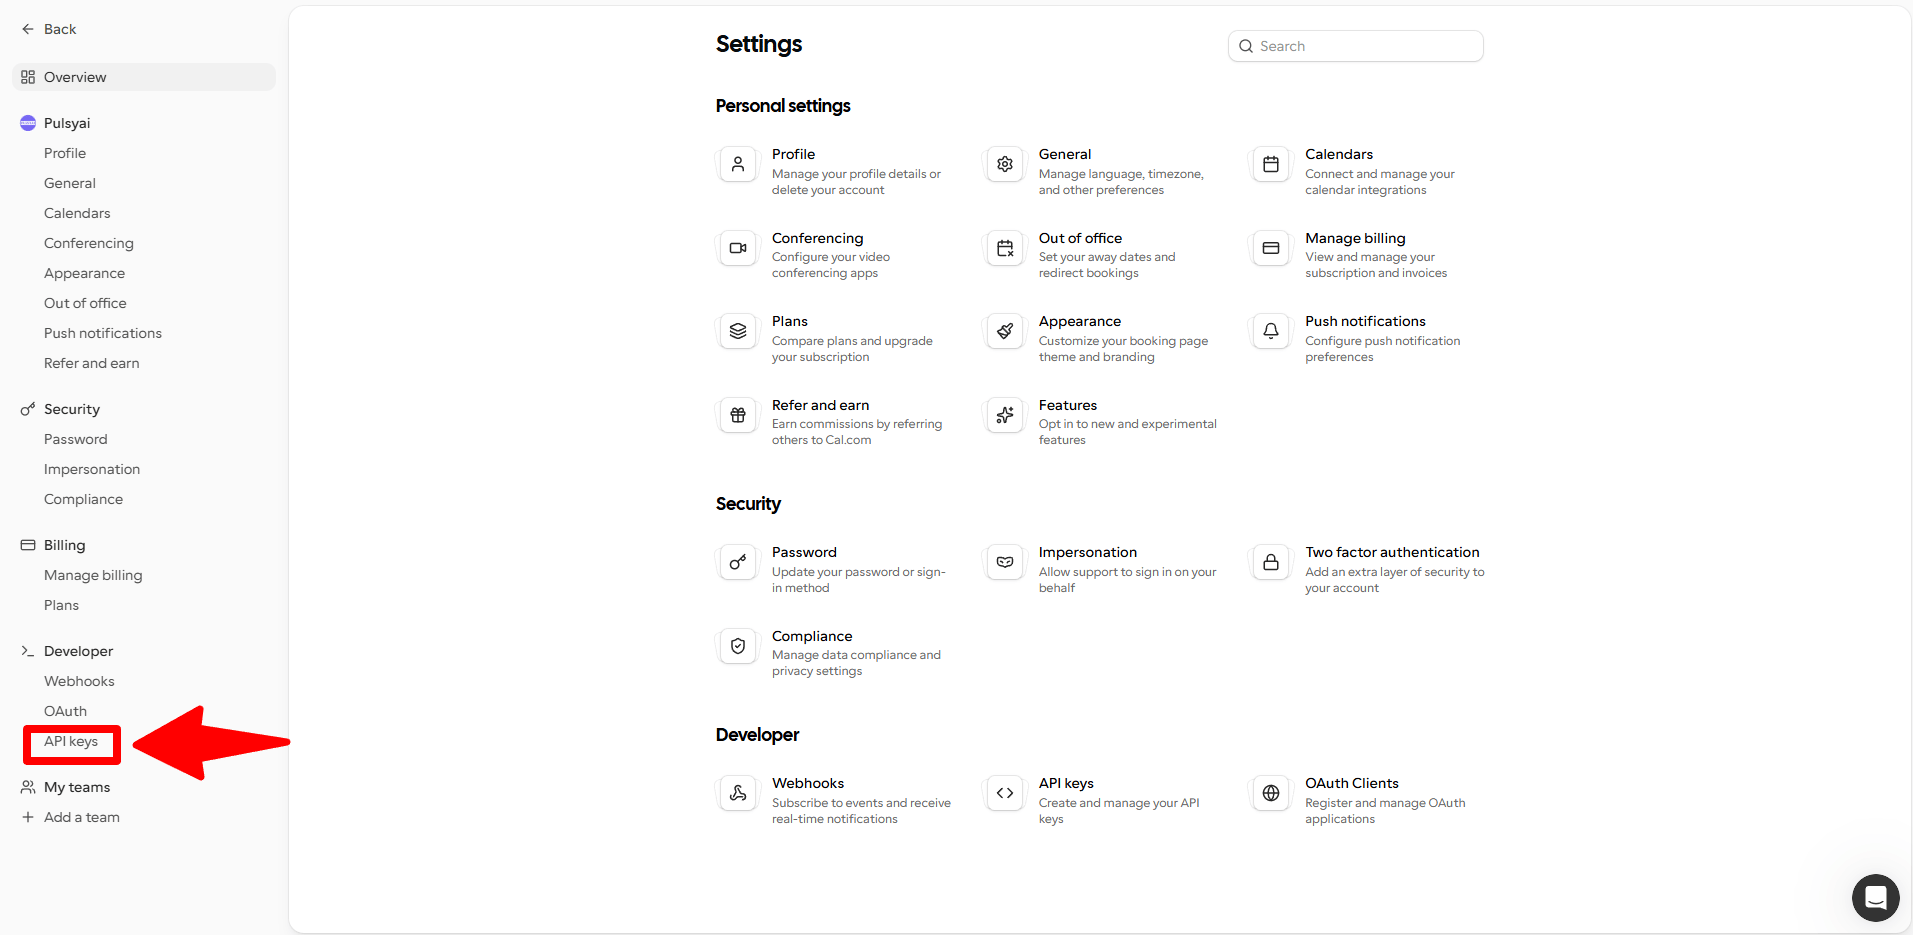
 In Settings, scroll to the **Developer** section and click **API keys**.
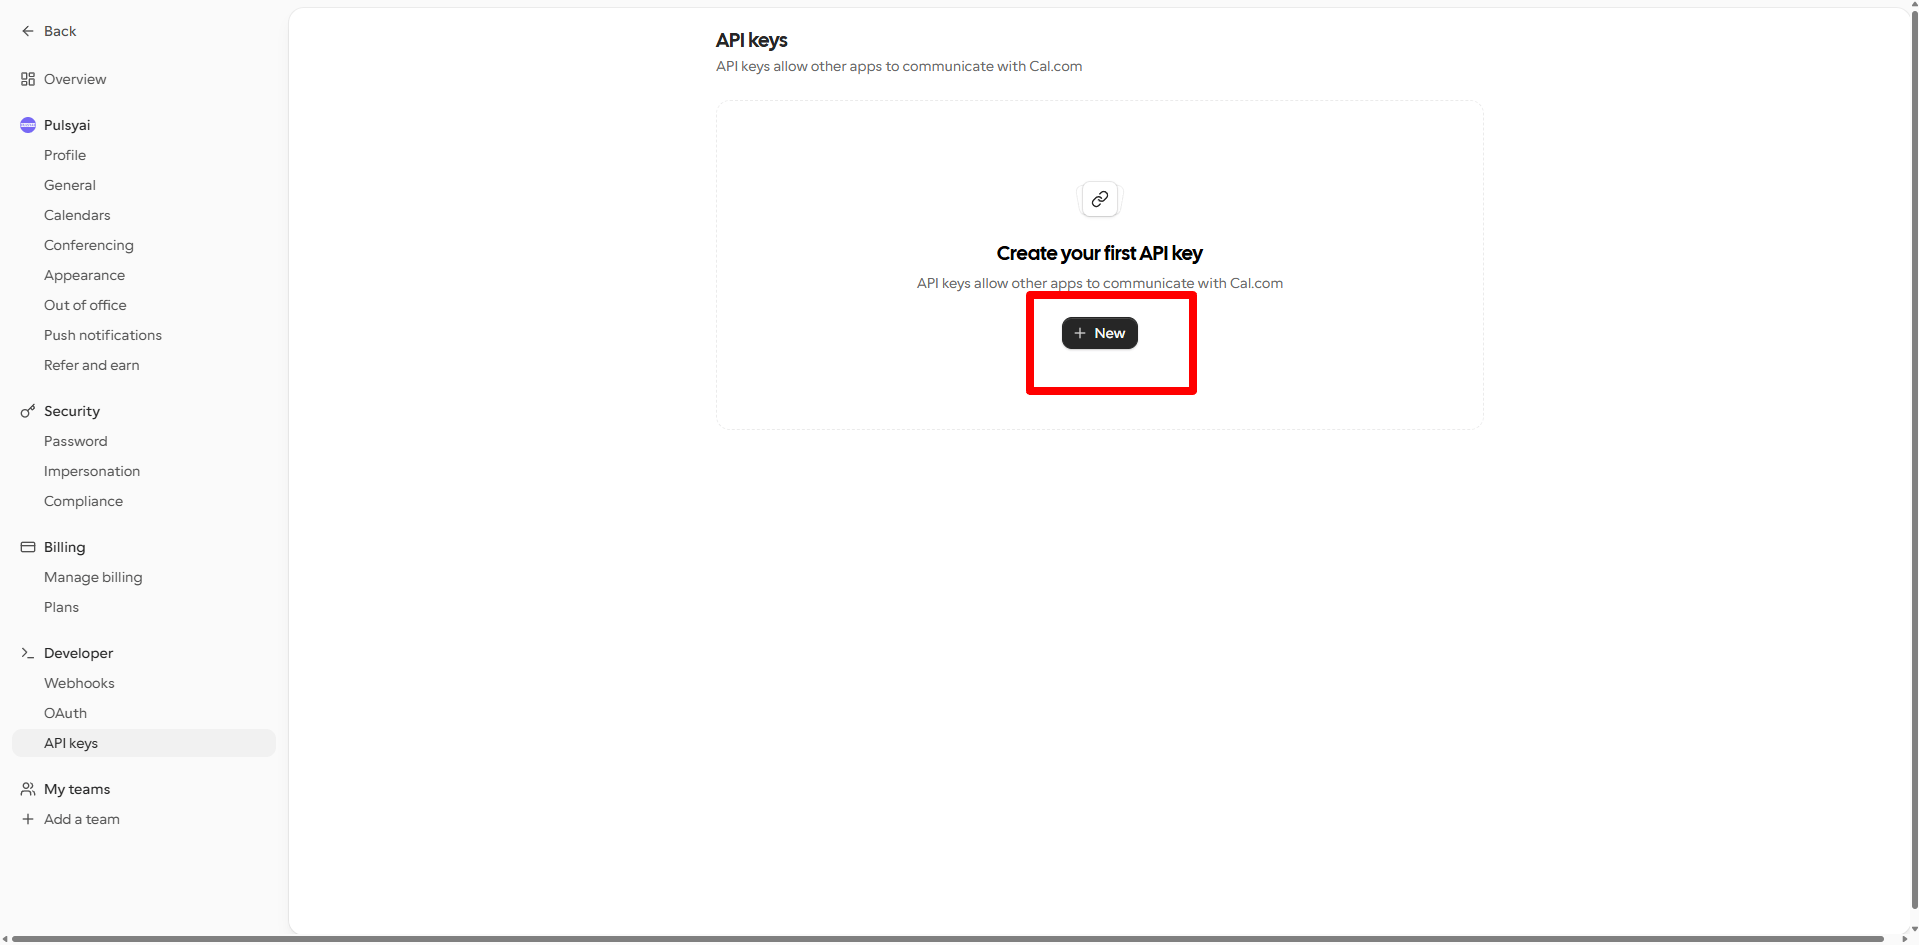
 Click **+ New** to open the key creation modal.
 Give the key any name you want (e.g., `Calendar PulsyAI`). Then **toggle Never expires ON** before clicking Create.
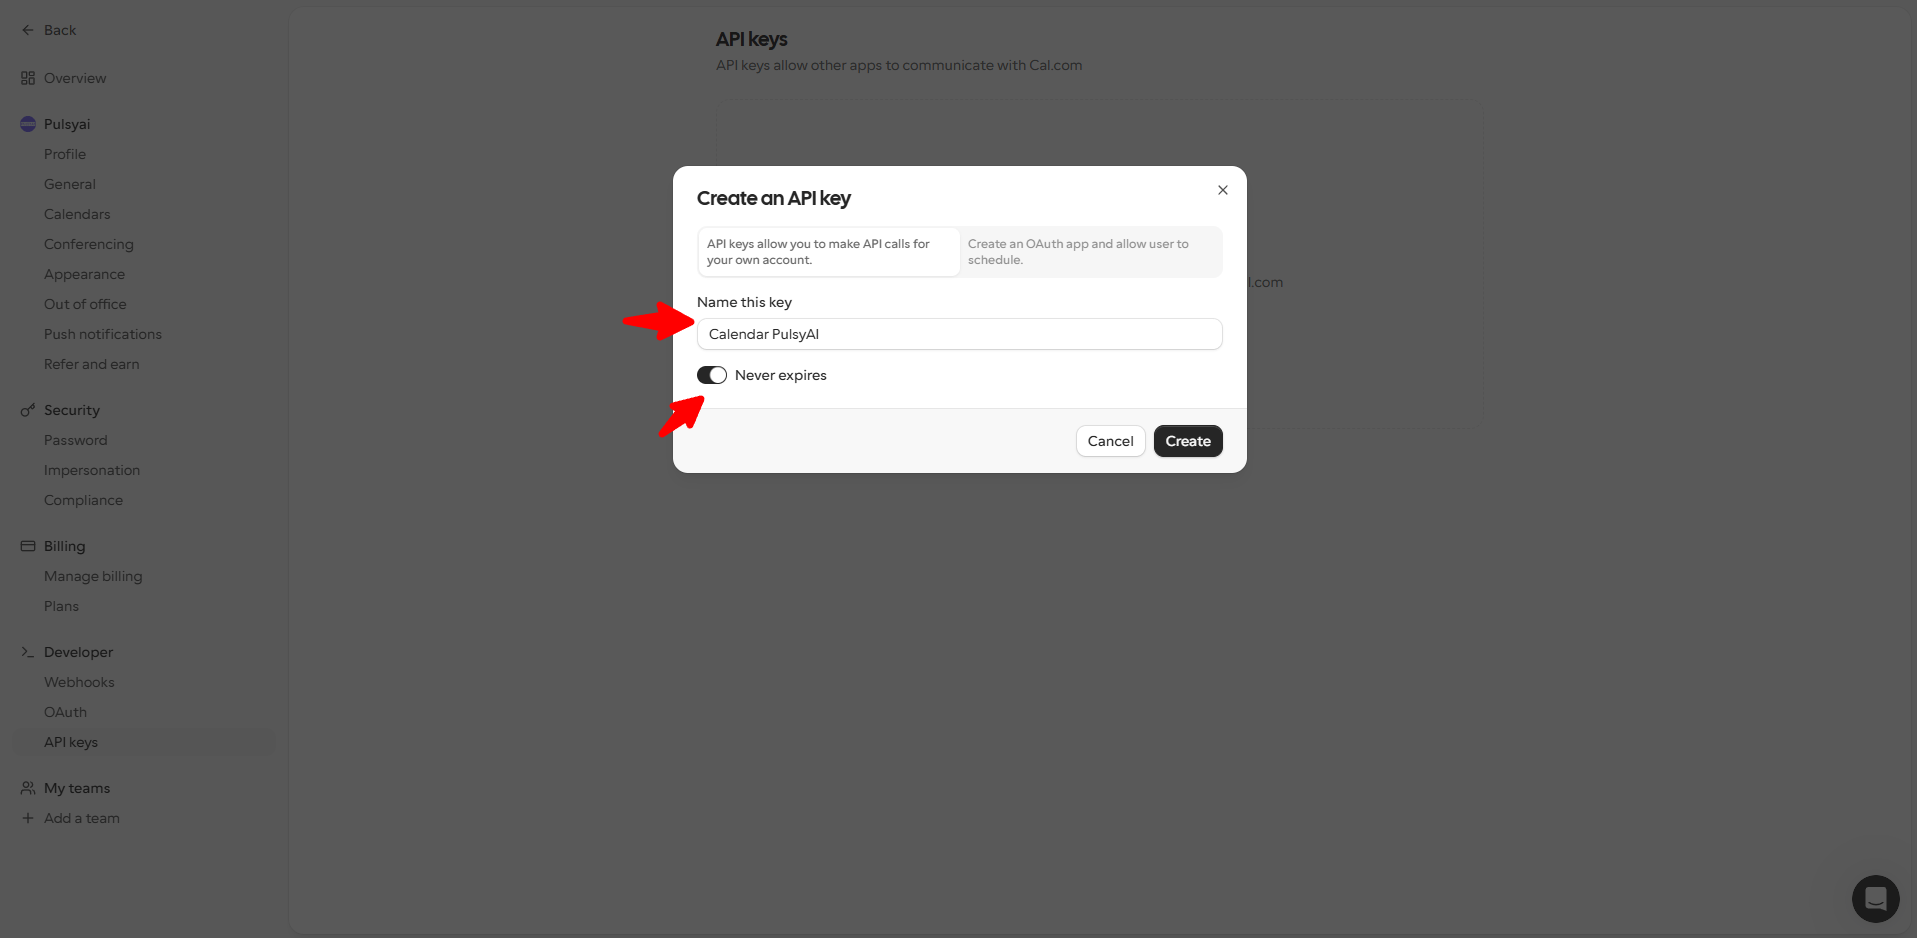 Always set the key to **Never expires**. If you set a duration (30, 60, 90 days), your booking automation will silently break the moment the key expires — your PulsyAI agent will start failing every booking attempt with no obvious cause. Resellers managing multiple clients do not want a recurring 30-day API rotation chore.
Cal.com shows the API key (format `cal_live_...`) **only once**. Copy it now.
Always set the key to **Never expires**. If you set a duration (30, 60, 90 days), your booking automation will silently break the moment the key expires — your PulsyAI agent will start failing every booking attempt with no obvious cause. Resellers managing multiple clients do not want a recurring 30-day API rotation chore.
Cal.com shows the API key (format `cal_live_...`) **only once**. Copy it now.
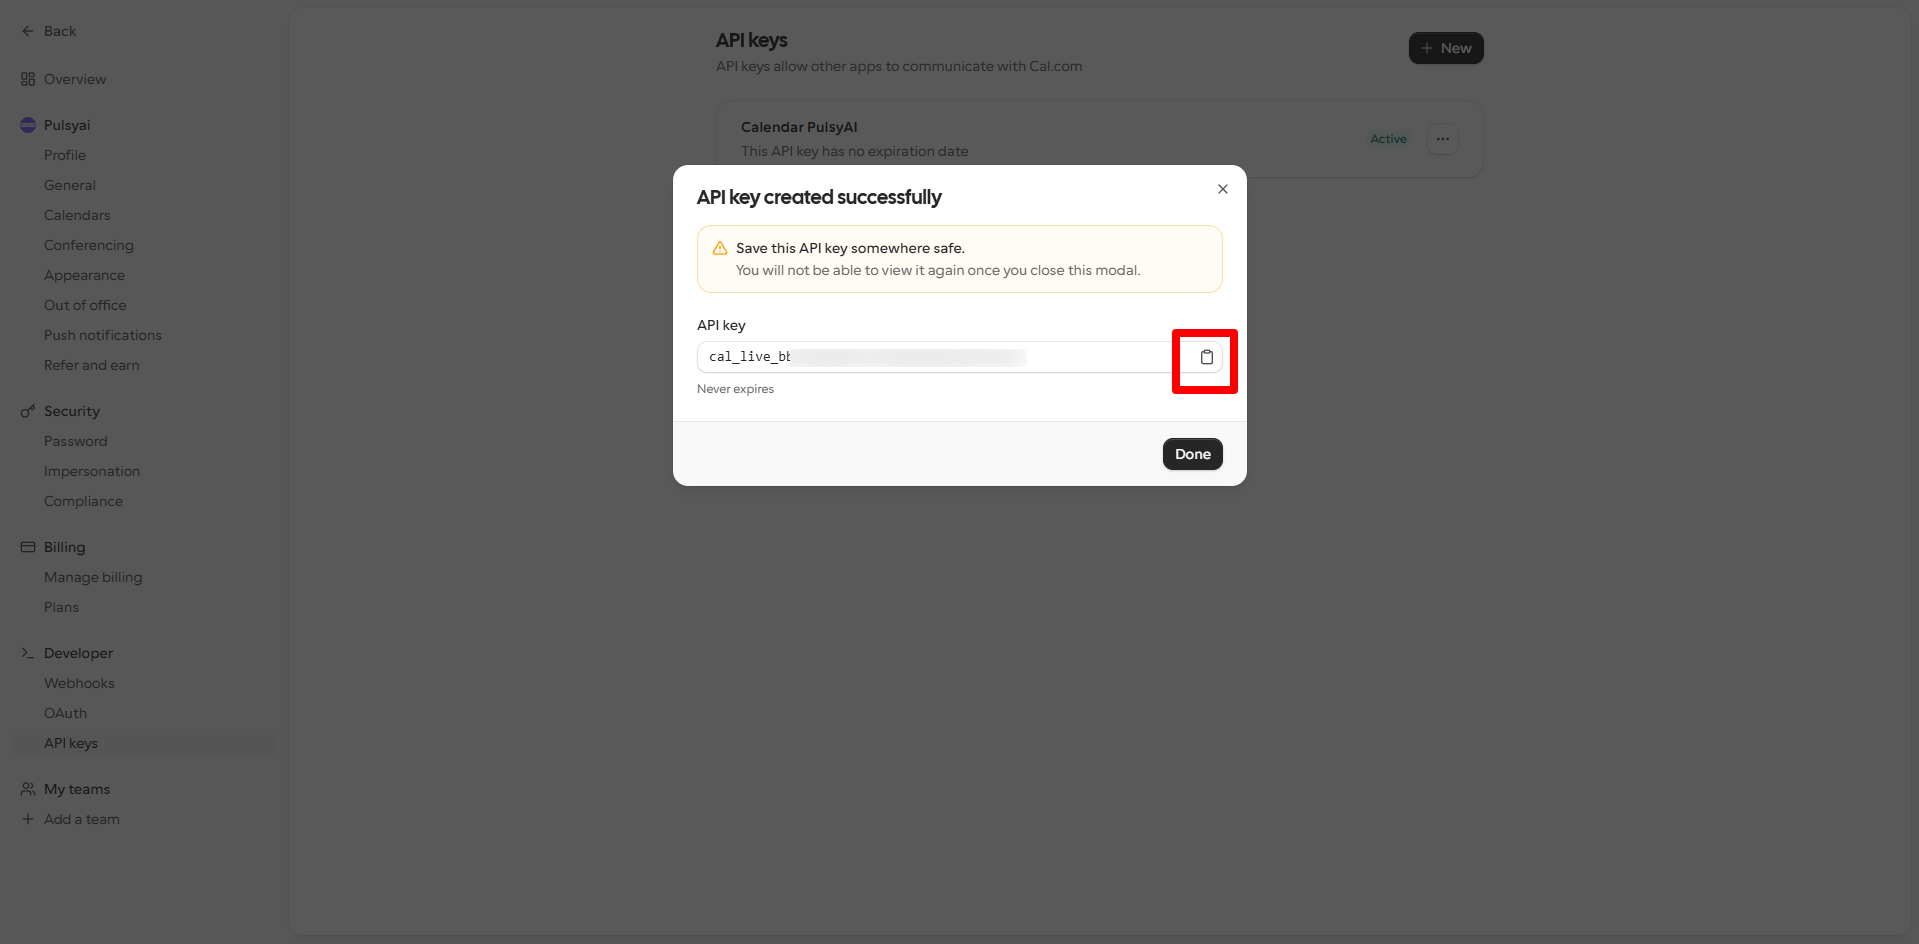 Cal.com will not show the API key again after you close this modal. If you lose it, you'll have to revoke it and generate a new one.
## Step 5: Match your Timezone (the most important rule)
The timezone is the single most common cause of "the booking worked but landed at the wrong hour" tickets. PulsyAI's Cal.com modal accepts any timezone, but it **must match exactly** the timezone configured in two other places.
**Three timezones must be identical:**
1. The timezone of the **event type on Cal.com** (e.g., `America/Toronto`)
2. The **Timezone** field inside the PulsyAI Cal.com integration modal
3. The **Timezone** field in **Call Flows → Call Configuration** for the same agent
If any of these three are out of sync, your PulsyAI agent will propose or confirm slots at the wrong local hour. Always use the IANA format (e.g., `America/Toronto`, `America/Montreal`, `Europe/Paris`).
## Step 6: Add Cal.com to your PulsyAI agent
Open the agent inside PulsyAI, click the **Integrations** tab, then **+ Add Integration** and choose **Cal.com**. Fill the five fields:
| Field | Value |
| ------------ | -------------------------------------------------------------------------------- |
| **Name** | Any descriptive label (e.g., `calendar`, `free-consultation`, `30min-discovery`) |
| **Username** | Your Cal.com username from Step 2 (e.g., `mb-lgziz3`) |
| **Event ID** | The numeric Event ID from Step 3 (e.g., `6166895`) |
| **API key** | The `cal_live_...` key from Step 4 |
| **Timezone** | IANA timezone matching your Cal.com event (e.g., `America/Toronto`) |
Cal.com will not show the API key again after you close this modal. If you lose it, you'll have to revoke it and generate a new one.
## Step 5: Match your Timezone (the most important rule)
The timezone is the single most common cause of "the booking worked but landed at the wrong hour" tickets. PulsyAI's Cal.com modal accepts any timezone, but it **must match exactly** the timezone configured in two other places.
**Three timezones must be identical:**
1. The timezone of the **event type on Cal.com** (e.g., `America/Toronto`)
2. The **Timezone** field inside the PulsyAI Cal.com integration modal
3. The **Timezone** field in **Call Flows → Call Configuration** for the same agent
If any of these three are out of sync, your PulsyAI agent will propose or confirm slots at the wrong local hour. Always use the IANA format (e.g., `America/Toronto`, `America/Montreal`, `Europe/Paris`).
## Step 6: Add Cal.com to your PulsyAI agent
Open the agent inside PulsyAI, click the **Integrations** tab, then **+ Add Integration** and choose **Cal.com**. Fill the five fields:
| Field | Value |
| ------------ | -------------------------------------------------------------------------------- |
| **Name** | Any descriptive label (e.g., `calendar`, `free-consultation`, `30min-discovery`) |
| **Username** | Your Cal.com username from Step 2 (e.g., `mb-lgziz3`) |
| **Event ID** | The numeric Event ID from Step 3 (e.g., `6166895`) |
| **API key** | The `cal_live_...` key from Step 4 |
| **Timezone** | IANA timezone matching your Cal.com event (e.g., `America/Toronto`) |
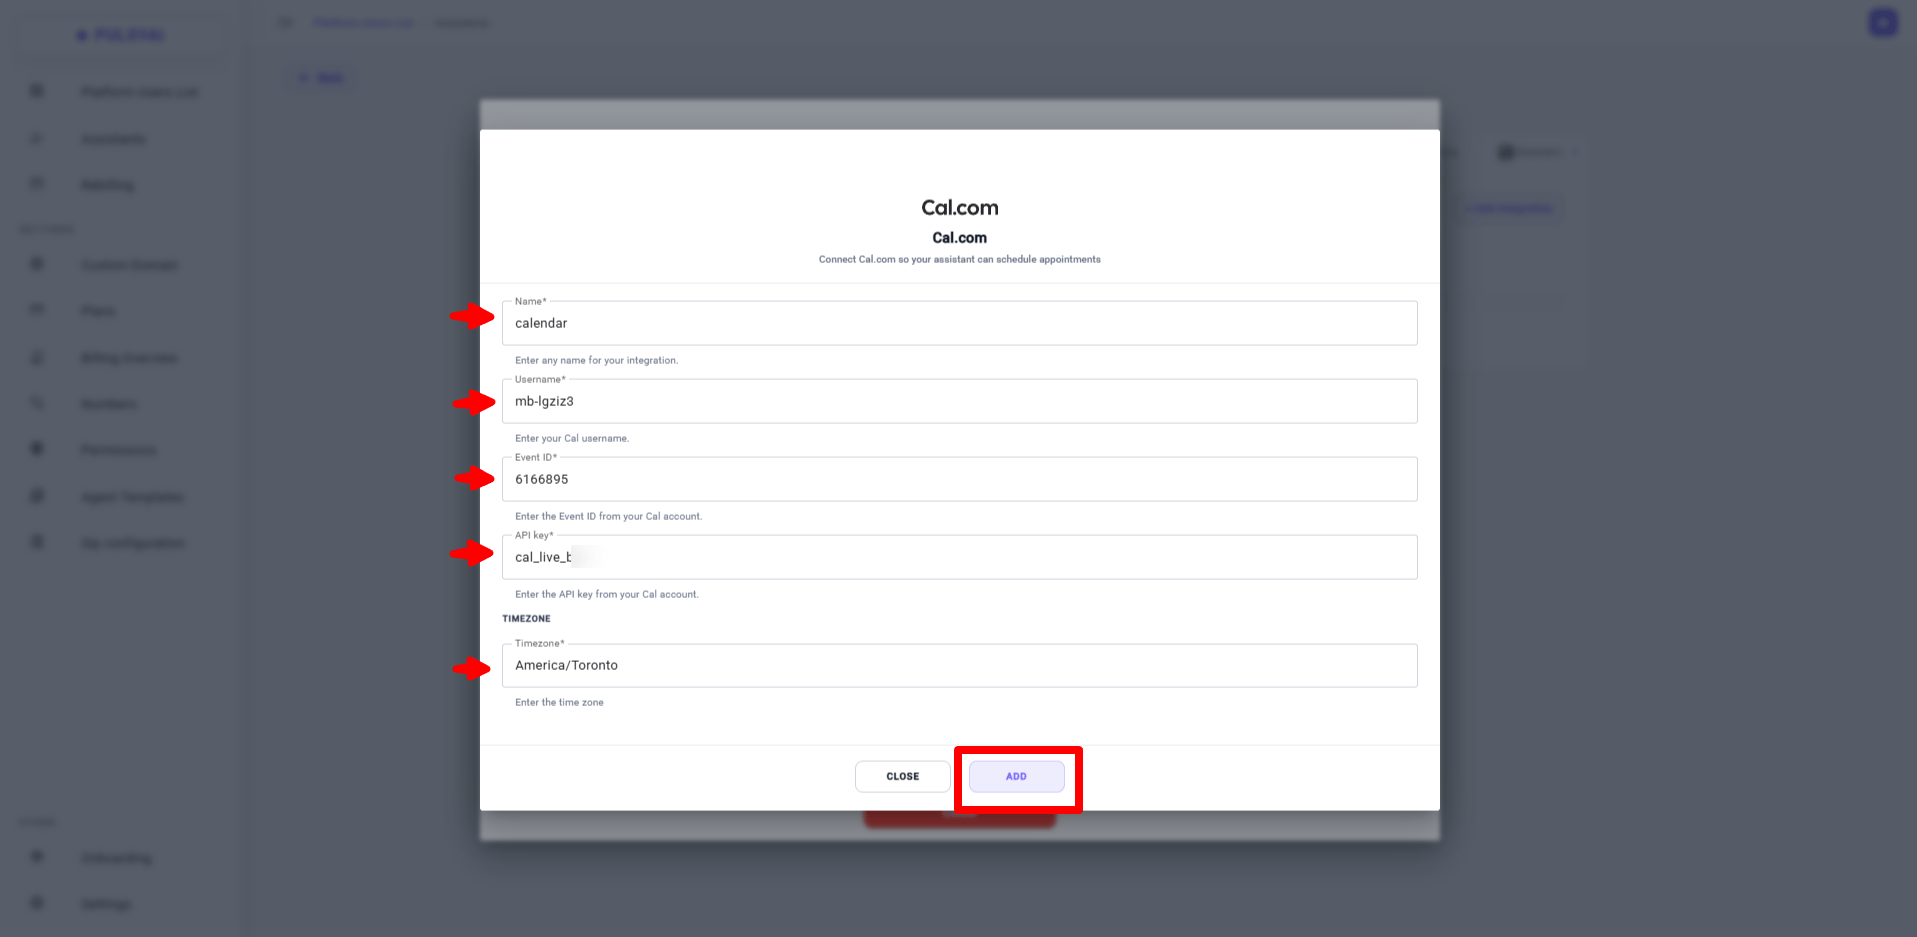 Click **ADD**. The Cal.com integration is now attached to this agent and ready to be wired into a Call Flow step.
## Step 7: Wire Cal.com into a Call Flow step
Adding Cal.com to the agent doesn't book anything on its own — you have to attach it to the **specific Call Flow step** where booking should happen.
Click **ADD**. The Cal.com integration is now attached to this agent and ready to be wired into a Call Flow step.
## Step 7: Wire Cal.com into a Call Flow step
Adding Cal.com to the agent doesn't book anything on its own — you have to attach it to the **specific Call Flow step** where booking should happen.
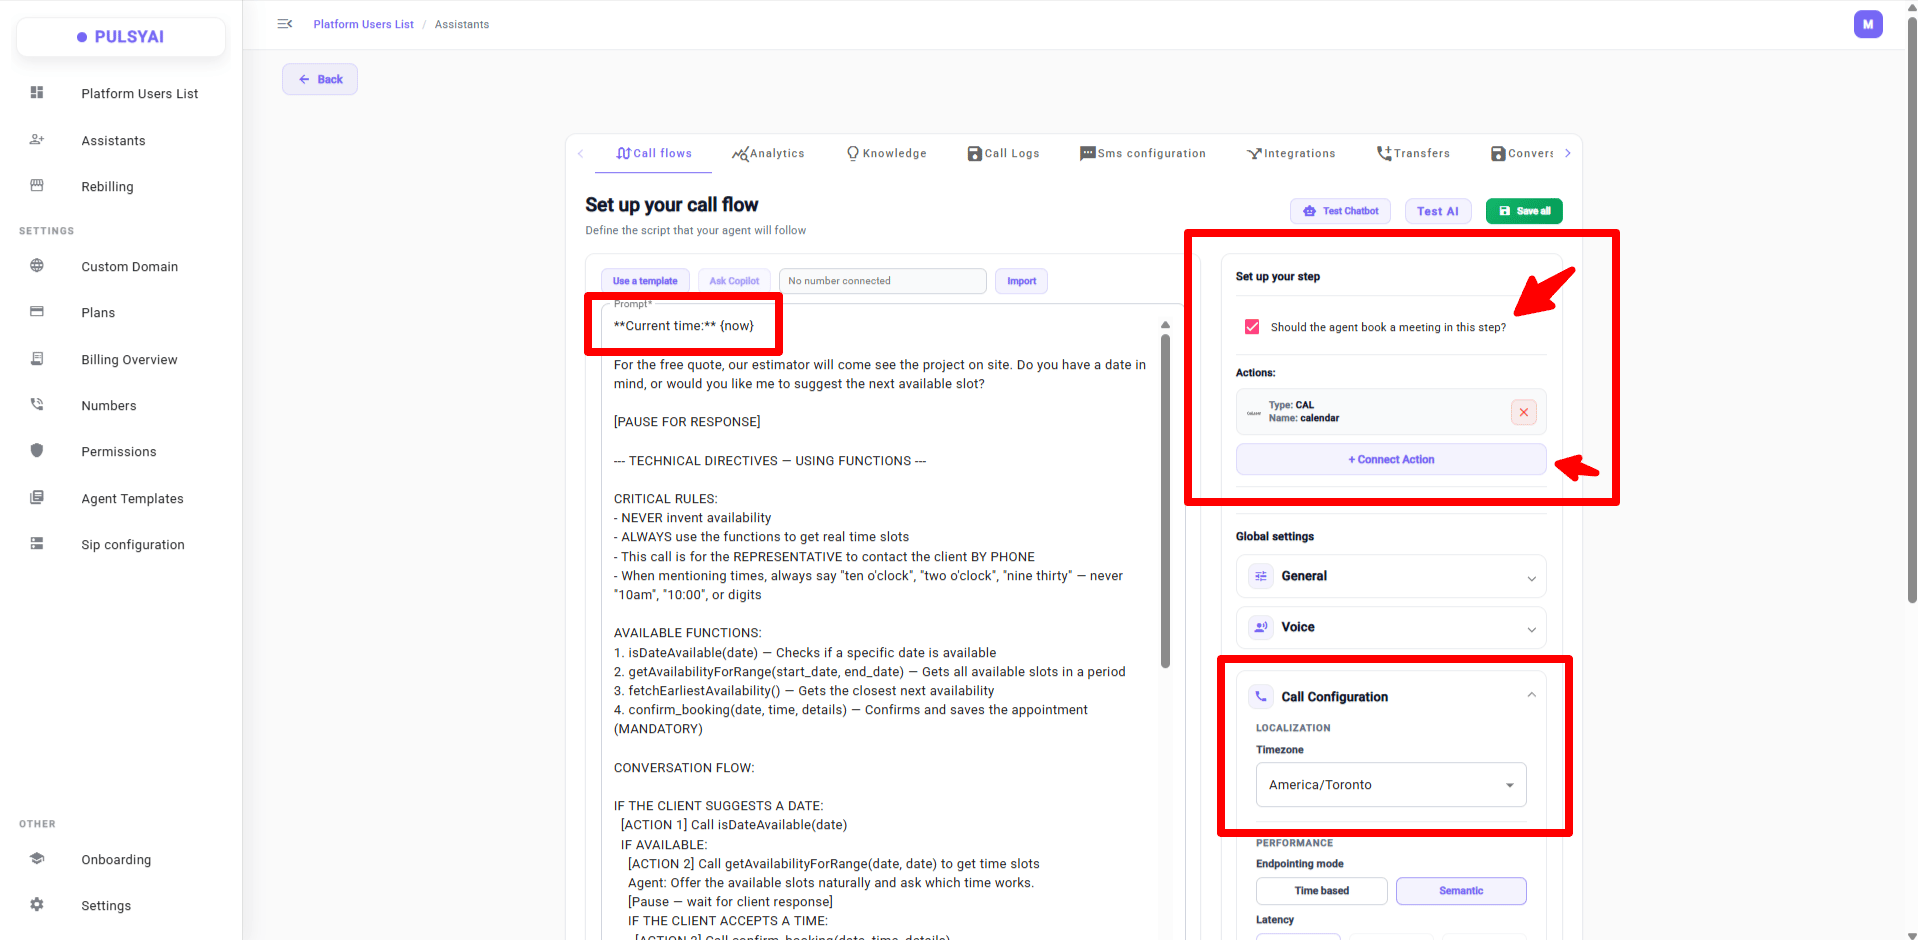 In the Call Flows tab:
1. Open the step where the agent should book the appointment.
2. Check **Should the agent book a meeting in this step?**
3. Click **+ Connect Action** under Actions and select the Cal.com integration you just added.
4. In **Call Configuration → Timezone**, set the same IANA timezone you used in the Cal.com modal.
5. At the top of the prompt (or inside the Agent Context), add the `{now}` variable so the agent knows the current time in the configured timezone:
```text theme={null}
**Current time:** {now}
```
The `{now}` template variable is **not automatic**. If you don't insert it into the prompt or Agent Context, your PulsyAI agent has no concept of "today" or "now" — it will ask the client for context it shouldn't need, or propose slots in the past. Always include `**Current time:** {now}` at the top of any prompt that involves booking.
### The booking prompt itself
For the actual prompt the agent uses to handle the booking conversation — the full function-calling flow with `isDateAvailable`, `getAvailabilityForRange`, `fetchEarliestAvailability`, and `confirm_booking` — use the universal PulsyAI booking prompt documented in [**Prompt Examples → Booking appointments**](/platform/build-your-agent/prompt-examples#booking-appointments).
That prompt is universal: the function names work identically across every booking backend on PulsyAI, including Cal.com. There is no Cal.com-specific prompt — once the integration is wired into the step, the universal booking prompt drives the conversation. Copy it, swap the opening line for your client's service vocabulary, and you're live.
## Multiple booking types on the same agent
Cal.com is added **once per booking type**, not once per agent. If your client offers a free consultation, a paid consultation, and a follow-up call, you'll add Cal.com to the PulsyAI agent **three times** — each with the same Username and API key, but a different **Name** and **Event ID**:
| Name | Event ID | Use case |
| ------------------- | --------- | ------------------------ |
| `free-consultation` | `6166895` | Initial discovery call |
| `paid-consultation` | `7234112` | Billed strategy session |
| `follow-up` | `7891045` | Post-engagement check-in |
Each Cal.com entry is then connected to its own Call Flow step using **+ Connect Action**. When you have multiple Cal.com integrations on the same agent, make the prompt explicit about which one applies to which step — otherwise the agent has no way to know which calendar slot to read from.
## Downstream calendar sync
PulsyAI does **not** sync directly with Google Calendar, Outlook, or Apple Calendar. Those calendars sync through **Cal.com itself** — the connection your client made in Step 1. When your PulsyAI agent confirms a booking, it writes to Cal.com, and Cal.com pushes it to every downstream calendar your client has connected. This is the cleanest architecture: one source of truth, no double-bookings, no fragile multi-calendar logic on the agent side.
## Troubleshooting
**Wrong Event ID** — The agent calls the availability function but no slots come back, or it fails to confirm. Re-check the Event ID in the Cal.com URL and confirm it matches the value pasted into PulsyAI.
**API key expired or revoked** — All Cal.com functions fail silently. If you set a duration on the key, regenerate it with **Never expires** toggled on. If the key was revoked from inside Cal.com, generate a new one and paste it into the PulsyAI modal.
**Timezone mismatch** — The booking succeeds but lands at the wrong local hour. Re-check the three timezones from Step 5: Cal.com event, PulsyAI Cal.com modal, and Call Flow Call Configuration. All three must be the same IANA string.
**Missing `{now}` variable** — The agent doesn't know the current date or time and starts proposing slots in the past or asking the caller what day it is. Add `**Current time:** {now}` to the top of the prompt or to the Agent Context.
**Multiple Cal.com integrations, no routing in prompt** — When several Cal.com entries are connected to the same agent, the prompt has to explicitly tell the agent which booking type belongs to which step or scenario. Without that, the agent will pick one at random.
## Next step
The universal PulsyAI booking prompt with the full function-calling flow — ready to drop into your Cal.com step.
The broader picture: how PulsyAI handles every integration type, step-attached vs. global.
In the Call Flows tab:
1. Open the step where the agent should book the appointment.
2. Check **Should the agent book a meeting in this step?**
3. Click **+ Connect Action** under Actions and select the Cal.com integration you just added.
4. In **Call Configuration → Timezone**, set the same IANA timezone you used in the Cal.com modal.
5. At the top of the prompt (or inside the Agent Context), add the `{now}` variable so the agent knows the current time in the configured timezone:
```text theme={null}
**Current time:** {now}
```
The `{now}` template variable is **not automatic**. If you don't insert it into the prompt or Agent Context, your PulsyAI agent has no concept of "today" or "now" — it will ask the client for context it shouldn't need, or propose slots in the past. Always include `**Current time:** {now}` at the top of any prompt that involves booking.
### The booking prompt itself
For the actual prompt the agent uses to handle the booking conversation — the full function-calling flow with `isDateAvailable`, `getAvailabilityForRange`, `fetchEarliestAvailability`, and `confirm_booking` — use the universal PulsyAI booking prompt documented in [**Prompt Examples → Booking appointments**](/platform/build-your-agent/prompt-examples#booking-appointments).
That prompt is universal: the function names work identically across every booking backend on PulsyAI, including Cal.com. There is no Cal.com-specific prompt — once the integration is wired into the step, the universal booking prompt drives the conversation. Copy it, swap the opening line for your client's service vocabulary, and you're live.
## Multiple booking types on the same agent
Cal.com is added **once per booking type**, not once per agent. If your client offers a free consultation, a paid consultation, and a follow-up call, you'll add Cal.com to the PulsyAI agent **three times** — each with the same Username and API key, but a different **Name** and **Event ID**:
| Name | Event ID | Use case |
| ------------------- | --------- | ------------------------ |
| `free-consultation` | `6166895` | Initial discovery call |
| `paid-consultation` | `7234112` | Billed strategy session |
| `follow-up` | `7891045` | Post-engagement check-in |
Each Cal.com entry is then connected to its own Call Flow step using **+ Connect Action**. When you have multiple Cal.com integrations on the same agent, make the prompt explicit about which one applies to which step — otherwise the agent has no way to know which calendar slot to read from.
## Downstream calendar sync
PulsyAI does **not** sync directly with Google Calendar, Outlook, or Apple Calendar. Those calendars sync through **Cal.com itself** — the connection your client made in Step 1. When your PulsyAI agent confirms a booking, it writes to Cal.com, and Cal.com pushes it to every downstream calendar your client has connected. This is the cleanest architecture: one source of truth, no double-bookings, no fragile multi-calendar logic on the agent side.
## Troubleshooting
**Wrong Event ID** — The agent calls the availability function but no slots come back, or it fails to confirm. Re-check the Event ID in the Cal.com URL and confirm it matches the value pasted into PulsyAI.
**API key expired or revoked** — All Cal.com functions fail silently. If you set a duration on the key, regenerate it with **Never expires** toggled on. If the key was revoked from inside Cal.com, generate a new one and paste it into the PulsyAI modal.
**Timezone mismatch** — The booking succeeds but lands at the wrong local hour. Re-check the three timezones from Step 5: Cal.com event, PulsyAI Cal.com modal, and Call Flow Call Configuration. All three must be the same IANA string.
**Missing `{now}` variable** — The agent doesn't know the current date or time and starts proposing slots in the past or asking the caller what day it is. Add `**Current time:** {now}` to the top of the prompt or to the Agent Context.
**Multiple Cal.com integrations, no routing in prompt** — When several Cal.com entries are connected to the same agent, the prompt has to explicitly tell the agent which booking type belongs to which step or scenario. Without that, the agent will pick one at random.
## Next step
The universal PulsyAI booking prompt with the full function-calling flow — ready to drop into your Cal.com step.
The broader picture: how PulsyAI handles every integration type, step-attached vs. global.