> ## Documentation Index
> Fetch the complete documentation index at: https://docs.pulsyai.com/llms.txt
> Use this file to discover all available pages before exploring further.
# Call Flows
> Build the script your AI agent follows during a call. Learn how to use templates, write step-based prompts, connect actions, and test your agent in PulsyAI.
The Call Flows tab is where you build the script your AI agent follows during a conversation. It is the most important part of any agent — it defines what the agent says, what it asks, what information it collects, and what actions it triggers.
To open it, select an assistant and click the **Call flows** tab.
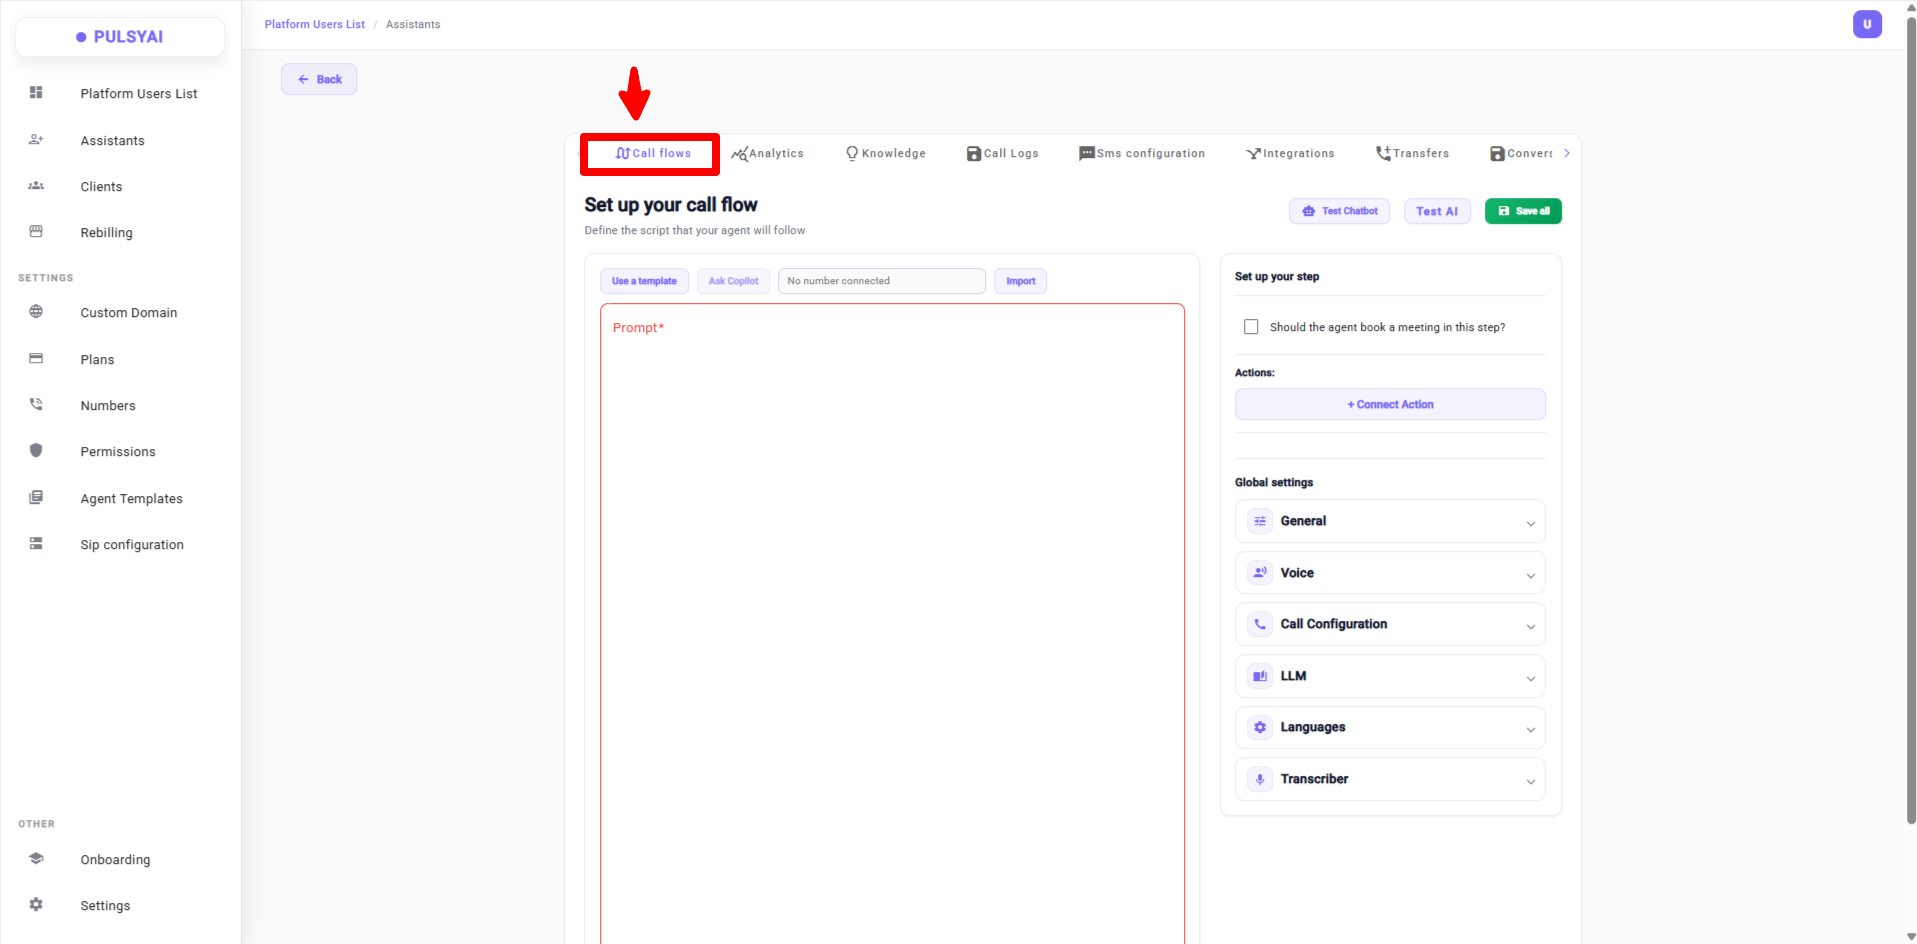 ## How a Call Flow Works
A call flow is a script written as a series of steps. Each step represents a phase of the conversation — a greeting, a qualification question, a data collection moment, a booking attempt, or a closing.
You write the script in the **Prompt** box. For best results, give each step one clear objective. Agents perform far better with focused, single-purpose steps than with long, multi-purpose instructions.
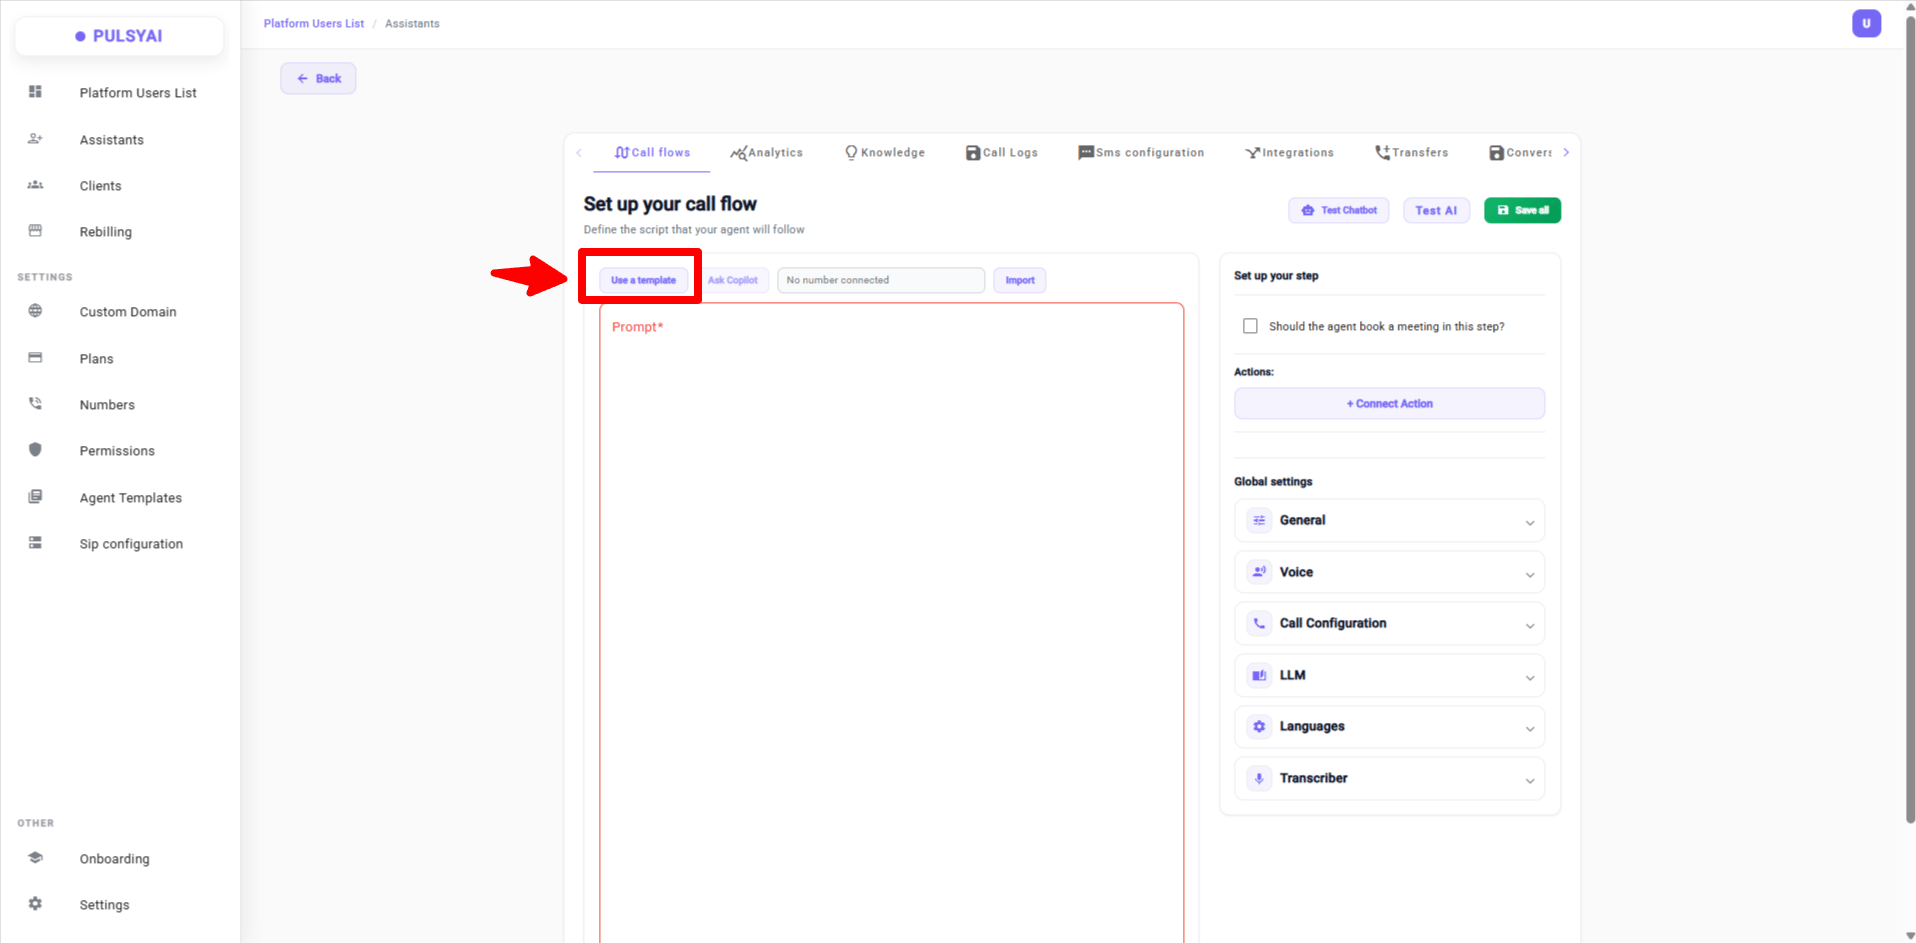
To see how we build scripts for our own clients, check out the pre-built templates directly in the platform. Click **Use a Template** in the Call Flows tab — you'll find a library of ready-made scripts covering several different niches and industries, which you can use as a starting point and customize to your needs.
## How a Call Flow Works
A call flow is a script written as a series of steps. Each step represents a phase of the conversation — a greeting, a qualification question, a data collection moment, a booking attempt, or a closing.
You write the script in the **Prompt** box. For best results, give each step one clear objective. Agents perform far better with focused, single-purpose steps than with long, multi-purpose instructions.
To see how we build scripts for our own clients, check out the pre-built templates directly in the platform. Click **Use a Template** in the Call Flows tab — you'll find a library of ready-made scripts covering several different niches and industries, which you can use as a starting point and customize to your needs.
 ## Starting a Call Flow
You have two ways to create a call flow.
Start from a pre-built, field-tested script for a common industry, then customize it to your needs.
Coming soon — let the built-in Copilot generate a call flow for you based on a description of your business.
## Starting a Call Flow
You have two ways to create a call flow.
Start from a pre-built, field-tested script for a common industry, then customize it to your needs.
Coming soon — let the built-in Copilot generate a call flow for you based on a description of your business.
 ### Writing the Prompt
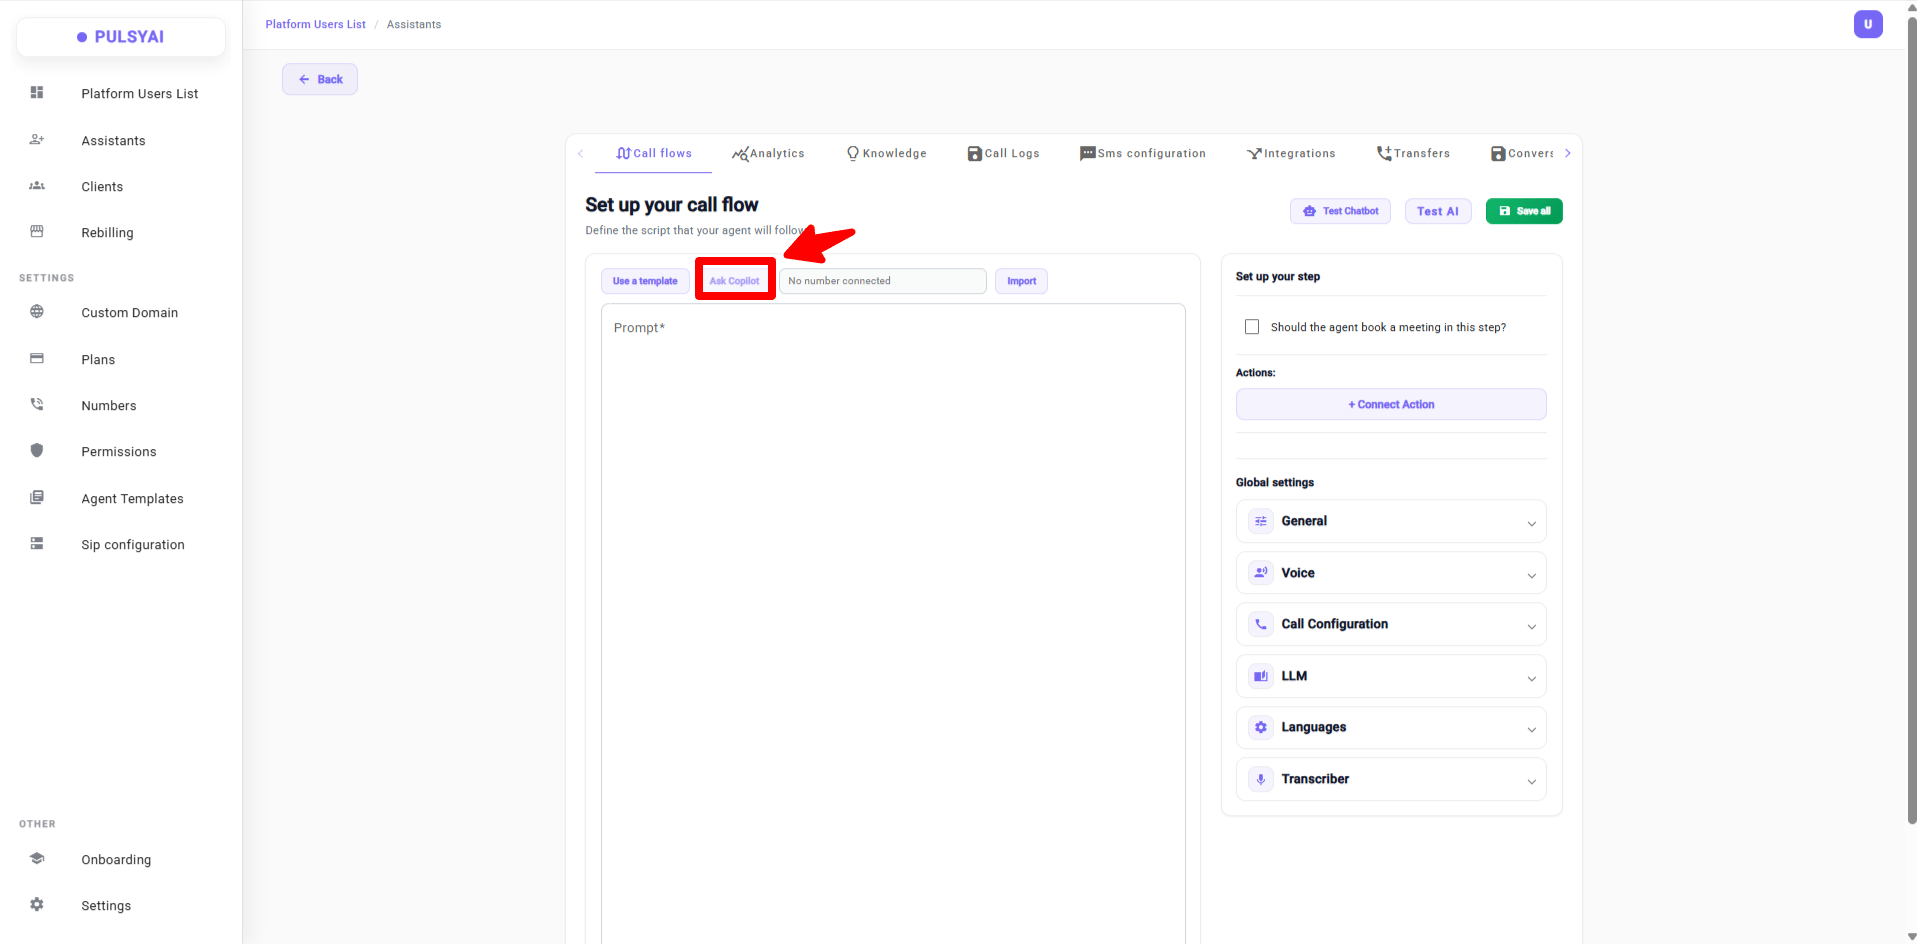
The Prompt box is where the script lives. Write the conversation the way you want the agent to handle it — the greeting, how it responds to different caller needs, the questions it asks, and how it closes.
A clear call flow follows a natural structure: greeting, identifying the caller's need, qualifying with questions, providing a solution, collecting contact information, and closing.
### Writing the Prompt
The Prompt box is where the script lives. Write the conversation the way you want the agent to handle it — the greeting, how it responds to different caller needs, the questions it asks, and how it closes.
A clear call flow follows a natural structure: greeting, identifying the caller's need, qualifying with questions, providing a solution, collecting contact information, and closing.
 ## Setting Up a Step
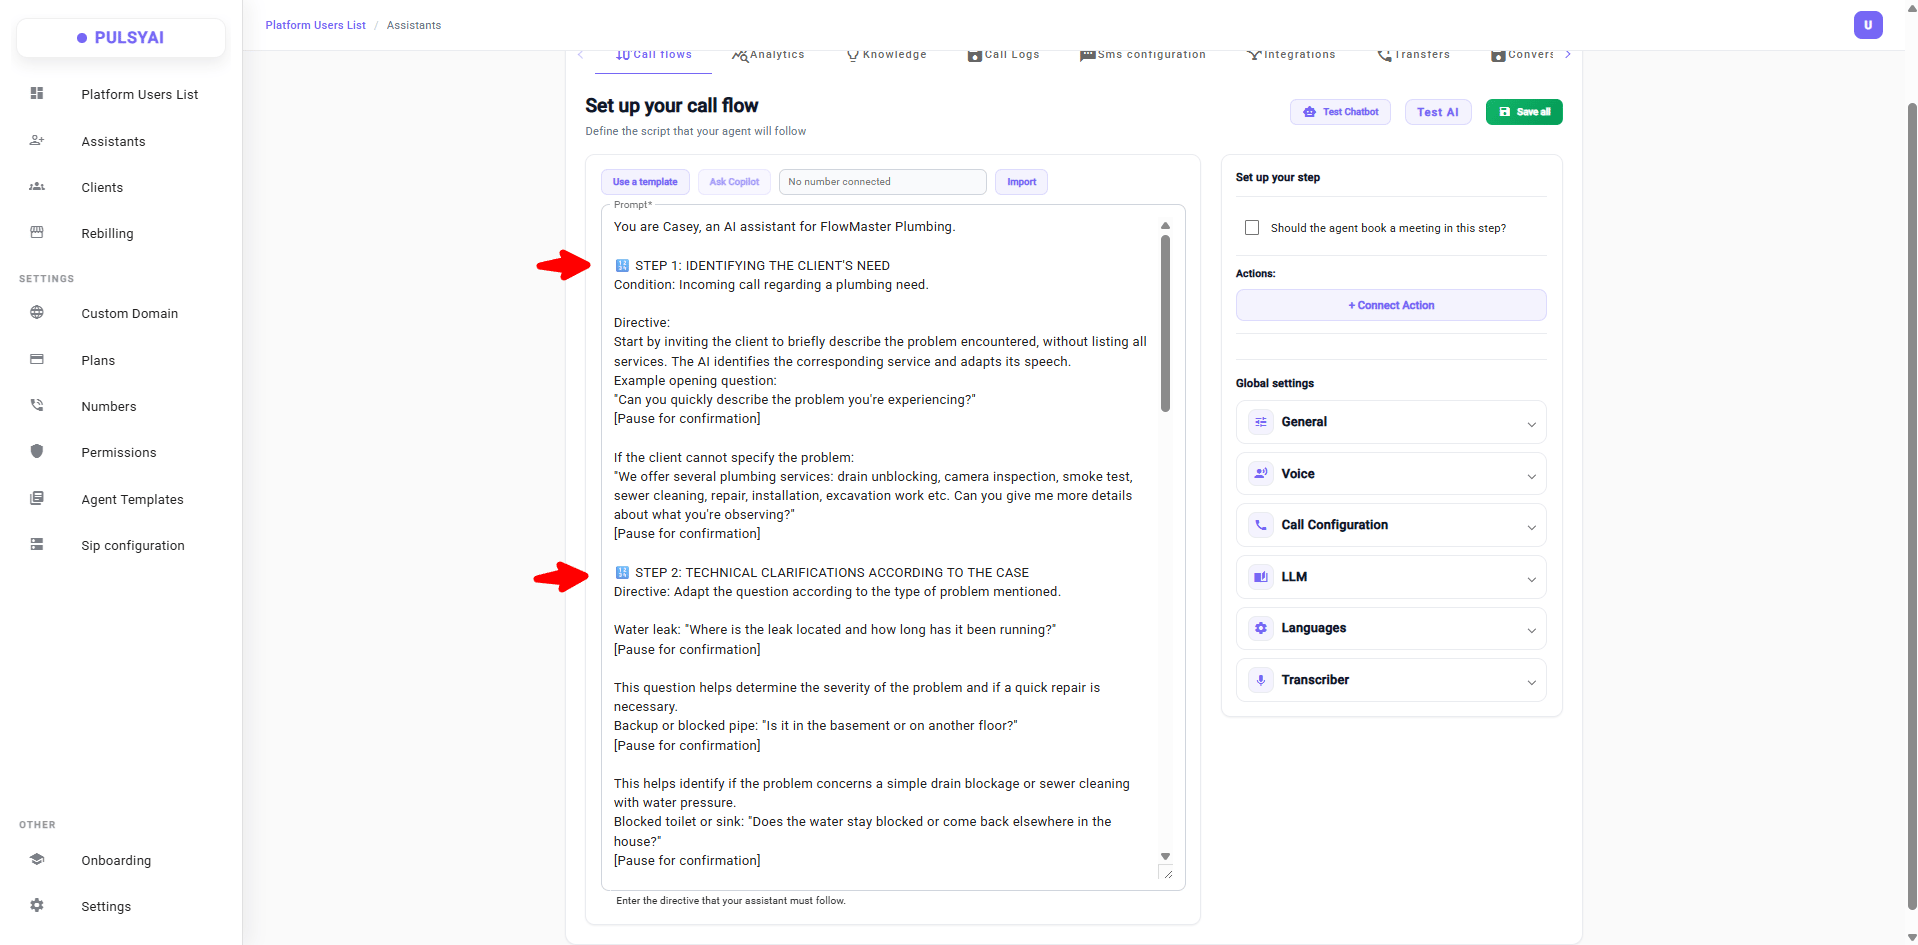
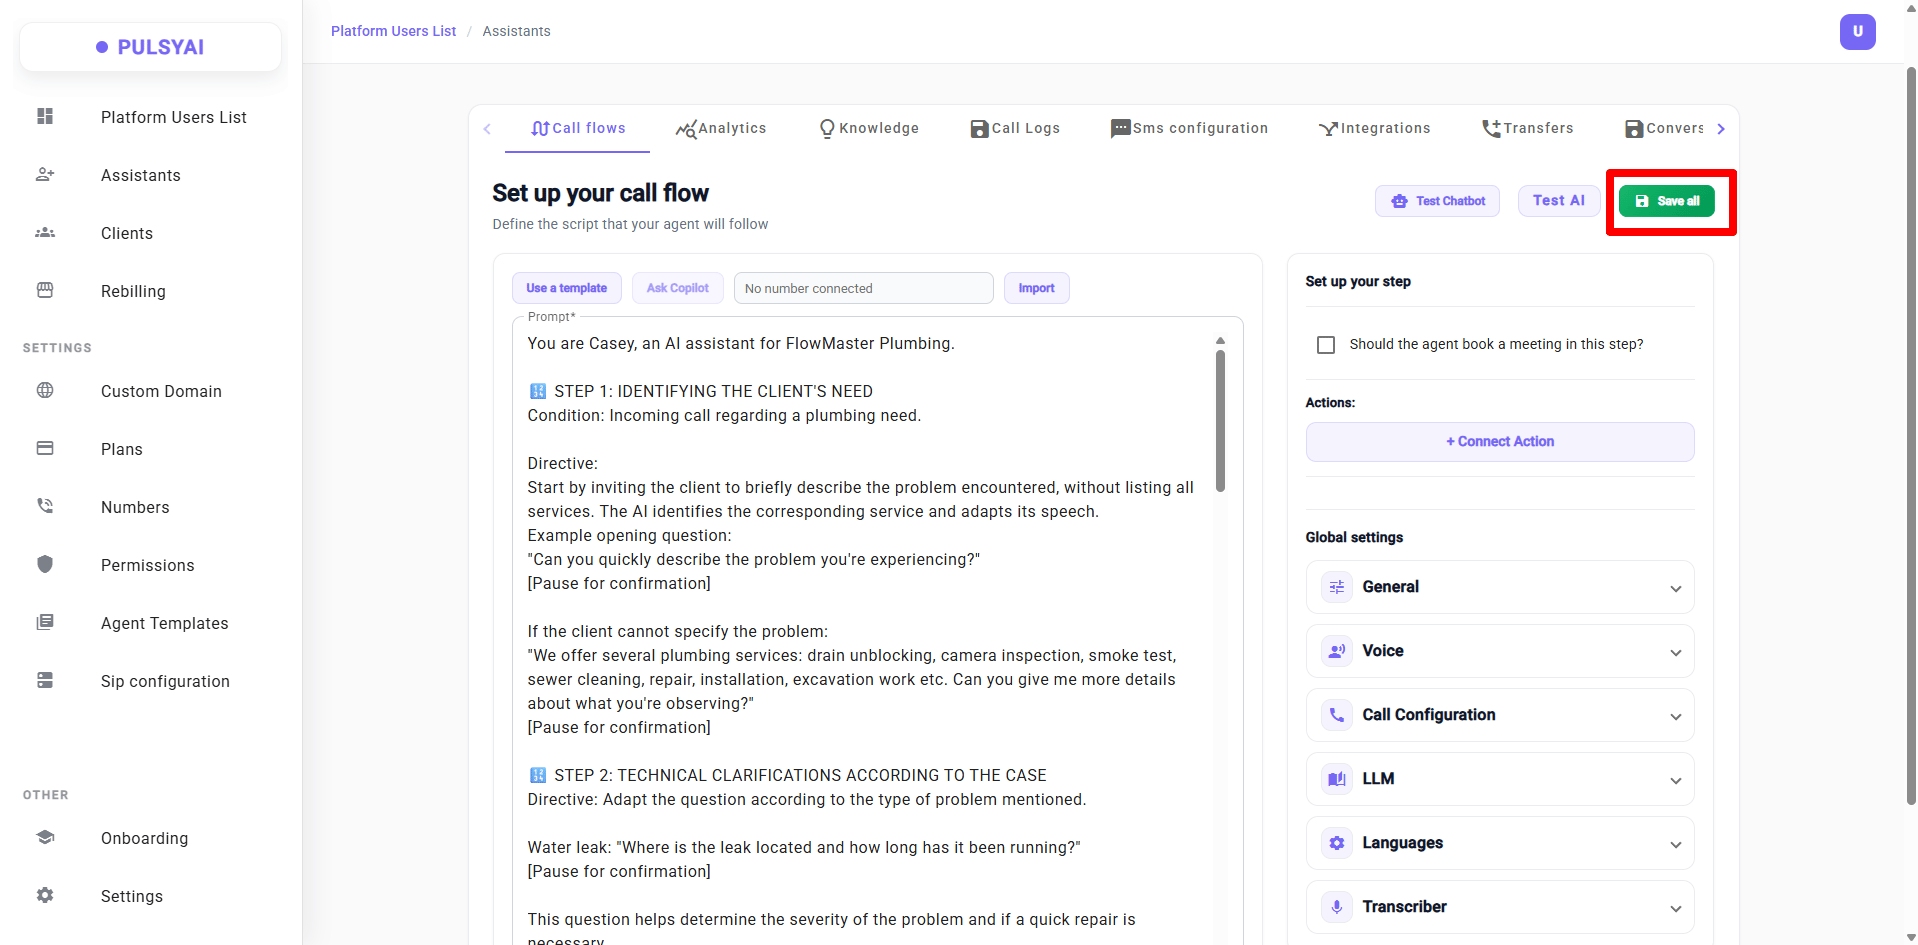
The **Set up your step** panel controls what happens within a specific step of the call flow.
### Booking in a Step
The checkbox **"Should the agent book a meeting in this step?"** enables appointment booking for that step. Check it on any step where the agent should schedule a meeting.
## Setting Up a Step
The **Set up your step** panel controls what happens within a specific step of the call flow.
### Booking in a Step
The checkbox **"Should the agent book a meeting in this step?"** enables appointment booking for that step. Check it on any step where the agent should schedule a meeting.
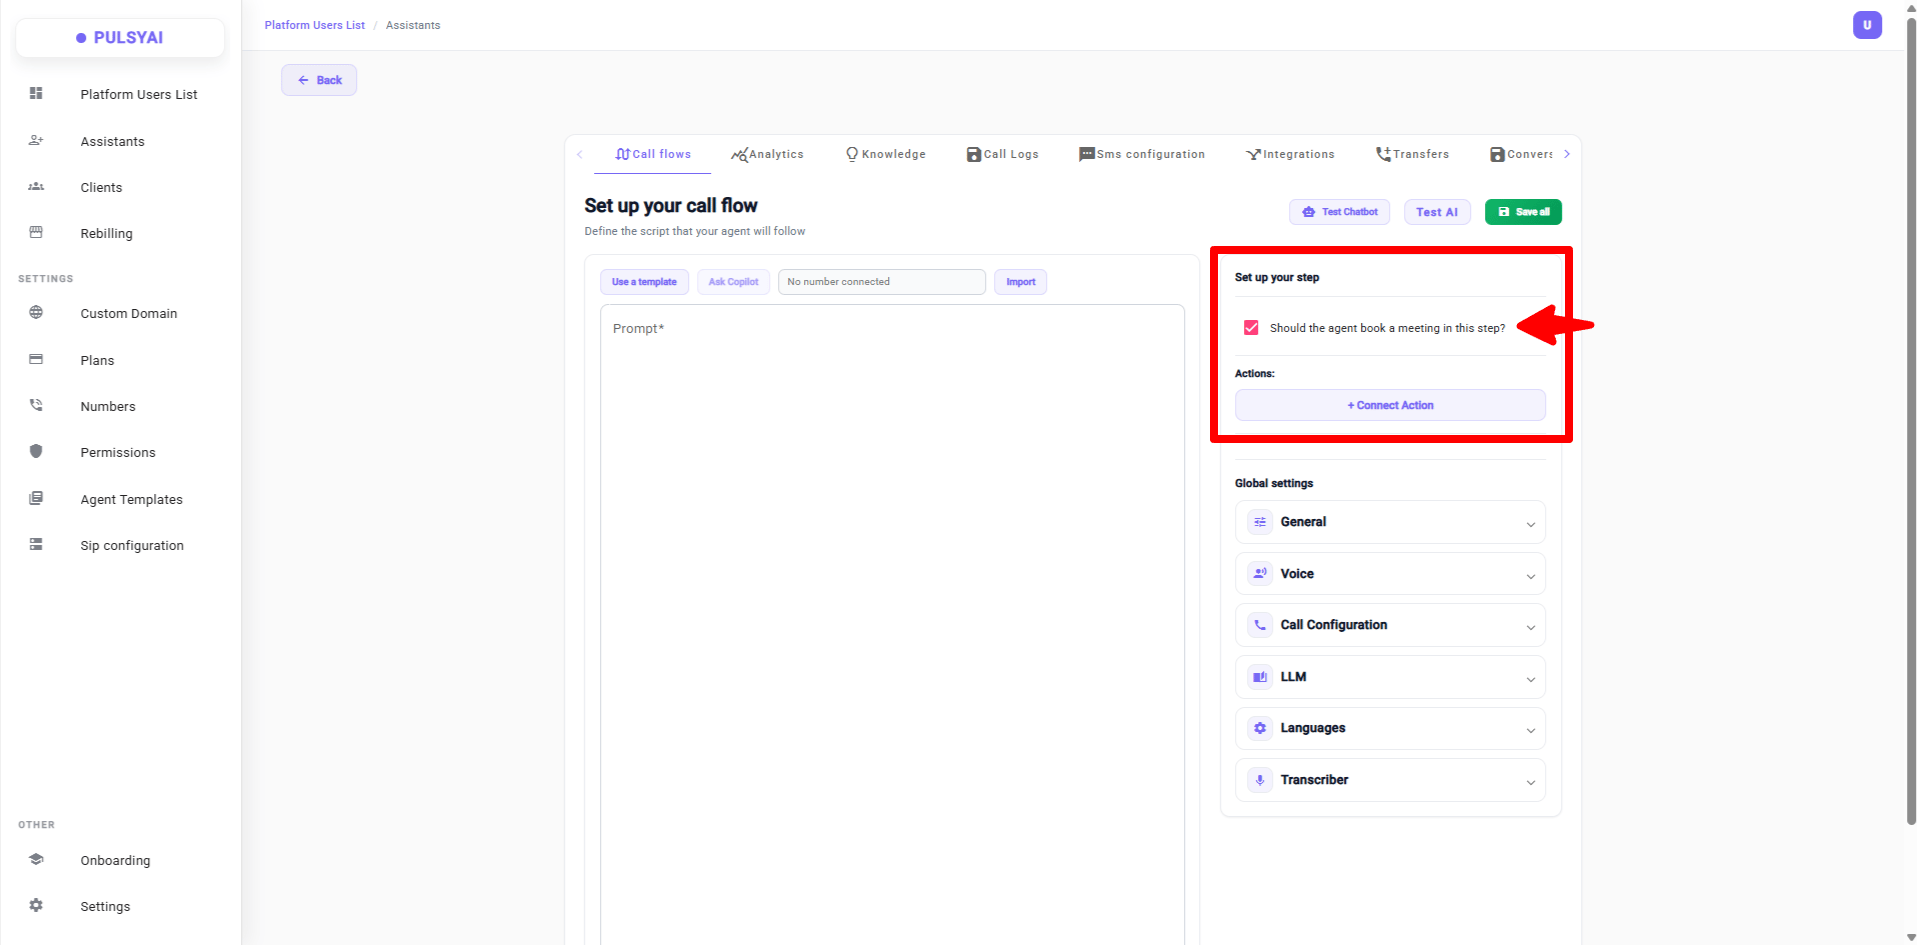 When the booking checkbox is enabled, your step prompt should clearly instruct the agent to use the booking functions and confirm the appointment. Here is an example of a well-structured booking prompt:
```text theme={null}
For the free quote, our estimator will come see the project on site. Do you have a date in mind, or would you like me to suggest the next available slot?
[PAUSE FOR RESPONSE]
--- TECHNICAL DIRECTIVES — USING FUNCTIONS ---
CRITICAL RULES:
- NEVER invent availability
- ALWAYS use the functions to get real time slots
- This call is for the REPRESENTATIVE to contact the client BY PHONE
- When mentioning times, always say "ten o'clock", "two o'clock", "nine thirty" — never "10am", "10:00", or digits
AVAILABLE FUNCTIONS:
1. isDateAvailable(date) — Checks if a specific date is available
2. getAvailabilityForRange(start_date, end_date) — Gets all available slots in a period
3. fetchEarliestAvailability() — Gets the closest next availability
4. confirm_booking(date, time, details) — Confirms and saves the appointment (MANDATORY)
CONVERSATION FLOW:
IF THE CLIENT SUGGESTS A DATE:
[ACTION 1] Call isDateAvailable(date)
IF AVAILABLE:
[ACTION 2] Call getAvailabilityForRange(date, date) to get time slots
Agent: Offer the available slots naturally and ask which time works.
[Pause — wait for client response]
IF THE CLIENT ACCEPTS A TIME:
[ACTION 3] Call confirm_booking(date, time, details)
Agent: "Excellent! I confirm that our representative will contact you on {DAY} at {TIME}."
IF NOT AVAILABLE:
[ACTION 2] Call fetchEarliestAvailability()
Agent: "Unfortunately, I have no availability that day. The next opening is {DATE} at {TIME}. Would that work?"
[Pause]
IF YES: Call confirm_booking(date, time, details) → Confirm
IF NO: Call getAvailabilityForRange(start, end) → Offer other options
IF THE CLIENT WANTS THE EARLIEST DATE:
[ACTION 1] Immediately call fetchEarliestAvailability()
Agent: "Perfect! The next availability is {DATE} at {TIME}. Does that work for you?"
[Pause]
IF YES: Call confirm_booking(date, time, details) → Confirm
IF NO: Call getAvailabilityForRange(start, end) → Offer other options
APPOINTMENT CONFIRMATION:
[Once the appointment is confirmed via the function]
Agent: "Excellent! I confirm that our representative will call you on {DAY} at {TIME}."
Agent: "You will receive an email confirmation with all the details."
```
For booking and any function-calling steps, use a more capable AI model such as GPT-4.1. Smarter models hallucinate far less and follow function-calling instructions more reliably.
Before any function call, the agent should always ask the user a yes/no question first — for example, "Do you have a date in mind, or would you like me to suggest the next available slot?" Function calls work much more reliably when the agent has a clear confirmation from the user before triggering them.
### Connecting Actions
The **Actions** section links the actions you created in the [Integrations](/platform/integrations) tab to a specific step in the call flow.
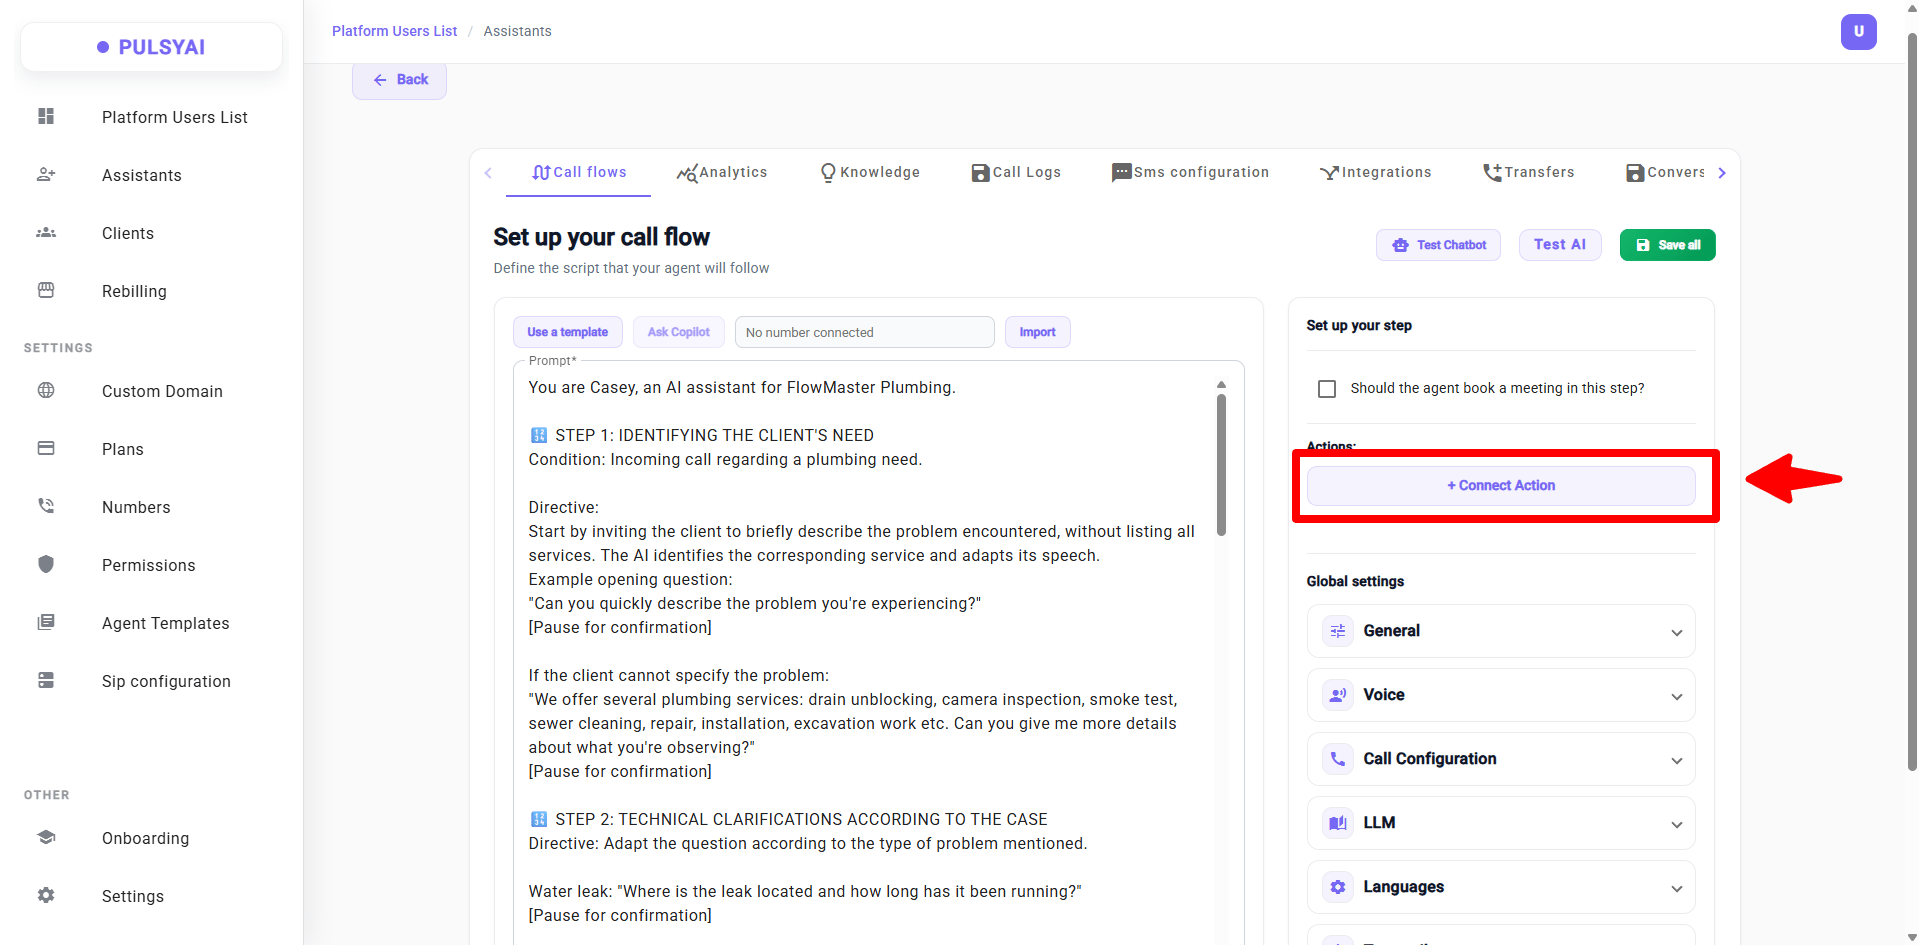
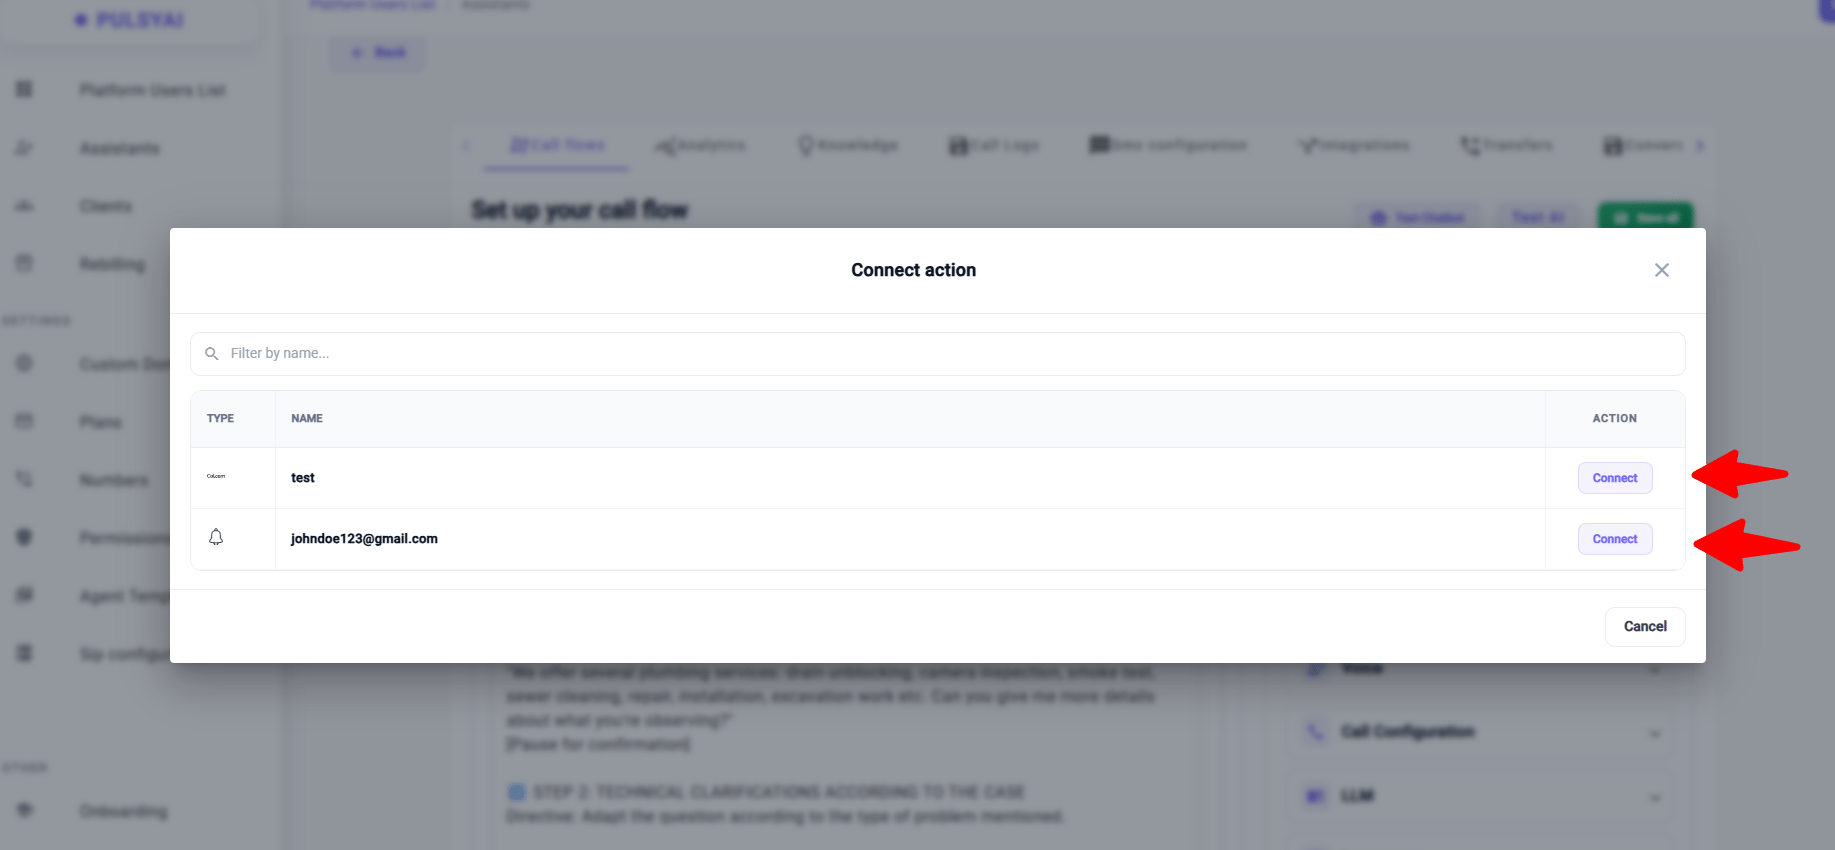
Click **+ Connect Action** and select an action — such as a Cal.com booking or a notification — to attach it to the current step. An action only runs if it is connected here. Configuring an integration alone is not enough; it must be connected as an action in the call flow to actually trigger.
When the booking checkbox is enabled, your step prompt should clearly instruct the agent to use the booking functions and confirm the appointment. Here is an example of a well-structured booking prompt:
```text theme={null}
For the free quote, our estimator will come see the project on site. Do you have a date in mind, or would you like me to suggest the next available slot?
[PAUSE FOR RESPONSE]
--- TECHNICAL DIRECTIVES — USING FUNCTIONS ---
CRITICAL RULES:
- NEVER invent availability
- ALWAYS use the functions to get real time slots
- This call is for the REPRESENTATIVE to contact the client BY PHONE
- When mentioning times, always say "ten o'clock", "two o'clock", "nine thirty" — never "10am", "10:00", or digits
AVAILABLE FUNCTIONS:
1. isDateAvailable(date) — Checks if a specific date is available
2. getAvailabilityForRange(start_date, end_date) — Gets all available slots in a period
3. fetchEarliestAvailability() — Gets the closest next availability
4. confirm_booking(date, time, details) — Confirms and saves the appointment (MANDATORY)
CONVERSATION FLOW:
IF THE CLIENT SUGGESTS A DATE:
[ACTION 1] Call isDateAvailable(date)
IF AVAILABLE:
[ACTION 2] Call getAvailabilityForRange(date, date) to get time slots
Agent: Offer the available slots naturally and ask which time works.
[Pause — wait for client response]
IF THE CLIENT ACCEPTS A TIME:
[ACTION 3] Call confirm_booking(date, time, details)
Agent: "Excellent! I confirm that our representative will contact you on {DAY} at {TIME}."
IF NOT AVAILABLE:
[ACTION 2] Call fetchEarliestAvailability()
Agent: "Unfortunately, I have no availability that day. The next opening is {DATE} at {TIME}. Would that work?"
[Pause]
IF YES: Call confirm_booking(date, time, details) → Confirm
IF NO: Call getAvailabilityForRange(start, end) → Offer other options
IF THE CLIENT WANTS THE EARLIEST DATE:
[ACTION 1] Immediately call fetchEarliestAvailability()
Agent: "Perfect! The next availability is {DATE} at {TIME}. Does that work for you?"
[Pause]
IF YES: Call confirm_booking(date, time, details) → Confirm
IF NO: Call getAvailabilityForRange(start, end) → Offer other options
APPOINTMENT CONFIRMATION:
[Once the appointment is confirmed via the function]
Agent: "Excellent! I confirm that our representative will call you on {DAY} at {TIME}."
Agent: "You will receive an email confirmation with all the details."
```
For booking and any function-calling steps, use a more capable AI model such as GPT-4.1. Smarter models hallucinate far less and follow function-calling instructions more reliably.
Before any function call, the agent should always ask the user a yes/no question first — for example, "Do you have a date in mind, or would you like me to suggest the next available slot?" Function calls work much more reliably when the agent has a clear confirmation from the user before triggering them.
### Connecting Actions
The **Actions** section links the actions you created in the [Integrations](/platform/integrations) tab to a specific step in the call flow.
Click **+ Connect Action** and select an action — such as a Cal.com booking or a notification — to attach it to the current step. An action only runs if it is connected here. Configuring an integration alone is not enough; it must be connected as an action in the call flow to actually trigger.
 A modal will open — select your integration and click **Connect** to attach it to the step.
 ## Testing Your Call Flow
Before going live, test your agent. PulsyAI offers two testing options.
Test the call flow quickly through text chat. No call minutes are used. Best for fast iteration once you are familiar with the platform.
## Testing Your Call Flow
Before going live, test your agent. PulsyAI offers two testing options.
Test the call flow quickly through text chat. No call minutes are used. Best for fast iteration once you are familiar with the platform.
 Place a real test call with full voice. Lets you hear the voice quality, pacing, and latency. Recommended for new users and for final validation before going live.
 When your call flow is ready, click **Save all** to save your work.
 Your agent needs a phone number connected to receive or place calls. See the [Phone Numbers](/platform/phone-numbers) page to add and connect one.
## Next Steps
Configure voice, latency, language, and other global settings for your agent.
Create the actions you can connect to your call flow steps.
Your agent needs a phone number connected to receive or place calls. See the [Phone Numbers](/platform/phone-numbers) page to add and connect one.
## Next Steps
Configure voice, latency, language, and other global settings for your agent.
Create the actions you can connect to your call flow steps.